
-
Hyperdrive is now available on the Free plan of Cloudflare Workers, enabling you to build Workers that connect to PostgreSQL or MySQL databases without compromise.
Low-latency access to SQL databases is critical to building full-stack Workers applications. We want you to be able to build on fast, global apps on Workers, regardless of the tools you use. So we made Hyperdrive available for all, to make it easier to build Workers that connect to PostgreSQL and MySQL.
If you want to learn more about how Hyperdrive works, read the deep dive ↗ on how Hyperdrive can make your database queries up to 4x faster.
Visit the docs to get started with Hyperdrive for PostgreSQL or MySQL.
-
The following full-stack frameworks now have Generally Available ("GA") adapters for Cloudflare Workers, and are ready for you to use in production:
The following frameworks are now in beta, with GA support coming very soon:
- Next.js, supported through @opennextjs/cloudflare ↗ is now
v1.0-beta. - Angular
- SolidJS (SolidStart)
You can also build complete full-stack apps on Workers without a framework:
- You can “just use Vite" ↗ and React together, and build a back-end API in the same Worker. Follow our React SPA with an API tutorial to learn how.
Get started building today with our framework guides, or read our Developer Week 2025 blog post ↗ about all the updates to building full-stack applications on Workers.
- Next.js, supported through @opennextjs/cloudflare ↗ is now
-
The Cloudflare Vite plugin has reached v1.0 ↗ and is now Generally Available ("GA").
When you use
@cloudflare/vite-plugin, you can use Vite's local development server and build tooling, while ensuring that while developing, your code runs inworkerd↗, the open-source Workers runtime.This lets you get the best of both worlds for a full-stack app — you can use Hot Module Replacement ↗ from Vite right alongside Durable Objects and other runtime APIs and bindings that are unique to Cloudflare Workers.
@cloudflare/vite-pluginis made possible by the new environment API ↗ in Vite, and was built in partnership with the Vite team ↗.You can build any type of application with
@cloudflare/vite-plugin, using any rendering mode, from single page applications (SPA) and static sites to server-side rendered (SSR) pages and API routes.React Router v7 (Remix) is the first full-stack framework to provide full support for Cloudflare Vite plugin, allowing you to use all parts of Cloudflare's developer platform, without additional build steps.
You can also build complete full-stack apps on Workers without a framework — "just use Vite" ↗ and React together, and build a back-end API in the same Worker. Follow our React SPA with an API tutorial to learn how.
If you're already using Vite ↗ in your build and development toolchain, you can start using our plugin with minimal changes to your
vite.config.ts:vite.config.ts import { defineConfig } from "vite";import { cloudflare } from "@cloudflare/vite-plugin";export default defineConfig({plugins: [cloudflare()],});Take a look at the documentation for our Cloudflare Vite plugin for more information!
-
Email Workers enables developers to programmatically take action on anything that hits their email inbox. If you're building with Email Workers, you can now test the behavior of an Email Worker script, receiving, replying and sending emails in your local environment using
wrangler dev.Below is an example that shows you how you can receive messages using the
email()handler and parse them using postal-mime ↗:import * as PostalMime from 'postal-mime';export default {async email(message, env, ctx) {const parser = new PostalMime.default();const rawEmail = new Response(message.raw);const email = await parser.parse(await rawEmail.arrayBuffer());console.log(email);},};Now when you run
npx wrangler dev, wrangler will expose a local/cdn-cgi/handler/emailendpoint that you canPOSTemail messages to and trigger your Worker'semail()handler:Terminal window curl -X POST 'http://localhost:8787/cdn-cgi/handler/email' \--url-query 'from=sender@example.com' \--url-query 'to=recipient@example.com' \--header 'Content-Type: application/json' \--data-raw 'Received: from smtp.example.com (127.0.0.1)by cloudflare-email.com (unknown) id 4fwwffRXOpyRfor <recipient@example.com>; Tue, 27 Aug 2024 15:50:20 +0000From: "John" <sender@example.com>Reply-To: sender@example.comTo: recipient@example.comSubject: Testing Email Workers Local DevContent-Type: text/html; charset="windows-1252"X-Mailer: CurlDate: Tue, 27 Aug 2024 08:49:44 -0700Message-ID: <6114391943504294873000@ZSH-GHOSTTY>Hi there'This is what you get in the console:
{headers: [{key: 'received',value: 'from smtp.example.com (127.0.0.1) by cloudflare-email.com (unknown) id 4fwwffRXOpyR for <recipient@example.com>; Tue, 27 Aug 2024 15:50:20 +0000'},{ key: 'from', value: '"John" <sender@example.com>' },{ key: 'reply-to', value: 'sender@example.com' },{ key: 'to', value: 'recipient@example.com' },{ key: 'subject', value: 'Testing Email Workers Local Dev' },{ key: 'content-type', value: 'text/html; charset="windows-1252"' },{ key: 'x-mailer', value: 'Curl' },{ key: 'date', value: 'Tue, 27 Aug 2024 08:49:44 -0700' },{key: 'message-id',value: '<6114391943504294873000@ZSH-GHOSTTY>'}],from: { address: 'sender@example.com', name: 'John' },to: [ { address: 'recipient@example.com', name: '' } ],replyTo: [ { address: 'sender@example.com', name: '' } ],subject: 'Testing Email Workers Local Dev',messageId: '<6114391943504294873000@ZSH-GHOSTTY>',date: '2024-08-27T15:49:44.000Z',html: 'Hi there\n',attachments: []}Local development is a critical part of the development flow, and also works for sending, replying and forwarding emails. See our documentation for more information.
-
Hyperdrive now supports connecting to MySQL and MySQL-compatible databases, including Amazon RDS and Aurora MySQL, Google Cloud SQL for MySQL, Azure Database for MySQL, PlanetScale and MariaDB.
Hyperdrive makes your regional, MySQL databases fast when connecting from Cloudflare Workers. It eliminates unnecessary network roundtrips during connection setup, pools database connections globally, and can cache query results to provide the fastest possible response times.
Best of all, you can connect using your existing drivers, ORMs, and query builders with Hyperdrive's secure credentials, no code changes required.
import { createConnection } from "mysql2/promise";export interface Env {HYPERDRIVE: Hyperdrive;}export default {async fetch(request, env, ctx): Promise<Response> {const connection = await createConnection({host: env.HYPERDRIVE.host,user: env.HYPERDRIVE.user,password: env.HYPERDRIVE.password,database: env.HYPERDRIVE.database,port: env.HYPERDRIVE.port,disableEval: true, // Required for Workers compatibility});const [results, fields] = await connection.query("SHOW tables;");ctx.waitUntil(connection.end());return new Response(JSON.stringify({ results, fields }), {headers: {"Content-Type": "application/json","Access-Control-Allow-Origin": "*",},});},} satisfies ExportedHandler<Env>;Learn more about how Hyperdrive works and get started building Workers that connect to MySQL with Hyperdrive.
-
When using a Worker with the
nodejs_compatcompatibility flag enabled, the following Node.js APIs are now available:This make it easier to reuse existing Node.js code in Workers or use npm packages that depend on these APIs.
The full
node:crypto↗ API is now available in Workers.You can use it to verify and sign data:
import { sign, verify } from "node:crypto";const signature = sign("sha256", "-data to sign-", env.PRIVATE_KEY);const verified = verify("sha256", "-data to sign-", env.PUBLIC_KEY, signature);Or, to encrypt and decrypt data:
import { publicEncrypt, privateDecrypt } from "node:crypto";const encrypted = publicEncrypt(env.PUBLIC_KEY, "some data");const plaintext = privateDecrypt(env.PRIVATE_KEY, encrypted);See the
node:cryptodocumentation for more information.The following APIs from
node:tlsare now available:This enables secure connections over TLS (Transport Layer Security) to external services.
import { connect } from "node:tls";// ... in a request handler ...const connectionOptions = { key: env.KEY, cert: env.CERT };const socket = connect(url, connectionOptions, () => {if (socket.authorized) {console.log("Connection authorized");}});socket.on("data", (data) => {console.log(data);});socket.on("end", () => {console.log("server ends connection");});See the
node:tlsdocumentation for more information.
-
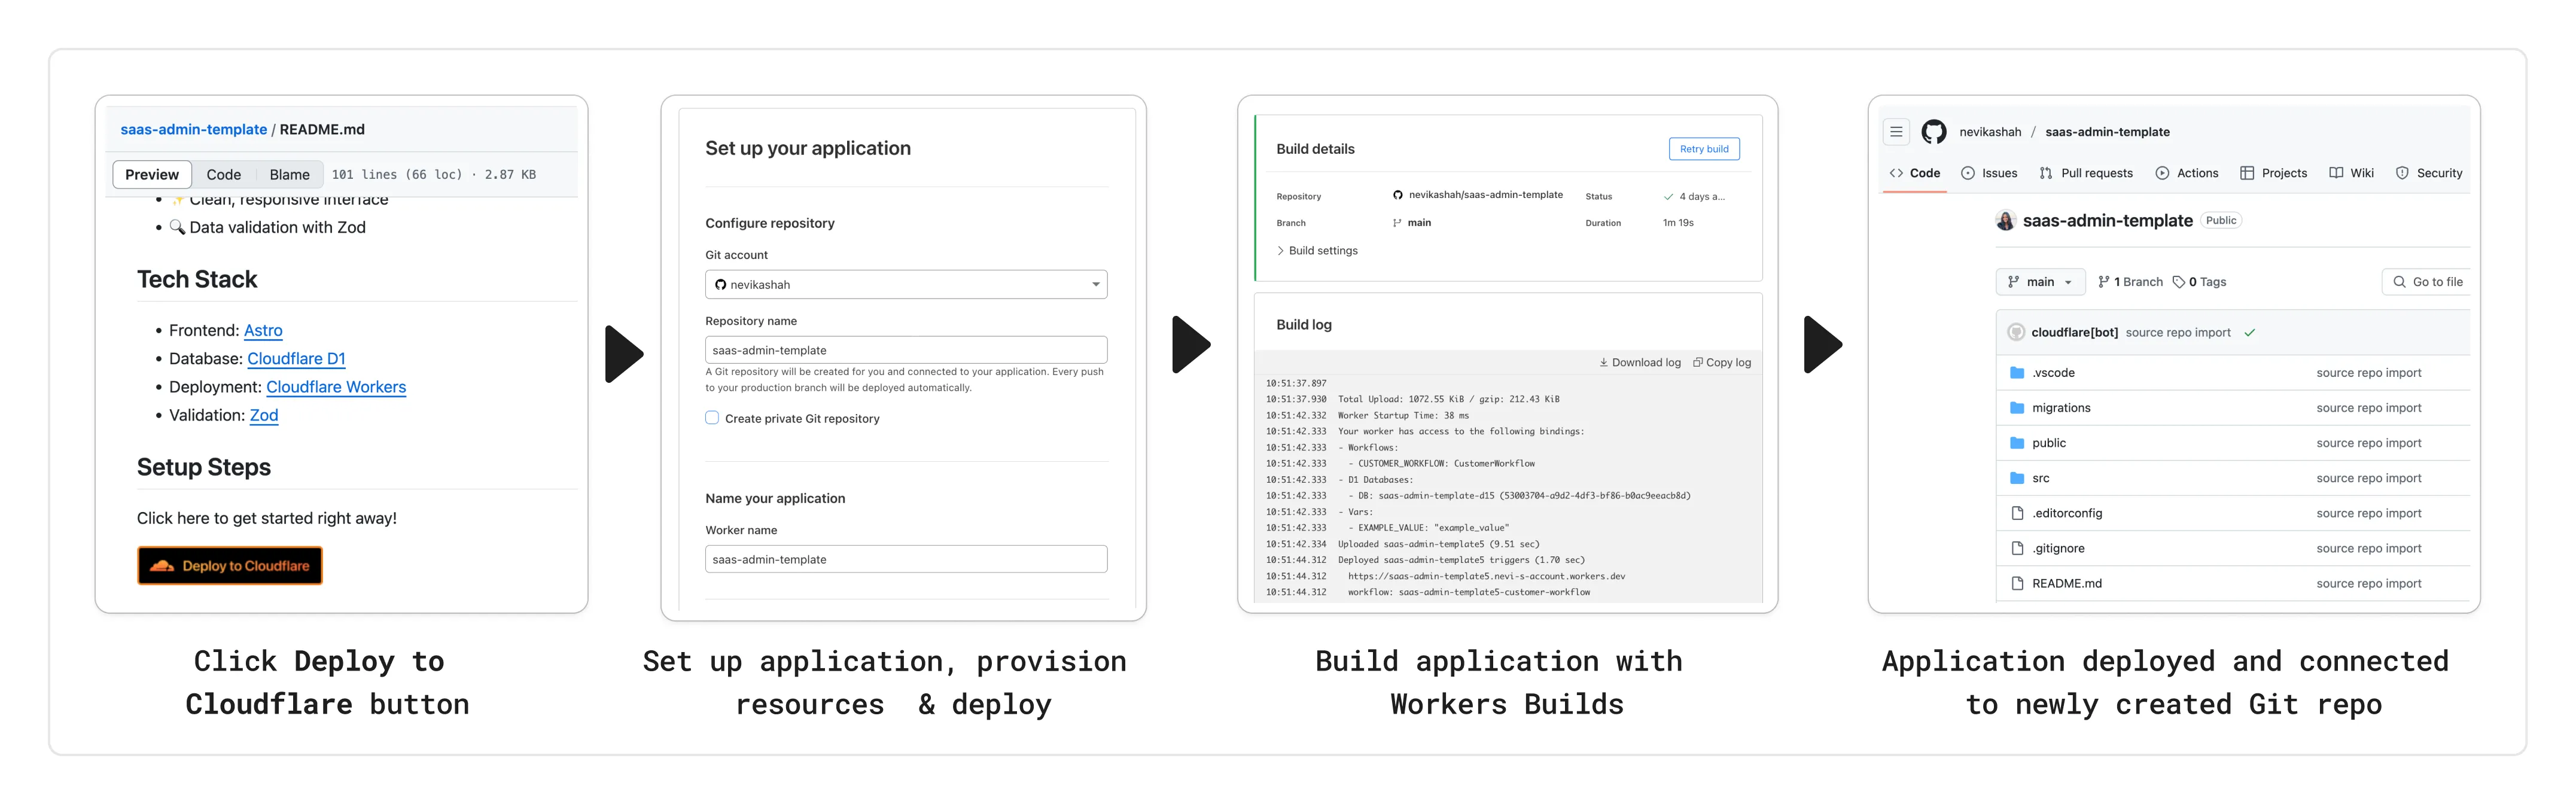
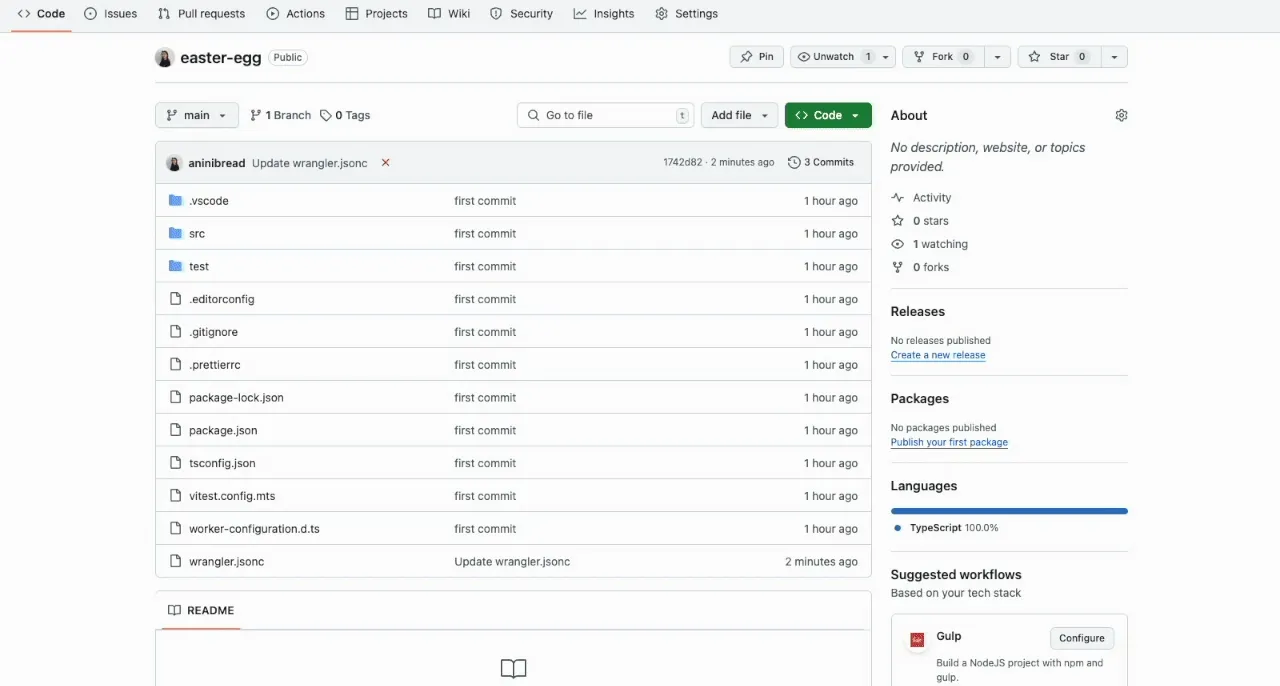
You can now add a Deploy to Cloudflare button to the README of your Git repository containing a Workers application — making it simple for other developers to quickly set up and deploy your project!
The Deploy to Cloudflare button:
- Creates a new Git repository on your GitHub/ GitLab account: Cloudflare will automatically clone and create a new repository on your account, so you can continue developing.
- Automatically provisions resources the app needs: If your repository requires Cloudflare primitives like a Workers KV namespace, a D1 database, or an R2 bucket, Cloudflare will automatically provision them on your account and bind them to your Worker upon deployment.
- Configures Workers Builds (CI/CD): Every new push to your production branch on your newly created repository will automatically build and deploy courtesy of Workers Builds.
- Adds preview URLs to each pull request: If you'd like to test your changes before deploying, you can push changes to a non-production branch and preview URLs will be generated and posted back to GitHub as a comment.
To create a Deploy to Cloudflare button in your README, you can add the following snippet, including your Git repository URL:
[](https://deploy.workers.cloudflare.com/?url=<YOUR_GIT_REPO_URL>)Check out our documentation for more information on how to set up a deploy button for your application and best practices to ensure a successful deployment for other developers.
-
The Agents SDK now includes built-in support for building remote MCP (Model Context Protocol) servers directly as part of your Agent. This allows you to easily create and manage MCP servers, without the need for additional infrastructure or configuration.
The SDK includes a new
MCPAgentclass that extends theAgentclass and allows you to expose resources and tools over the MCP protocol, as well as authorization and authentication to enable remote MCP servers.export class MyMCP extends McpAgent {server = new McpServer({name: "Demo",version: "1.0.0",});async init() {this.server.resource(`counter`, `mcp://resource/counter`, (uri) => {// ...});this.server.tool("add","Add two numbers together",{ a: z.number(), b: z.number() },async ({ a, b }) => {// ...},);}}export class MyMCP extends McpAgent<Env> {server = new McpServer({name: "Demo",version: "1.0.0",});async init() {this.server.resource(`counter`, `mcp://resource/counter`, (uri) => {// ...});this.server.tool("add","Add two numbers together",{ a: z.number(), b: z.number() },async ({ a, b }) => {// ...},);}}See the example ↗ for the full code and as the basis for building your own MCP servers, and the client example ↗ for how to build an Agent that acts as an MCP client.
To learn more, review the announcement blog ↗ as part of Developer Week 2025.
We've made a number of improvements to the Agents SDK, including:
- Support for building MCP servers with the new
MCPAgentclass. - The ability to export the current agent, request and WebSocket connection context using
import { context } from "agents", allowing you to minimize or avoid direct dependency injection when calling tools. - Fixed a bug that prevented query parameters from being sent to the Agent server from the
useAgentReact hook. - Automatically converting the
agentname inuseAgentoruseAgentChatto kebab-case to ensure it matches the naming convention expected byrouteAgentRequest.
To install or update the Agents SDK, run
npm i agents@latestin an existing project, or explore theagents-starterproject:Terminal window npm create cloudflare@latest -- --template cloudflare/agents-starterSee the full release notes and changelog on the Agents SDK repository ↗ and
- Support for building MCP servers with the new
-
Workflows is now Generally Available (or "GA"): in short, it's ready for production workloads. Alongside marking Workflows as GA, we've introduced a number of changes during the beta period, including:
- A new
waitForEventAPI that allows a Workflow to wait for an event to occur before continuing execution. - Increased concurrency: you can run up to 4,500 Workflow instances concurrently — and this will continue to grow.
- Improved observability, including new CPU time metrics that allow you to better understand which Workflow instances are consuming the most resources and/or contributing to your bill.
- Support for
vitestfor testing Workflows locally and in CI/CD pipelines.
Workflows also supports the new increased CPU limits that apply to Workers, allowing you to run more CPU-intensive tasks (up to 5 minutes of CPU time per instance), not including the time spent waiting on network calls, AI models, or other I/O bound tasks.
The new
step.waitForEventAPI allows a Workflow instance to wait on events and data, enabling human-in-the-the-loop interactions, such as approving or rejecting a request, directly handling webhooks from other systems, or pushing event data to a Workflow while it's running.Because Workflows are just code, you can conditionally execute code based on the result of a
waitForEventcall, and/or callwaitForEventmultiple times in a single Workflow based on what the Workflow needs.For example, if you wanted to implement a human-in-the-loop approval process, you could use
waitForEventto wait for a user to approve or reject a request, and then conditionally execute code based on the result.import { Workflow, WorkflowEvent } from "cloudflare:workflows";export class MyWorkflow extends WorkflowEntrypoint {async run(event, step) {// Other steps in your Workflowlet event = await step.waitForEvent("receive invoice paid webhook from Stripe",{ type: "stripe-webhook", timeout: "1 hour" },);// Rest of your Workflow}}import { Workflow, WorkflowEvent } from "cloudflare:workflows";export class MyWorkflow extends WorkflowEntrypoint<Env, Params> {async run(event: WorkflowEvent<Params>, step: WorkflowStep) {// Other steps in your Workflowlet event = await step.waitForEvent<IncomingStripeWebhook>("receive invoice paid webhook from Stripe", { type: "stripe-webhook", timeout: "1 hour" })// Rest of your Workflow}}You can then send a Workflow an event from an external service via HTTP or from within a Worker using the Workers API for Workflows:
export default {async fetch(req, env) {const instanceId = new URL(req.url).searchParams.get("instanceId");const webhookPayload = await req.json();let instance = await env.MY_WORKFLOW.get(instanceId);// Send our event, with `type` matching the event type defined in// our step.waitForEvent callawait instance.sendEvent({type: "stripe-webhook",payload: webhookPayload,});return Response.json({status: await instance.status(),});},};export default {async fetch(req: Request, env: Env) {const instanceId = new URL(req.url).searchParams.get("instanceId")const webhookPayload = await req.json<Payload>()let instance = await env.MY_WORKFLOW.get(instanceId);// Send our event, with `type` matching the event type defined in// our step.waitForEvent callawait instance.sendEvent({type: "stripe-webhook", payload: webhookPayload})return Response.json({status: await instance.status(),});},};Read the GA announcement blog ↗ to learn more about what landed as part of the Workflows GA.
- A new
-
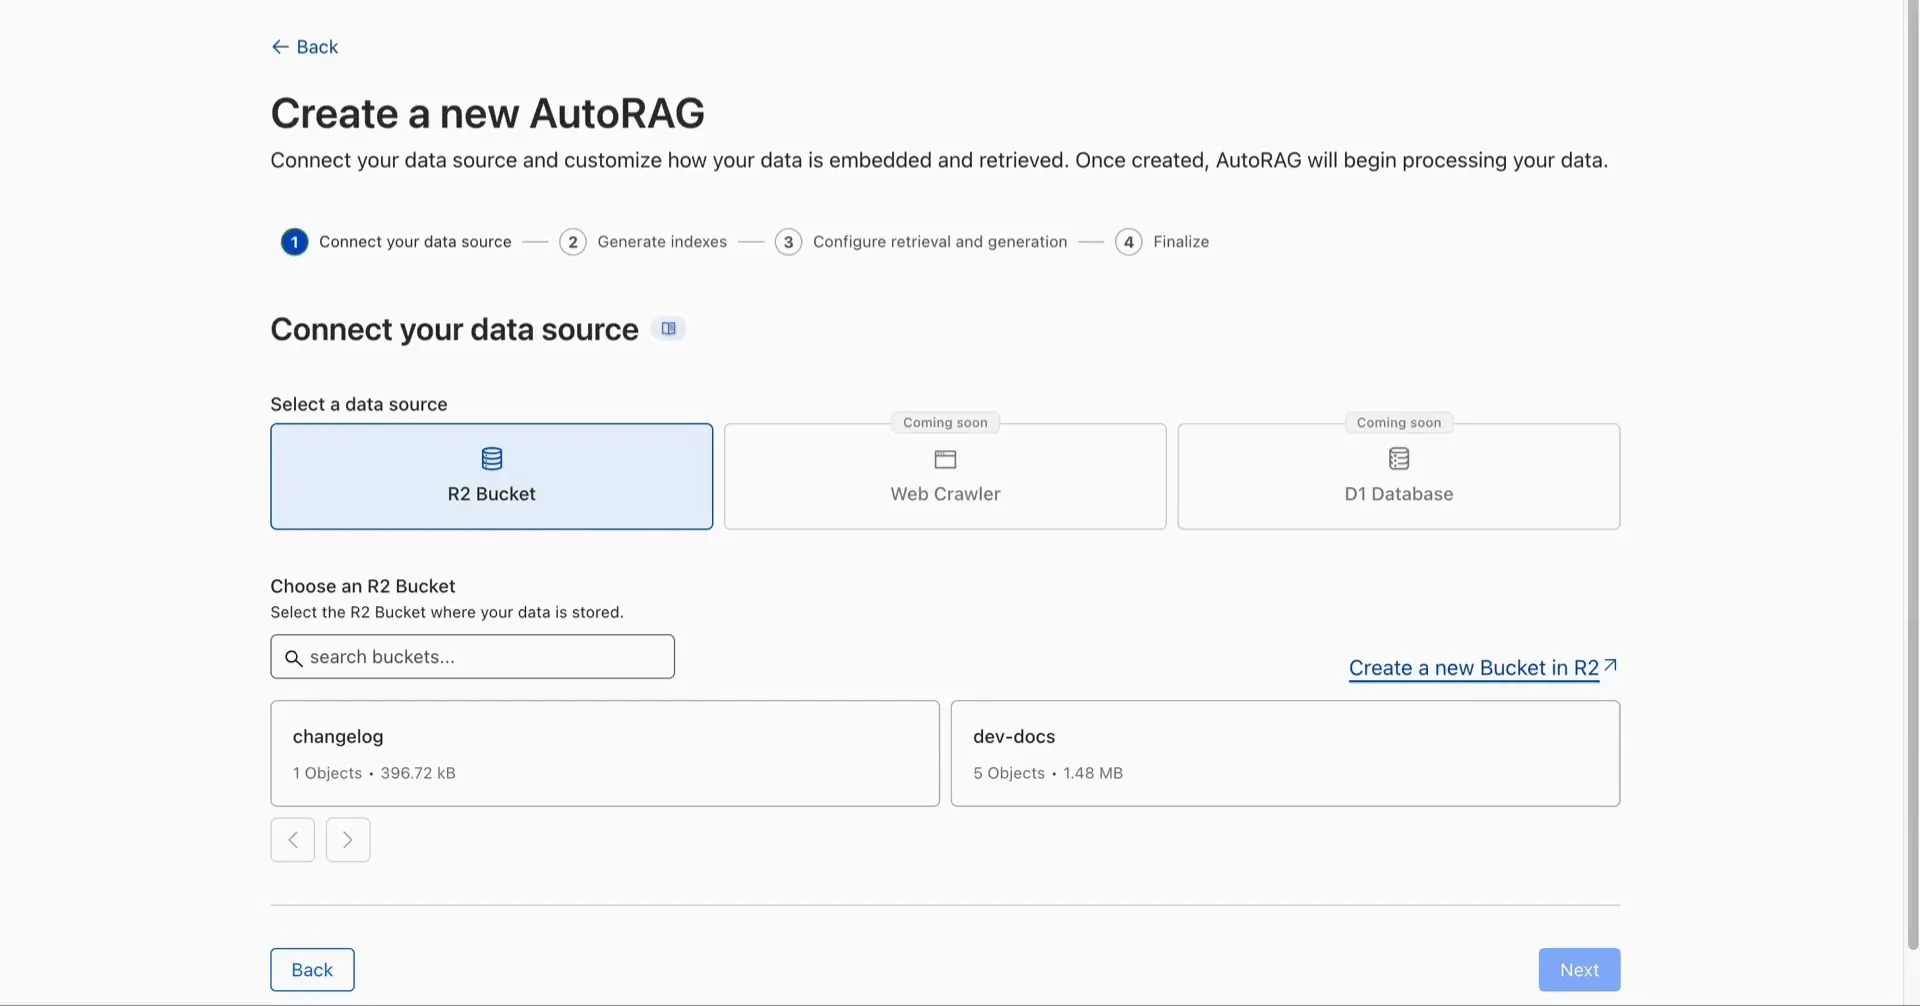
AutoRAG is now in open beta, making it easy for you to build fully-managed retrieval-augmented generation (RAG) pipelines without managing infrasturcture. Just upload your docs to R2, and AutoRAG handles the rest: embeddings, indexing, retrieval, and response generation via API.
With AutoRAG, you can:
- Customize your pipeline: Choose from Workers AI models, configure chunking strategies, edit system prompts, and more.
- Instant setup: AutoRAG provisions everything you need from Vectorize, AI gateway, to pipeline logic for you, so you can go from zero to a working RAG pipeline in seconds.
- Keep your index fresh: AutoRAG continuously syncs your index with your data source to ensure responses stay accurate and up to date.
- Ask questions: Query your data and receive grounded responses via a Workers binding or API.
Whether you're building internal tools, AI-powered search, or a support assistant, AutoRAG gets you from idea to deployment in minutes.
Get started in the Cloudflare dashboard ↗ or check out the guide for instructions on how to build your RAG pipeline today.
-
We’re excited to announce Browser Rendering is now available on the Workers Free plan ↗, making it even easier to prototype and experiment with web search and headless browser use-cases when building applications on Workers.
The Browser Rendering REST API is now Generally Available, allowing you to control browser instances from outside of Workers applications. We've added three new endpoints to help automate more browser tasks:
- Extract structured data – Use
/jsonto retrieve structured data from a webpage. - Retrieve links – Use
/linksto pull all links from a webpage. - Convert to Markdown – Use
/markdownto convert webpage content into Markdown format.
For example, to fetch the Markdown representation of a webpage:
Markdown example curl -X 'POST' 'https://api.cloudflare.com/client/v4/accounts/<accountId>/browser-rendering/markdown' \-H 'Content-Type: application/json' \-H 'Authorization: Bearer <apiToken>' \-d '{"url": "https://example.com"}'For the full list of endpoints, check out our REST API documentation. You can also interact with Browser Rendering via the Cloudflare TypeScript SDK ↗.
We also recently landed support for Playwright in Browser Rendering for browser automation from Cloudflare Workers, in addition to Puppeteer, giving you more flexibility to test across different browser environments.
Visit the Browser Rendering docs to learn more about how to use headless browsers in your applications.
- Extract structured data – Use
-
Durable Objects can now be used with zero commitment on the Workers Free plan allowing you to build AI agents with Agents SDK, collaboration tools, and real-time applications like chat or multiplayer games.
Durable Objects let you build stateful, serverless applications with millions of tiny coordination instances that run your application code alongside (in the same thread!) your durable storage. Each Durable Object can access its own SQLite database through a Storage API. A Durable Object class is defined in a Worker script encapsulating the Durable Object's behavior when accessed from a Worker. To try the code below, click the button:
import { DurableObject } from "cloudflare:workers";// Durable Objectexport class MyDurableObject extends DurableObject {...async sayHello(name) {return `Hello, ${name}!`;}}// Workerexport default {async fetch(request, env) {// Every unique ID refers to an individual instance of the Durable Object classconst id = env.MY_DURABLE_OBJECT.idFromName("foo");// A stub is a client used to invoke methods on the Durable Objectconst stub = env.MY_DURABLE_OBJECT.get(id);// Methods on the Durable Object are invoked via the stubconst response = await stub.sayHello("world");return response;},};Free plan limits apply to Durable Objects compute and storage usage. Limits allow developers to build real-world applications, with every Worker request able to call a Durable Object on the free plan.
For more information, checkout:
-
SQLite in Durable Objects is now generally available (GA) with 10GB SQLite database per Durable Object. Since the public beta ↗ in September 2024, we've added feature parity and robustness for the SQLite storage backend compared to the preexisting key-value (KV) storage backend for Durable Objects.
SQLite-backed Durable Objects are recommended for all new Durable Object classes, using
new_sqlite_classesWrangler configuration. Only SQLite-backed Durable Objects have access to Storage API's SQL and point-in-time recovery methods, which provide relational data modeling, SQL querying, and better data management.export class MyDurableObject extends DurableObject {sql: SqlStorageconstructor(ctx: DurableObjectState, env: Env) {super(ctx, env);this.sql = ctx.storage.sql;}async sayHello() {let result = this.sql.exec("SELECT 'Hello, World!' AS greeting").one();return result.greeting;}}KV-backed Durable Objects remain for backwards compatibility, and a migration path from key-value storage to SQL storage for existing Durable Object classes will be offered in the future.
For more details on SQLite storage, checkout Zero-latency SQLite storage in every Durable Object blog ↗.
-
You can now capture a maximum of 256 KB of log events per Workers invocation, helping you gain better visibility into application behavior.
All console.log() statements, exceptions, request metadata, and headers are automatically captured during the Worker invocation and emitted as JSON object. Workers Logs deserializes this object before indexing the fields and storing them. You can also capture, transform, and export the JSON object in a Tail Worker.
256 KB is a 2x increase from the previous 128 KB limit. After you exceed this limit, further context associated with the request will not be recorded in your logs.
This limit is automatically applied to all Workers.
-
We're excited to share that you can now use Playwright's browser automation capabilities ↗ from Cloudflare Workers.
Playwright ↗ is an open-source package developed by Microsoft that can do browser automation tasks; it's commonly used to write software tests, debug applications, create screenshots, and crawl pages. Like Puppeteer, we forked ↗ Playwright and modified it to be compatible with Cloudflare Workers and Browser Rendering ↗.
Below is an example of how to use Playwright with Browser Rendering to test a TODO application using assertions:
Assertion example import type { Fetcher } from '@cloudflare/workers-types';import { launch } from '@cloudflare/playwright';import { expect } from '@cloudflare/playwright/test';interface Env {MYBROWSER: Fetcher;}export default {async fetch(request: Request, env: Env) {const browser = await launch(env.MYBROWSER);const page = await browser.newPage();await page.goto('https://demo.playwright.dev/todomvc');const TODO_ITEMS = todos.length > 0 ? todos : ['buy some cheese','feed the cat','book a doctors appointment'];const newTodo = page.getByPlaceholder('What needs to be done?');for (const item of TODO_ITEMS) {await newTodo.fill(item);await newTodo.press('Enter');}await expect(page.getByTestId('todo-title')).toHaveCount(TODO_ITEMS.length);await Promise.all(TODO_ITEMS.map((value, index) => expect(page.getByTestId('todo-title').nth(index)).toHaveText(value)));},};Playwright is available as an npm package at
@cloudflare/playwright↗ and the code is at GitHub ↗.Learn more in our documentation.
-
You can now access all Cloudflare cache purge methods — no matter which plan you’re on. Whether you need to update a single asset or instantly invalidate large portions of your site’s content, you now have the same powerful tools previously reserved for Enterprise customers.
Anyone on Cloudflare can now:
- Purge Everything: Clears all cached content associated with a website.
- Purge by Prefix: Targets URLs sharing a common prefix.
- Purge by Hostname: Invalidates content by specific hostnames.
- Purge by URL (single-file purge): Precisely targets individual URLs.
- Purge by Tag: Uses Cache-Tag response headers to invalidate grouped assets, offering flexibility for complex cache management scenarios.
Want to learn how each purge method works, when to use them, or what limits apply to your plan? Dive into our purge cache documentation and API reference ↗ for all the details.
-
Queues now supports the ability to pause message delivery and/or purge (delete) messages on a queue. These operations can be useful when:
- Your consumer has a bug or downtime, and you want to temporarily stop messages from being processed while you fix the bug
- You have pushed invalid messages to a queue due to a code change during development, and you want to clean up the backlog
- Your queue has a backlog that is stale and you want to clean it up to allow new messages to be consumed
To pause a queue using Wrangler, run the
pause-deliverycommand. Paused queues continue to receive messages. And you can easily unpause a queue using theresume-deliverycommand.Pause and resume a queue $ wrangler queues pause-delivery my-queuePausing message delivery for queue my-queue.Paused message delivery for queue my-queue.$ wrangler queues resume-delivery my-queueResuming message delivery for queue my-queue.Resumed message delivery for queue my-queue.Purging a queue permanently deletes all messages in the queue. Unlike pausing, purging is an irreversible operation:
Purge a queue $ wrangler queues purge my-queue✔ This operation will permanently delete all the messages in queue my-queue. Type my-queue to proceed. … my-queuePurged queue 'my-queue'You can also do these operations using the Queues REST API, or the dashboard page for a queue.
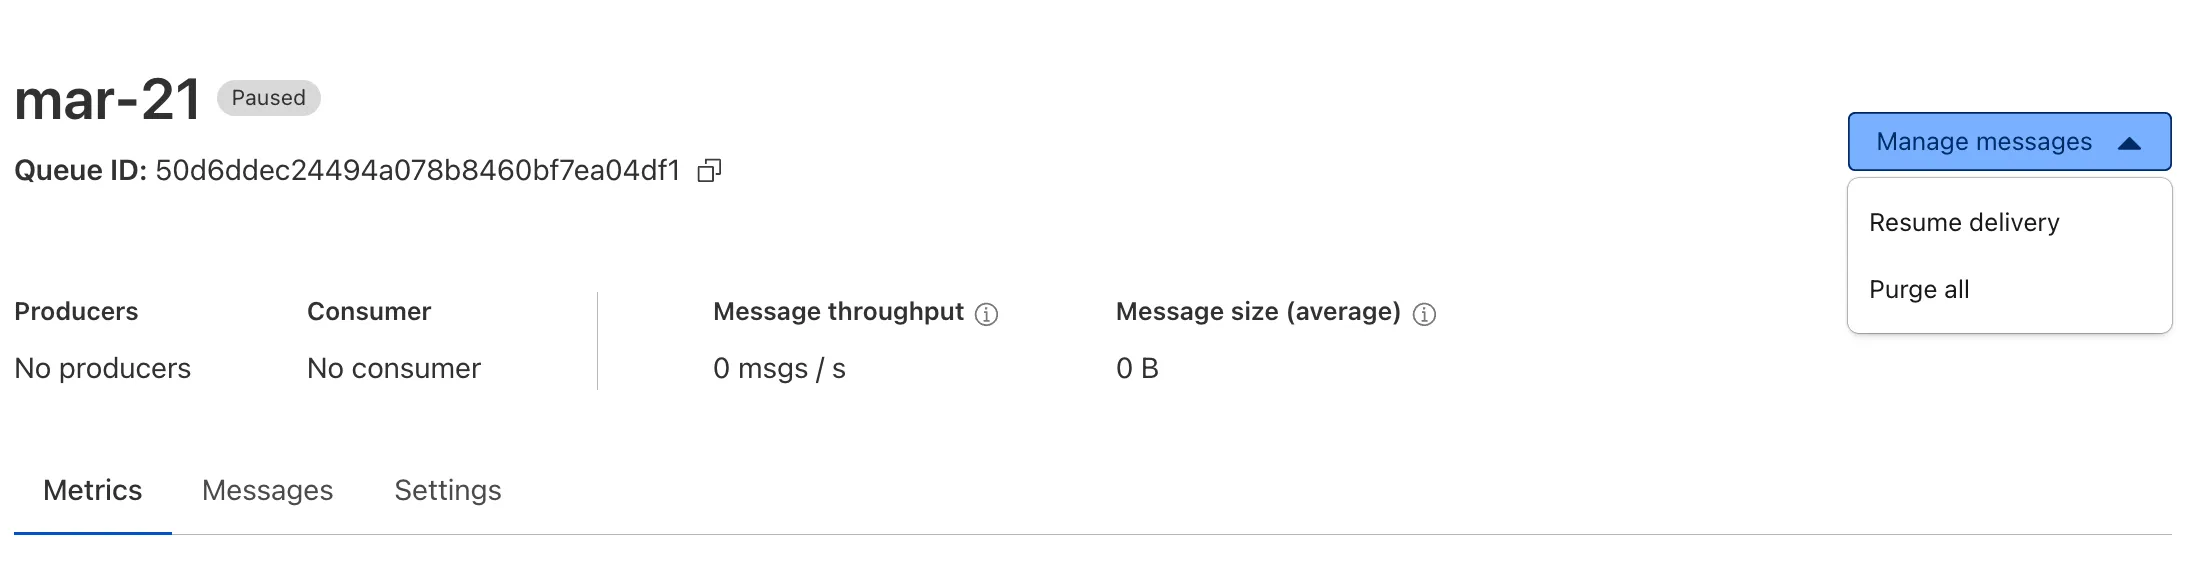
This feature is available on all new and existing queues. Head over to the pause and purge documentation to learn more. And if you haven't used Cloudflare Queues before, get started with the Cloudflare Queues guide.
-
The latest version of audit logs streamlines audit logging by automatically capturing all user and system actions performed through the Cloudflare Dashboard or public APIs. This update leverages Cloudflare’s existing API Gateway to generate audit logs based on OpenAPI schemas, ensuring a more consistent and automated logging process.
Availability: Audit logs (version 2) is now in Beta, with support limited to API access.
Use the following API endpoint to retrieve audit logs:
GET https://api.cloudflare.com/client/v4/accounts/<account_id>/logs/audit?since=<date>&before=<date>You can access detailed documentation for audit logs (version 2) Beta API release here ↗.
Key Improvements in the Beta Release:
-
Automated & standardized logging: Logs are now generated automatically using a standardized system, replacing manual, team-dependent logging. This ensures consistency across all Cloudflare services.
-
Expanded product coverage: Increased audit log coverage from 75% to 95%. Key API endpoints such as
/accounts,/zones, and/organizationsare now included. -
Granular filtering: Logs now follow a uniform format, enabling precise filtering by actions, users, methods, and resources—allowing for faster and more efficient investigations.
-
Enhanced context and traceability: Each log entry now includes detailed context, such as the authentication method used, the interface (API or Dashboard) through which the action was performed, and mappings to Cloudflare Ray IDs for better traceability.
-
Comprehensive activity capture: Expanded logging to include GET requests and failed attempts, ensuring that all critical activities are recorded.
Known Limitations in Beta
- Error handling for the API is not implemented.
- There may be gaps or missing entries in the available audit logs.
- UI is unavailable in this Beta release.
- System-level logs and User-Activity logs are not included.
Support for these features is coming as part of the GA release later this year. For more details, including a sample audit log, check out our blog post: Introducing Automatic Audit Logs ↗
-
-
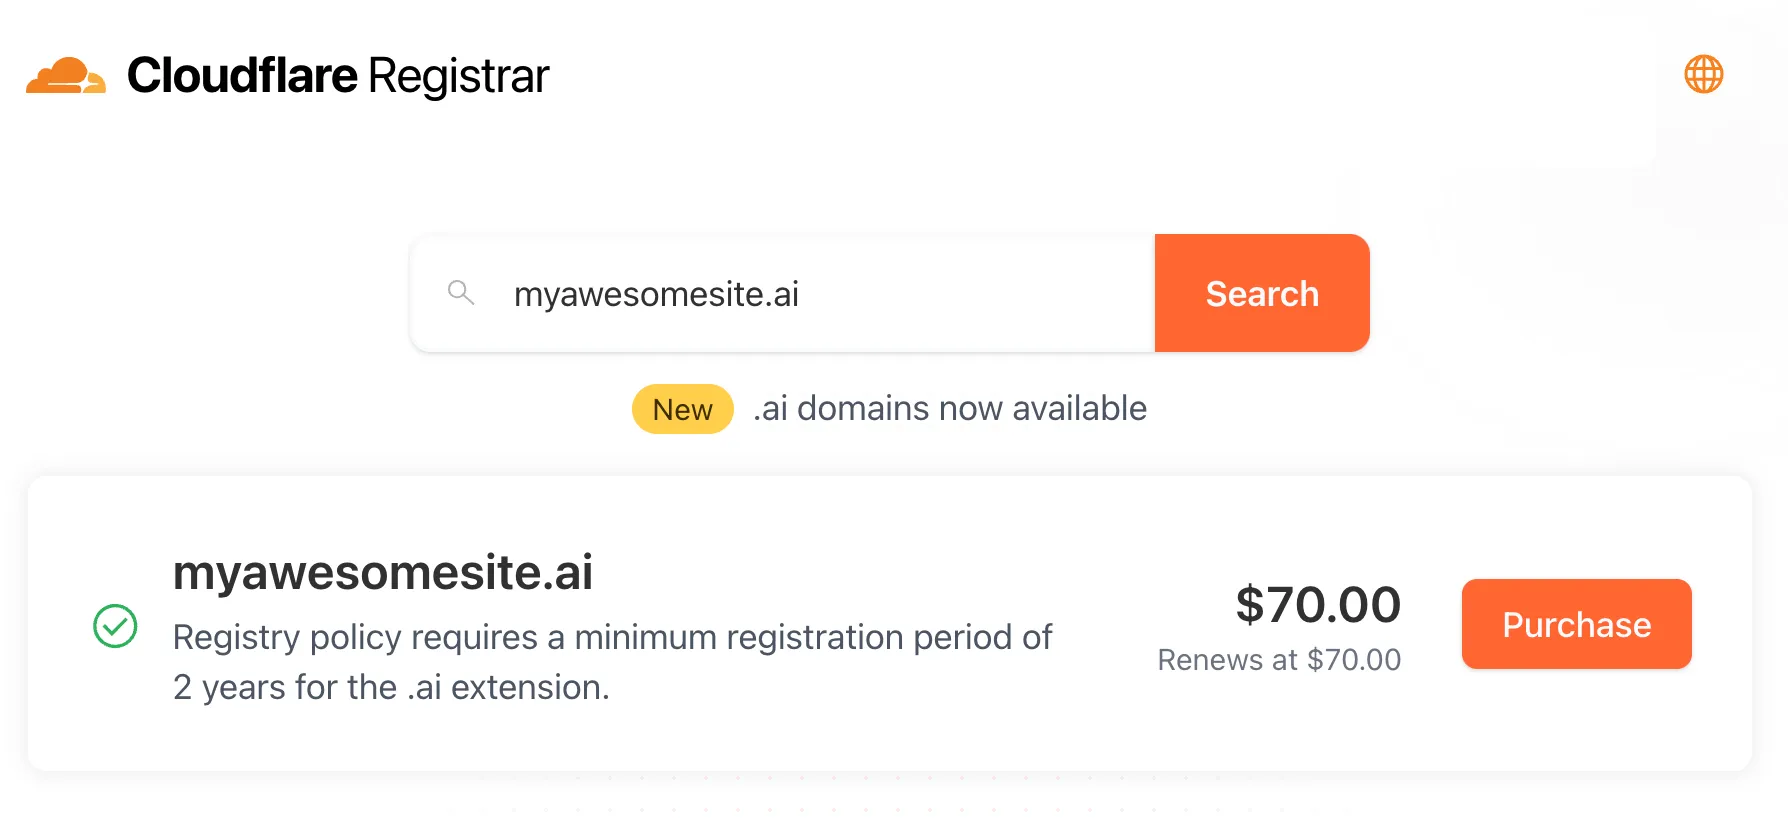
Cloudflare Registrar now supports
.aiand.shopdomains. These are two of our most highly-requested top-level domains (TLDs) and are great additions to the 300+ other TLDs we support ↗.Starting today, customers can:
- Register and renew these domains at cost without any markups or add-on fees
- Enjoy best-in-class security and performance with native integrations with Cloudflare DNS, CDN, and SSL services like one-click DNSSEC
- Combat domain hijacking with Custom Domain Protection ↗ (available on enterprise plans)
We can't wait to see what AI and e-commerce projects you deploy on Cloudflare. To get started, transfer your domains to Cloudflare or search for new ones to register ↗.
-
You can now run a Worker for up to 5 minutes of CPU time for each request.
Previously, each Workers request ran for a maximum of 30 seconds of CPU time — that is the time that a Worker is actually performing a task (we still allowed unlimited wall-clock time, in case you were waiting on slow resources). This meant that some compute-intensive tasks were impossible to do with a Worker. For instance, you might want to take the cryptographic hash of a large file from R2. If this computation ran for over 30 seconds, the Worker request would have timed out.
By default, Workers are still limited to 30 seconds of CPU time. This protects developers from incurring accidental cost due to buggy code.
By changing the
cpu_msvalue in your Wrangler configuration, you can opt in to any value up to 300,000 (5 minutes).{// ...rest of your configuration..."limits": {"cpu_ms": 300000,},// ...rest of your configuration...}[limits]cpu_ms = 300_000For more information on the updates limits, see the documentation on Wrangler configuration for
cpu_msand on Workers CPU time limits.For building long-running tasks on Cloudflare, we also recommend checking out Workflows and Queues.
-
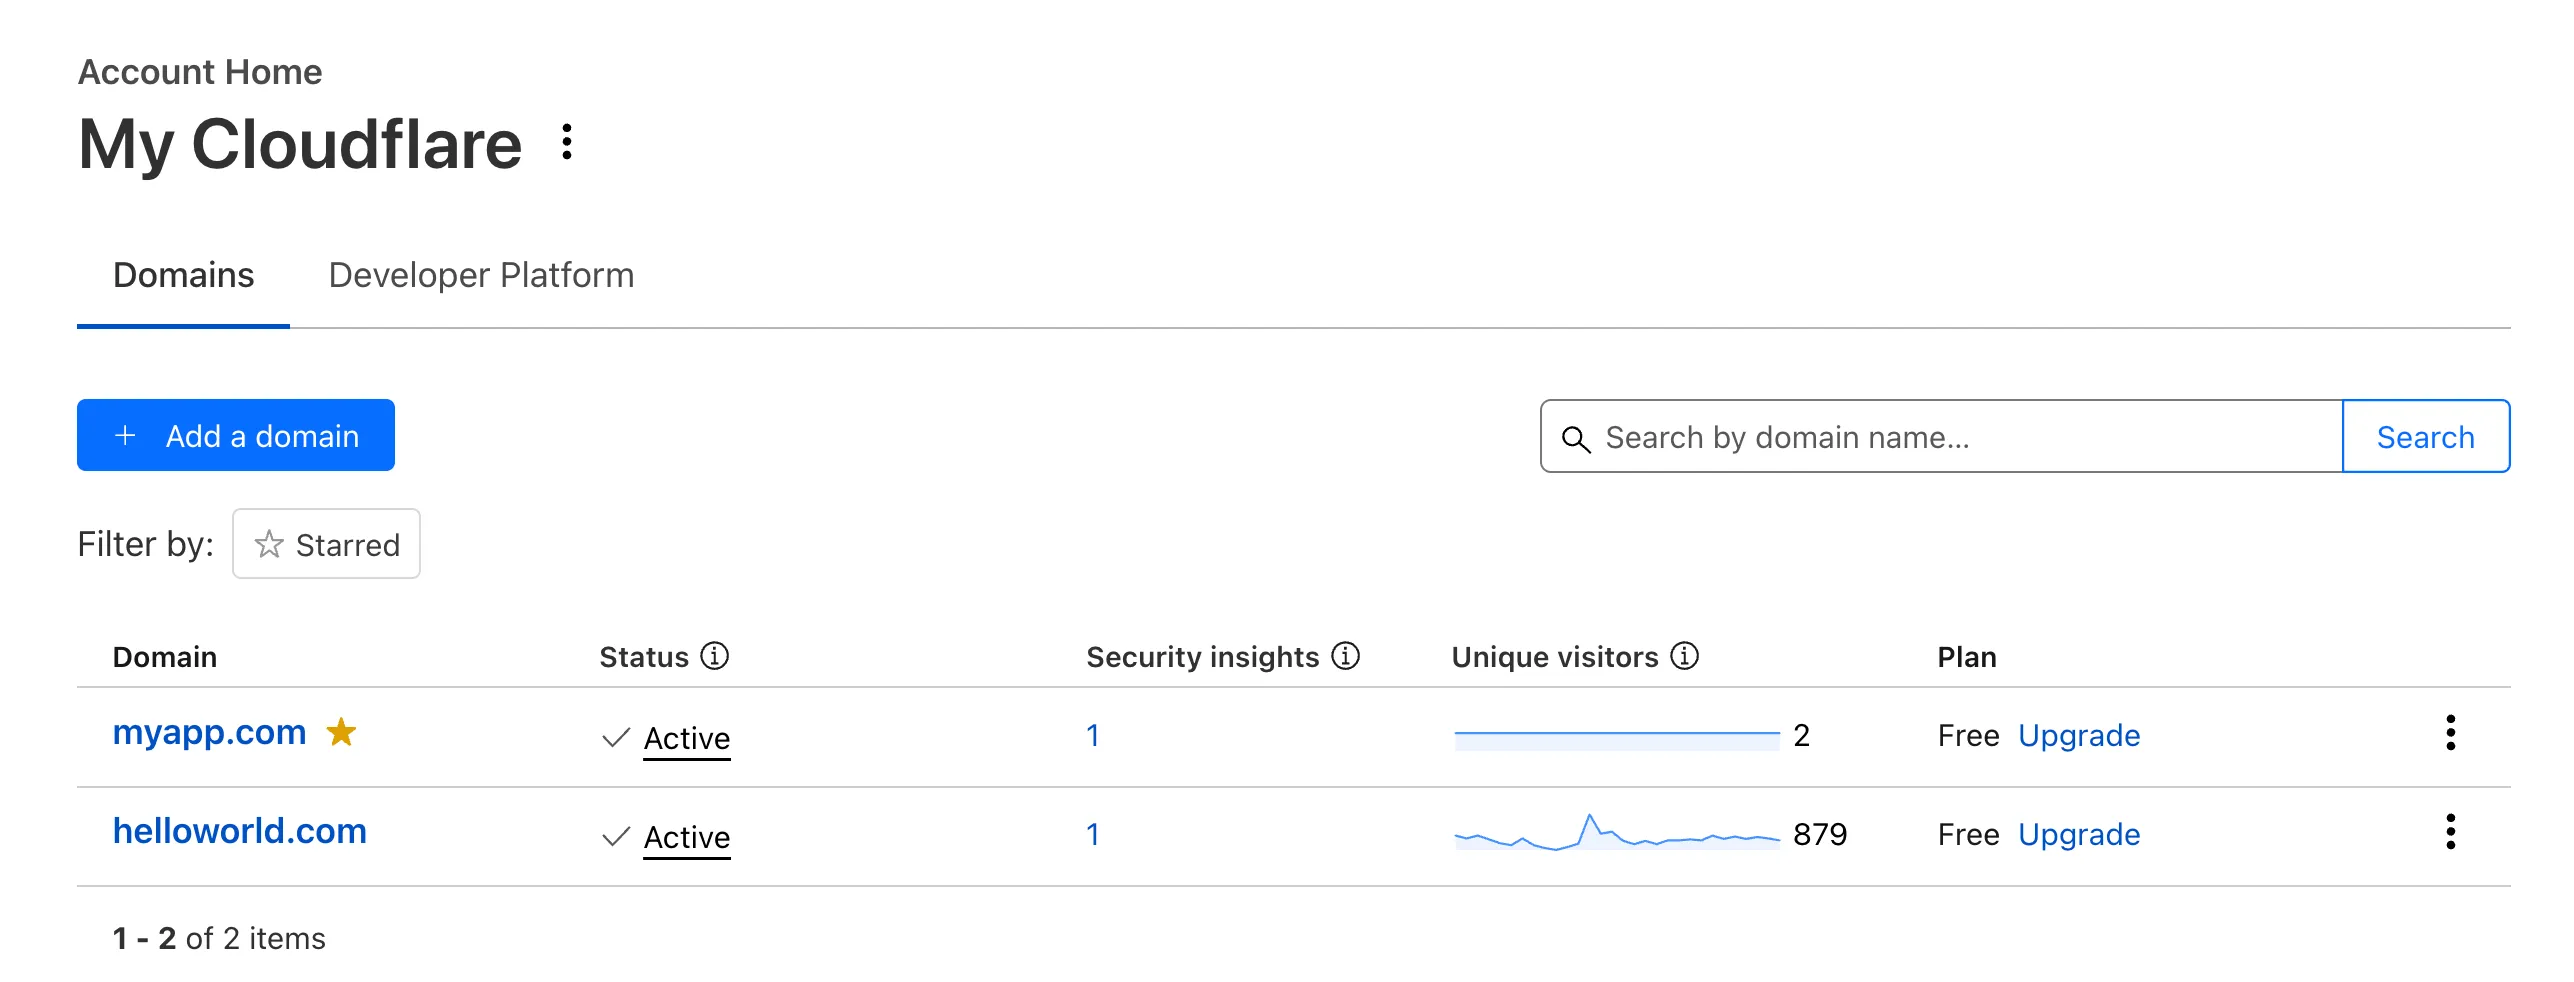
Recently, Account Home has been updated to streamline your workflows:
-
Recent Workers projects: You'll now find your projects readily accessible from a new
Developer Platformtab on Account Home. See recently-modified projects and explore what you can work our developer-focused products. -
Traffic and security insights: Get a snapshot of domain performance at a glance with key metrics and trends.
-
Quick actions: You can now perform common actions for your account, domains, and even Workers in just 1-2 clicks from the 3-dot menu.
-
Keep starred domains front and center: Now, when you filter for starred domains on Account Home, we'll save your preference so you'll continue to only see starred domains by default.
We can't wait for you to take the new Account Home for a spin.
For more info:
-
-
Source maps are now Generally Available (GA). You can now be uploaded with a maximum gzipped size of 15 MB. Previously, the maximum size limit was 15 MB uncompressed.
Source maps help map between the original source code and the transformed/minified code that gets deployed to production. By uploading your source map, you allow Cloudflare to map the stack trace from exceptions onto the original source code making it easier to debug.

With no source maps uploaded: notice how all the Javascript has been minified to one file, so the stack trace is missing information on file name, shows incorrect line numbers, and incorrectly references
jsinstead ofts.
With source maps uploaded: all methods reference the correct files and line numbers.
Uploading source maps and stack trace remapping happens out of band from the Worker execution, so source maps do not affect upload speed, bundle size, or cold starts. The remapped stack traces are accessible through Tail Workers, Workers Logs, and Workers Logpush.
To enable source maps, add the following to your Pages Function's or Worker's wrangler configuration:
{"upload_source_maps": true}upload_source_maps = true
-
Update: Mon Mar 24th, 11PM UTC: Next.js has made further changes to address a smaller vulnerability introduced in the patches made to its middleware handling. Users should upgrade to Next.js versions
15.2.4,14.2.26,13.5.10or12.3.6. If you are unable to immediately upgrade or are running an older version of Next.js, you can enable the WAF rule described in this changelog as a mitigation.Update: Mon Mar 24th, 8PM UTC: Next.js has now backported the patch for this vulnerability ↗ to cover Next.js v12 and v13. Users on those versions will need to patch to
13.5.9and12.3.5(respectively) to mitigate the vulnerability.Update: Sat Mar 22nd, 4PM UTC: We have changed this WAF rule to opt-in only, as sites that use auth middleware with third-party auth vendors were observing failing requests.
We strongly recommend updating your version of Next.js (if eligible) to the patched versions, as your app will otherwise be vulnerable to an authentication bypass attack regardless of auth provider.
This rule is opt-in only for sites on the Pro plan or above in the WAF managed ruleset.
To enable the rule:
- Head to Security > WAF > Managed rules in the Cloudflare dashboard for the zone (website) you want to protect.
- Click the three dots next to Cloudflare Managed Ruleset and choose Edit
- Scroll down and choose Browse Rules
- Search for CVE-2025-29927 (ruleId:
34583778093748cc83ff7b38f472013e) - Change the Status to Enabled and the Action to Block. You can optionally set the rule to Log, to validate potential impact before enabling it. Log will not block requests.
- Click Next
- Scroll down and choose Save
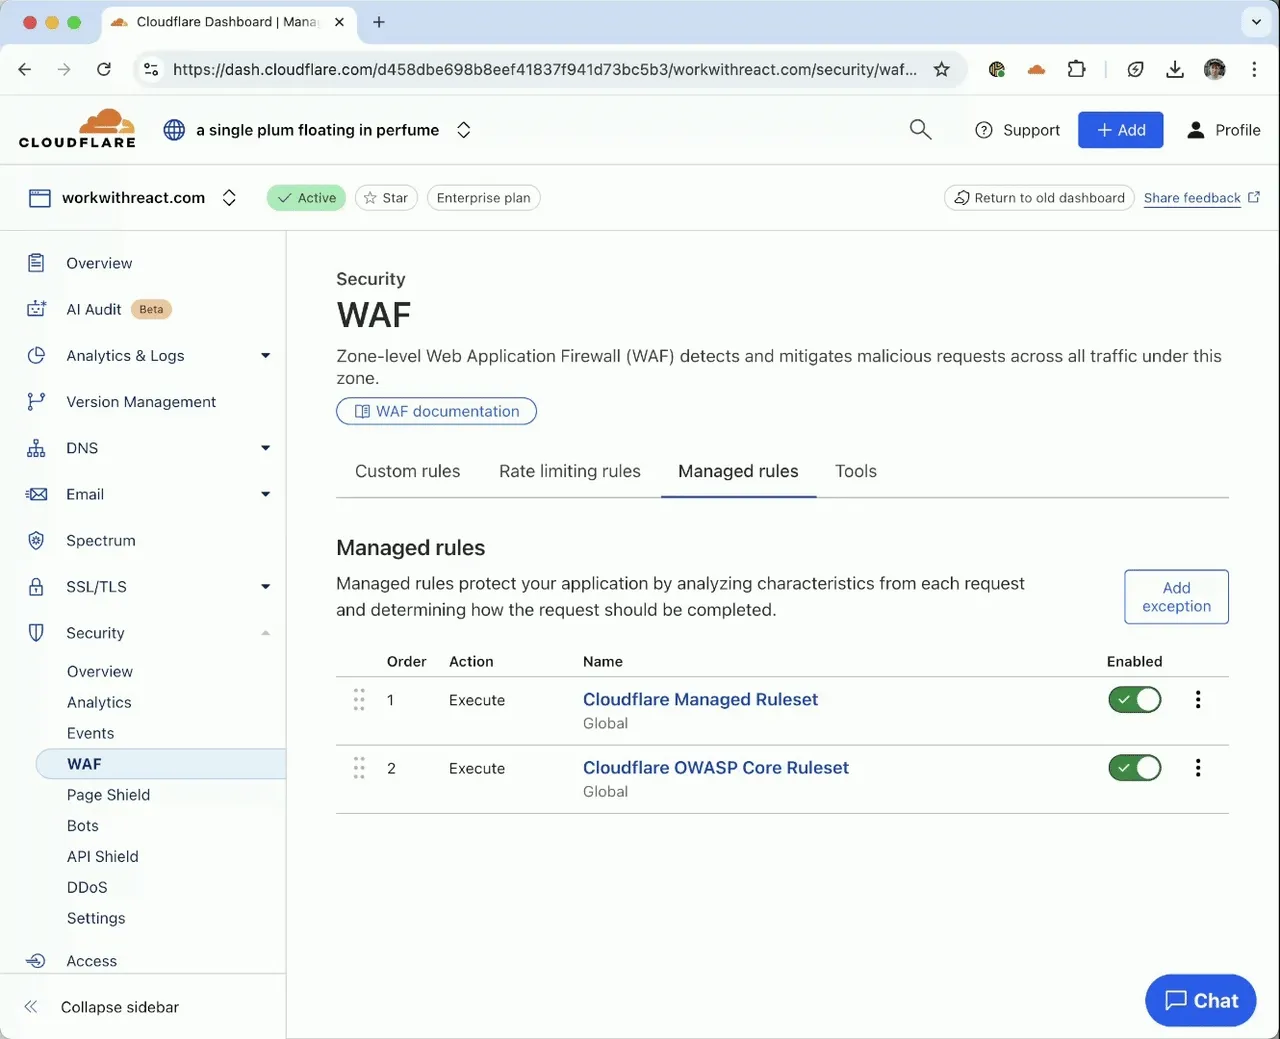
This will enable the WAF rule and block requests with the
x-middleware-subrequestheader regardless of Next.js version.For users on the Free plan, or who want to define a more specific rule, you can create a Custom WAF rule to block requests with the
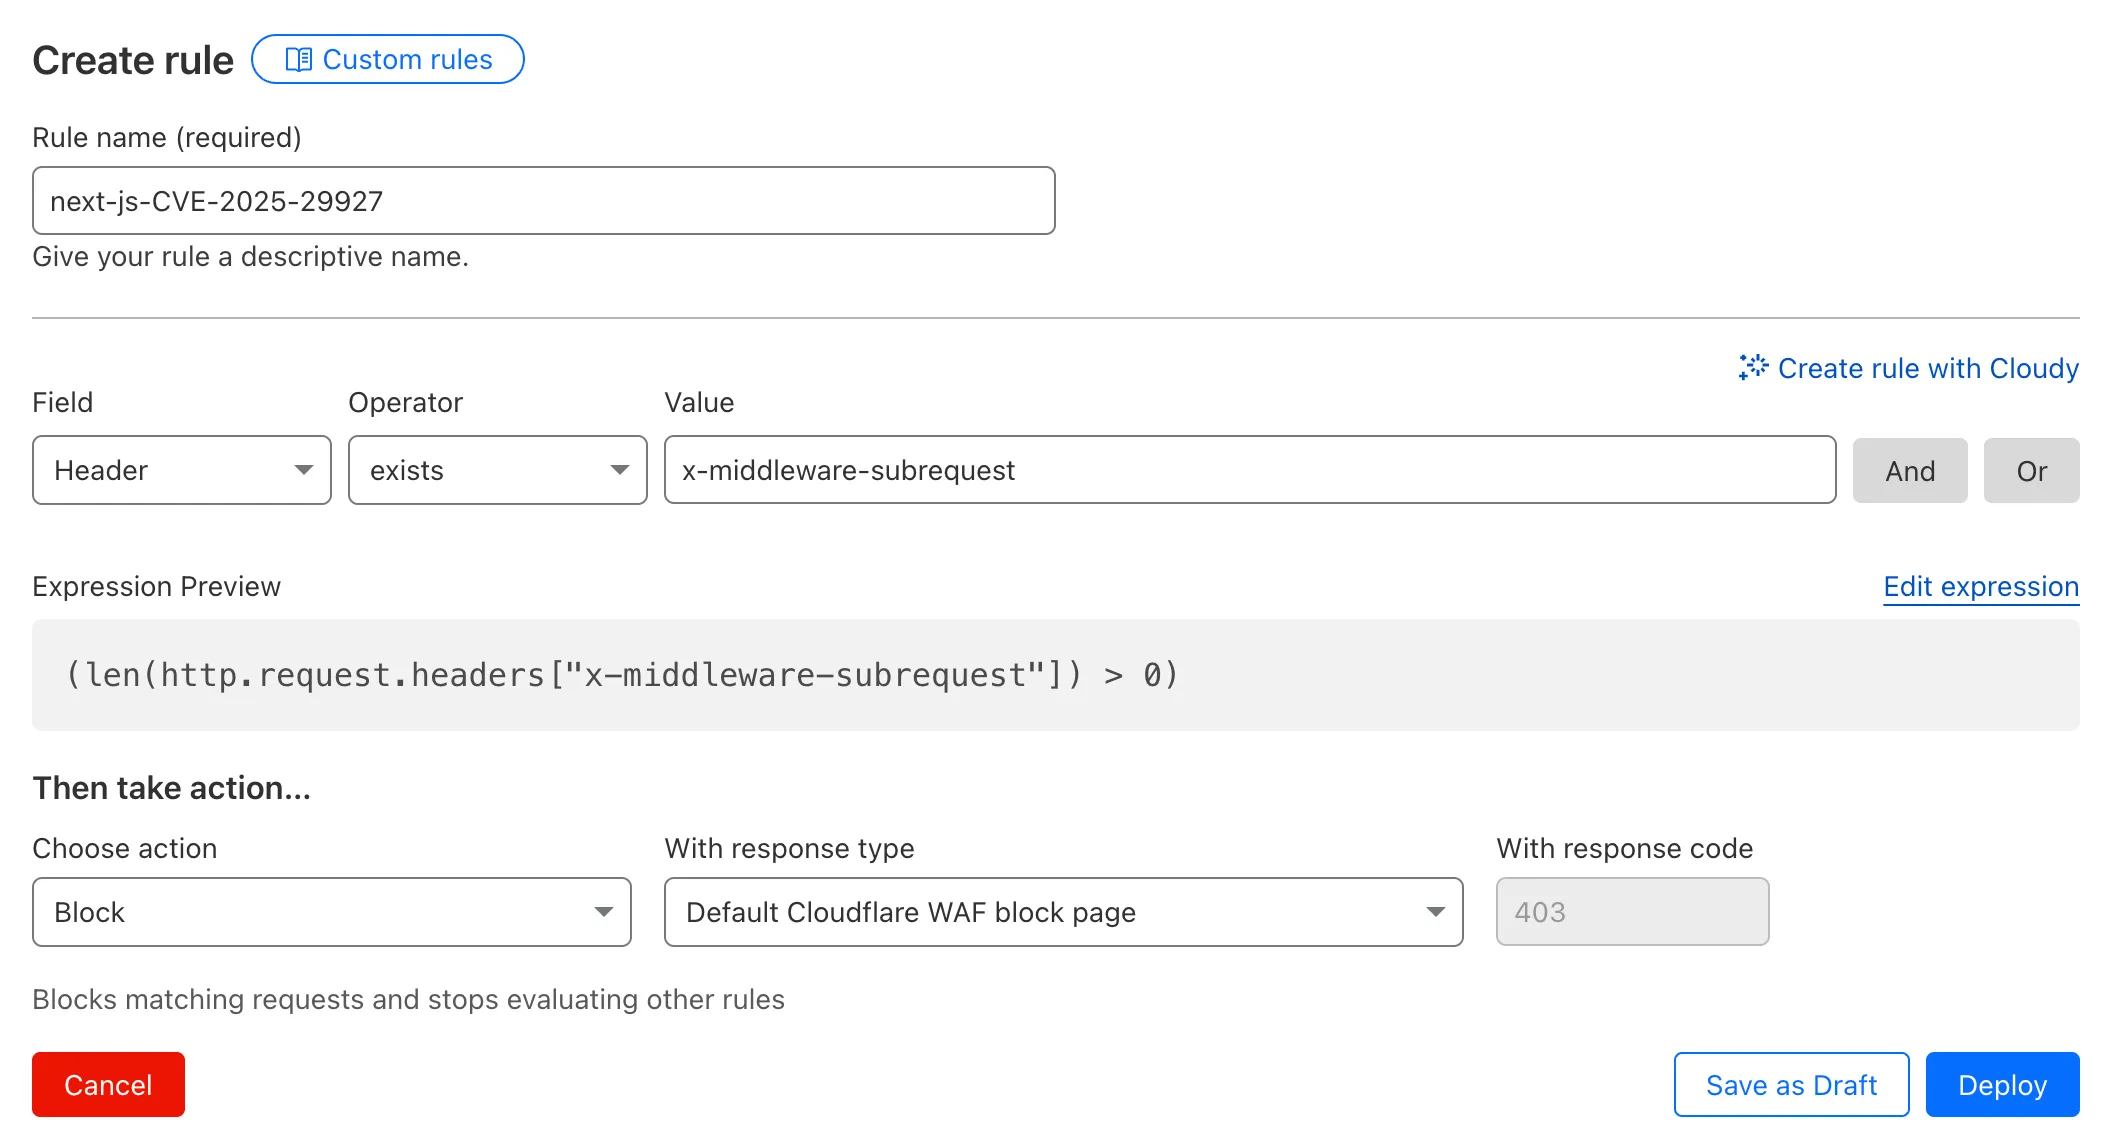
x-middleware-subrequestheader regardless of Next.js version.To create a custom rule:
- Head to Security > WAF > Custom rules in the Cloudflare dashboard for the zone (website) you want to protect.
- Give the rule a name - e.g.
next-js-CVE-2025-29927 - Set the matching parameters for the rule match any request where the
x-middleware-subrequestheaderexistsper the rule expression below.
Terminal window (len(http.request.headers["x-middleware-subrequest"]) > 0)- Set the action to 'block'. If you want to observe the impact before blocking requests, set the action to 'log' (and edit the rule later).
- Deploy the rule.
We've made a WAF (Web Application Firewall) rule available to all sites on Cloudflare to protect against the Next.js authentication bypass vulnerability ↗ (
CVE-2025-29927) published on March 21st, 2025.Note: This rule is not enabled by default as it blocked requests across sites for specific authentication middleware.
- This managed rule protects sites using Next.js on Workers and Pages, as well as sites using Cloudflare to protect Next.js applications hosted elsewhere.
- This rule has been made available (but not enabled by default) to all sites as part of our WAF Managed Ruleset and blocks requests that attempt to bypass authentication in Next.js applications.
- The vulnerability affects almost all Next.js versions, and has been fully patched in Next.js
14.2.26and15.2.4. Earlier, interim releases did not fully patch this vulnerability. - Users on older versions of Next.js (
11.1.4to13.5.6) did not originally have a patch available, but this the patch for this vulnerability and a subsequent additional patch have been backported to Next.js versions12.3.6and13.5.10as of Monday, March 24th. Users on Next.js v11 will need to deploy the stated workaround or enable the WAF rule.
The managed WAF rule mitigates this by blocking external user requests with the
x-middleware-subrequestheader regardless of Next.js version, but we recommend users using Next.js 14 and 15 upgrade to the patched versions of Next.js as an additional mitigation.
-
We’re excited to introduce the Cloudflare Zero Trust Secure DNS Locations Write role, designed to provide DNS filtering customers with granular control over third-party access when configuring their Protective DNS (PDNS) solutions.
Many DNS filtering customers rely on external service partners to manage their DNS location endpoints. This role allows you to grant access to external parties to administer DNS locations without overprovisioning their permissions.
Secure DNS Location Requirements:
-
Mandate usage of Bring your own DNS resolver IP addresses ↗ if available on the account.
-
Require source network filtering for IPv4/IPv6/DoT endpoints; token authentication or source network filtering for the DoH endpoint.
You can assign the new role via Cloudflare Dashboard (
Manage Accounts > Members) or via API. For more information, refer to the Secure DNS Locations documentation ↗. -
-
We are excited to announce that AI Gateway now supports real-time AI interactions with the new Realtime WebSockets API.
This new capability allows developers to establish persistent, low-latency connections between their applications and AI models, enabling natural, real-time conversational AI experiences, including speech-to-speech interactions.
The Realtime WebSockets API works with the OpenAI Realtime API ↗, Google Gemini Live API ↗, and supports real-time text and speech interactions with models from Cartesia ↗, and ElevenLabs ↗.
Here's how you can connect AI Gateway to OpenAI's Realtime API ↗ using WebSockets:
OpenAI Realtime API example import WebSocket from "ws";const url ="wss://gateway.ai.cloudflare.com/v1/<account_id>/<gateway>/openai?model=gpt-4o-realtime-preview-2024-12-17";const ws = new WebSocket(url, {headers: {"cf-aig-authorization": process.env.CLOUDFLARE_API_KEY,Authorization: "Bearer " + process.env.OPENAI_API_KEY,"OpenAI-Beta": "realtime=v1",},});ws.on("open", () => console.log("Connected to server."));ws.on("message", (message) => console.log(JSON.parse(message.toString())));ws.send(JSON.stringify({type: "response.create",response: { modalities: ["text"], instructions: "Tell me a joke" },}),);Get started by checking out the Realtime WebSockets API documentation.
-
Document conversion plays an important role when designing and developing AI applications and agents. Workers AI now provides the
toMarkdownutility method that developers can use to for quick, easy, and convenient conversion and summary of documents in multiple formats to Markdown language.You can call this new tool using a binding by calling
env.AI.toMarkdown()or the using the REST API endpoint.In this example, we fetch a PDF document and an image from R2 and feed them both to
env.AI.toMarkdown(). The result is a list of converted documents. Workers AI models are used automatically to detect and summarize the image.import { Env } from "./env";export default {async fetch(request: Request, env: Env, ctx: ExecutionContext) {// https://pub-979cb28270cc461d94bc8a169d8f389d.r2.dev/somatosensory.pdfconst pdf = await env.R2.get('somatosensory.pdf');// https://pub-979cb28270cc461d94bc8a169d8f389d.r2.dev/cat.jpegconst cat = await env.R2.get('cat.jpeg');return Response.json(await env.AI.toMarkdown([{name: "somatosensory.pdf",blob: new Blob([await pdf.arrayBuffer()], { type: "application/octet-stream" }),},{name: "cat.jpeg",blob: new Blob([await cat.arrayBuffer()], { type: "application/octet-stream" }),},]),);},};This is the result:
[{"name": "somatosensory.pdf","mimeType": "application/pdf","format": "markdown","tokens": 0,"data": "# somatosensory.pdf\n## Metadata\n- PDFFormatVersion=1.4\n- IsLinearized=false\n- IsAcroFormPresent=false\n- IsXFAPresent=false\n- IsCollectionPresent=false\n- IsSignaturesPresent=false\n- Producer=Prince 20150210 (www.princexml.com)\n- Title=Anatomy of the Somatosensory System\n\n## Contents\n### Page 1\nThis is a sample document to showcase..."},{"name": "cat.jpeg","mimeType": "image/jpeg","format": "markdown","tokens": 0,"data": "The image is a close-up photograph of Grumpy Cat, a cat with a distinctive grumpy expression and piercing blue eyes. The cat has a brown face with a white stripe down its nose, and its ears are pointed upright. Its fur is light brown and darker around the face, with a pink nose and mouth. The cat's eyes are blue and slanted downward, giving it a perpetually grumpy appearance. The background is blurred, but it appears to be a dark brown color. Overall, the image is a humorous and iconic representation of the popular internet meme character, Grumpy Cat. The cat's facial expression and posture convey a sense of displeasure or annoyance, making it a relatable and entertaining image for many people."}]See Markdown Conversion for more information on supported formats, REST API and pricing.
-
📝 We've renamed the Agents package to
agents!If you've already been building with the Agents SDK, you can update your dependencies to use the new package name, and replace references to
agents-sdkwithagents:Terminal window # Install the new packagenpm i agentsTerminal window # Remove the old (deprecated) packagenpm uninstall agents-sdk# Find instances of the old package name in your codebasegrep -r 'agents-sdk' .# Replace instances of the old package name with the new one# (or use find-replace in your editor)sed -i 's/agents-sdk/agents/g' $(grep -rl 'agents-sdk' .)All future updates will be pushed to the new
agentspackage, and the older package has been marked as deprecated.We've added a number of big new features to the Agents SDK over the past few weeks, including:
- You can now set
cors: truewhen usingrouteAgentRequestto return permissive default CORS headers to Agent responses. - The regular client now syncs state on the agent (just like the React version).
useAgentChatbug fixes for passing headers/credentials, includng properly clearing cache on unmount.- Experimental
/schedulemodule with a prompt/schema for adding scheduling to your app (with evals!). - Changed the internal
zodschema to be compatible with the limitations of Google's Gemini models by removing the discriminated union, allowing you to use Gemini models with the scheduling API.
We've also fixed a number of bugs with state synchronization and the React hooks.
// via https://github.com/cloudflare/agents/tree/main/examples/cross-domainexport default {async fetch(request, env) {return (// Set { cors: true } to enable CORS headers.(await routeAgentRequest(request, env, { cors: true })) ||new Response("Not found", { status: 404 }));},};// via https://github.com/cloudflare/agents/tree/main/examples/cross-domainexport default {async fetch(request: Request, env: Env) {return (// Set { cors: true } to enable CORS headers.(await routeAgentRequest(request, env, { cors: true })) ||new Response("Not found", { status: 404 }));},} satisfies ExportedHandler<Env>;We've added a new
@unstable_callable()decorator for defining methods that can be called directly from clients. This allows you call methods from within your client code: you can call methods (with arguments) and get native JavaScript objects back.// server.tsimport { unstable_callable, Agent } from "agents";export class Rpc extends Agent {// Use the decorator to define a callable method@unstable_callable({description: "rpc test",})async getHistory() {return this.sql`SELECT * FROM history ORDER BY created_at DESC LIMIT 10`;}}// server.tsimport { unstable_callable, Agent, type StreamingResponse } from "agents";import type { Env } from "../server";export class Rpc extends Agent<Env> {// Use the decorator to define a callable method@unstable_callable({description: "rpc test",})async getHistory() {return this.sql`SELECT * FROM history ORDER BY created_at DESC LIMIT 10`;}}We've fixed a number of small bugs in the
agents-starter↗ project — a real-time, chat-based example application with tool-calling & human-in-the-loop built using the Agents SDK. The starter has also been upgraded to use the latest wrangler v4 release.If you're new to Agents, you can install and run the
agents-starterproject in two commands:Terminal window # Install it$ npm create cloudflare@latest agents-starter -- --template="cloudflare/agents-starter"# Run it$ npm run startYou can use the starter as a template for your own Agents projects: open up
src/server.tsandsrc/client.tsxto see how the Agents SDK is used.We've heard your feedback on the Agents SDK documentation, and we're shipping more API reference material and usage examples, including:
- Expanded API reference documentation, covering the methods and properties exposed by the Agents SDK, as well as more usage examples.
- More Client API documentation that documents
useAgent,useAgentChatand the new@unstable_callableRPC decorator exposed by the SDK. - New documentation on how to call agents and (optionally) authenticate clients before they connect to your Agents.
Note that the Agents SDK is continually growing: the type definitions included in the SDK will always include the latest APIs exposed by the
agentspackage.If you're still wondering what Agents are, read our blog on building AI Agents on Cloudflare ↗ and/or visit the Agents documentation to learn more.
- You can now set
-
Radar has expanded its security insights, providing visibility into aggregate trends in authentication requests, including the detection of leaked credentials through leaked credentials detection scans.
We have now introduced the following endpoints:
summary: Retrieves summaries of HTTP authentication requests distribution across two different dimensions.timeseries_group: Retrieves timeseries data for HTTP authentication requests distribution across two different dimensions.
The following dimensions are available, displaying the distribution of HTTP authentication requests based on:
compromised: Credential status (clean vs. compromised).bot_class: Bot class (human vs. bot).
Dive deeper into leaked credential detection in this blog post ↗ and learn more about the expanded Radar security insights in our blog post ↗.
-
Workers AI is excited to add 4 new models to the catalog, including 2 brand new classes of models with a text-to-speech and reranker model. Introducing:
- @cf/baai/bge-m3 - a multi-lingual embeddings model that supports over 100 languages. It can also simultaneously perform dense retrieval, multi-vector retrieval, and sparse retrieval, with the ability to process inputs of different granularities.
- @cf/baai/bge-reranker-base - our first reranker model! Rerankers are a type of text classification model that takes a query and context, and outputs a similarity score between the two. When used in RAG systems, you can use a reranker after the initial vector search to find the most relevant documents to return to a user by reranking the outputs.
- @cf/openai/whisper-large-v3-turbo - a faster, more accurate speech-to-text model. This model was added earlier but is graduating out of beta with pricing included today.
- @cf/myshell-ai/melotts - our first text-to-speech model that allows users to generate an MP3 with voice audio from inputted text.
Pricing is available for each of these models on the Workers AI pricing page.
This docs update includes a few minor bug fixes to the model schema for llama-guard, llama-3.2-1b, which you can review on the product changelog.
Try it out and let us know what you think! Stay tuned for more models in the coming days.
-
You can now access bindings from anywhere in your Worker by importing the
envobject fromcloudflare:workers.Previously,
envcould only be accessed during a request. This meant that bindings could not be used in the top-level context of a Worker.Now, you can import
envand access bindings such as secrets or environment variables in the initial setup for your Worker:import { env } from "cloudflare:workers";import ApiClient from "example-api-client";// API_KEY and LOG_LEVEL now usable in top-level scopeconst apiClient = ApiClient.new({ apiKey: env.API_KEY });const LOG_LEVEL = env.LOG_LEVEL || "info";export default {fetch(req) {// you can use apiClient or LOG_LEVEL, configured before any request is handled},};Additionally,
envwas normally accessed as a argument to a Worker's entrypoint handler, such asfetch. This meant that if you needed to access a binding from a deeply nested function, you had to passenvas an argument through many functions to get it to the right spot. This could be cumbersome in complex codebases.Now, you can access the bindings from anywhere in your codebase without passing
envas an argument:// helpers.jsimport { env } from "cloudflare:workers";// env is *not* an argument to this functionexport async function getValue(key) {let prefix = env.KV_PREFIX;return await env.KV.get(`${prefix}-${key}`);}For more information, see documentation on accessing
env.
-
You can now retry your Cloudflare Pages and Workers builds directly from GitHub. No need to switch to the Cloudflare Dashboard for a simple retry!
Let’s say you push a commit, but your build fails due to a spurious error like a network timeout. Instead of going to the Cloudflare Dashboard to manually retry, you can now rerun the build with just a few clicks inside GitHub, keeping you inside your workflow.
For Pages and Workers projects connected to a GitHub repository:
- When a build fails, go to your GitHub repository or pull request
- Select the failed Check Run for the build
- Select "Details" on the Check Run
- Select "Rerun" to trigger a retry build for that commit
Learn more about Pages Builds and Workers Builds.
-
You can now debug your Workers tests with our Vitest integration by running the following command:
Terminal window vitest --inspect --no-file-parallelismAttach a debugger to the port 9229 and you can start stepping through your Workers tests. This is available with
@cloudflare/vitest-pool-workersv0.7.5 or later.Learn more in our documentation.
-
A new beta release for the macOS WARP client is now available on the Downloads page. This release contains significant improvements to our captive portal / public Wi-Fi detection logic. If you have experienced captive portal issues in the past, re-test and give this version a try.
Changes and improvements
- Improved captive portal detection to make more public networks compatible and have faster detection.
- Improved error messages shown in the app.
- WARP tunnel protocol details can now be viewed using the
warp-cli tunnel statscommand. - Fixed issue with device revocation and re-registration when switching configurations.
Known issues
- macOS Sequoia: Due to changes Apple introduced in macOS 15.0.x, the WARP client may not behave as expected. Cloudflare recommends the use of macOS 15.3 or later.
-
We've released the next major version of Wrangler, the CLI for Cloudflare Workers —
wrangler@4.0.0. Wrangler v4 is a major release focused on updates to underlying systems and dependencies, along with improvements to keep Wrangler commands consistent and clear.You can run the following command to install it in your projects:
Terminal window npm i wrangler@latestTerminal window pnpm add wrangler@latestTerminal window yarn add wrangler@latestUnlike previous major versions of Wrangler, which were foundational rewrites ↗ and rearchitectures ↗ — Version 4 of Wrangler includes a much smaller set of changes. If you use Wrangler today, your workflow is very unlikely to change.
A detailed migration guide is available and if you find a bug or hit a roadblock when upgrading to Wrangler v4, open an issue on the
cloudflare/workers-sdkrepository on GitHub ↗.Going forward, we'll continue supporting Wrangler v3 with bug fixes and security updates until Q1 2026, and with critical security updates until Q1 2027, at which point it will be out of support.
-
We’re removing some of the restrictions in Email Routing so that AI Agents and task automation can better handle email workflows, including how Workers can reply to incoming emails.
It's now possible to keep a threaded email conversation with an Email Worker script as long as:
- The incoming email has to have valid DMARC ↗.
- The email can only be replied to once in the same
EmailMessageevent. - The recipient in the reply must match the incoming sender.
- The outgoing sender domain must match the same domain that received the email.
- Every time an email passes through Email Routing or another MTA, an entry is added to the
Referenceslist. We stop accepting replies to emails with more than 100Referencesentries to prevent abuse or accidental loops.
Here's an example of a Worker responding to Emails using a Workers AI model:
AI model responding to emails import PostalMime from "postal-mime";import {createMimeMessage} from "mimetext"import { EmailMessage } from "cloudflare:email";export default {async email(message, env, ctx) {const email = await PostalMime.parse(message.raw)const res = await env.AI.run('@cf/meta/llama-2-7b-chat-fp16', {messages: [{role: "user",content: email.text ?? ''}]})// message-id is generated by mimetextconst response = createMimeMessage()response.setHeader("In-Reply-To", message.headers.get("Message-ID")!);response.setSender("agent@example.com");response.setRecipient(message.from);response.setSubject("Llama response");response.addMessage({contentType: 'text/plain',data: res instanceof ReadableStream ? await new Response(res).text() : res.response!})const replyMessage = new EmailMessage("<email>", message.from, response.asRaw());await message.reply(replyMessage)}} satisfies ExportedHandler<Env>;See Reply to emails from Workers for more information.
-
You can now access environment variables and secrets on
process.envwhen using thenodejs_compatcompatability flag.const apiClient = ApiClient.new({ apiKey: process.env.API_KEY });const LOG_LEVEL = process.env.LOG_LEVEL || "info";In Node.js, environment variables are exposed via the global
process.envobject. Some libraries assume that this object will be populated, and many developers may be used to accessing variables in this way.Previously, the
process.envobject was always empty unless written to in Worker code. This could cause unexpected errors or friction when developing Workers using code previously written for Node.js.Now, environment variables, secrets, and version metadata can all be accessed on
process.env.To opt-in to the new
process.envbehaviour now, add thenodejs_compat_populate_process_envcompatibility flag to yourwrangler.jsonconfiguration:{// Rest of your configuration// Add "nodejs_compat_populate_process_env" to your compatibility_flags array"compatibility_flags": ["nodejs_compat", "nodejs_compat_populate_process_env"],// Rest of your configurationcompatibility_flags = [ "nodejs_compat", "nodejs_compat_populate_process_env" ]After April 1, 2025, populating
process.envwill become the default behavior when bothnodejs_compatis enabled and your Worker'scompatibility_dateis after "2025-04-01".
-
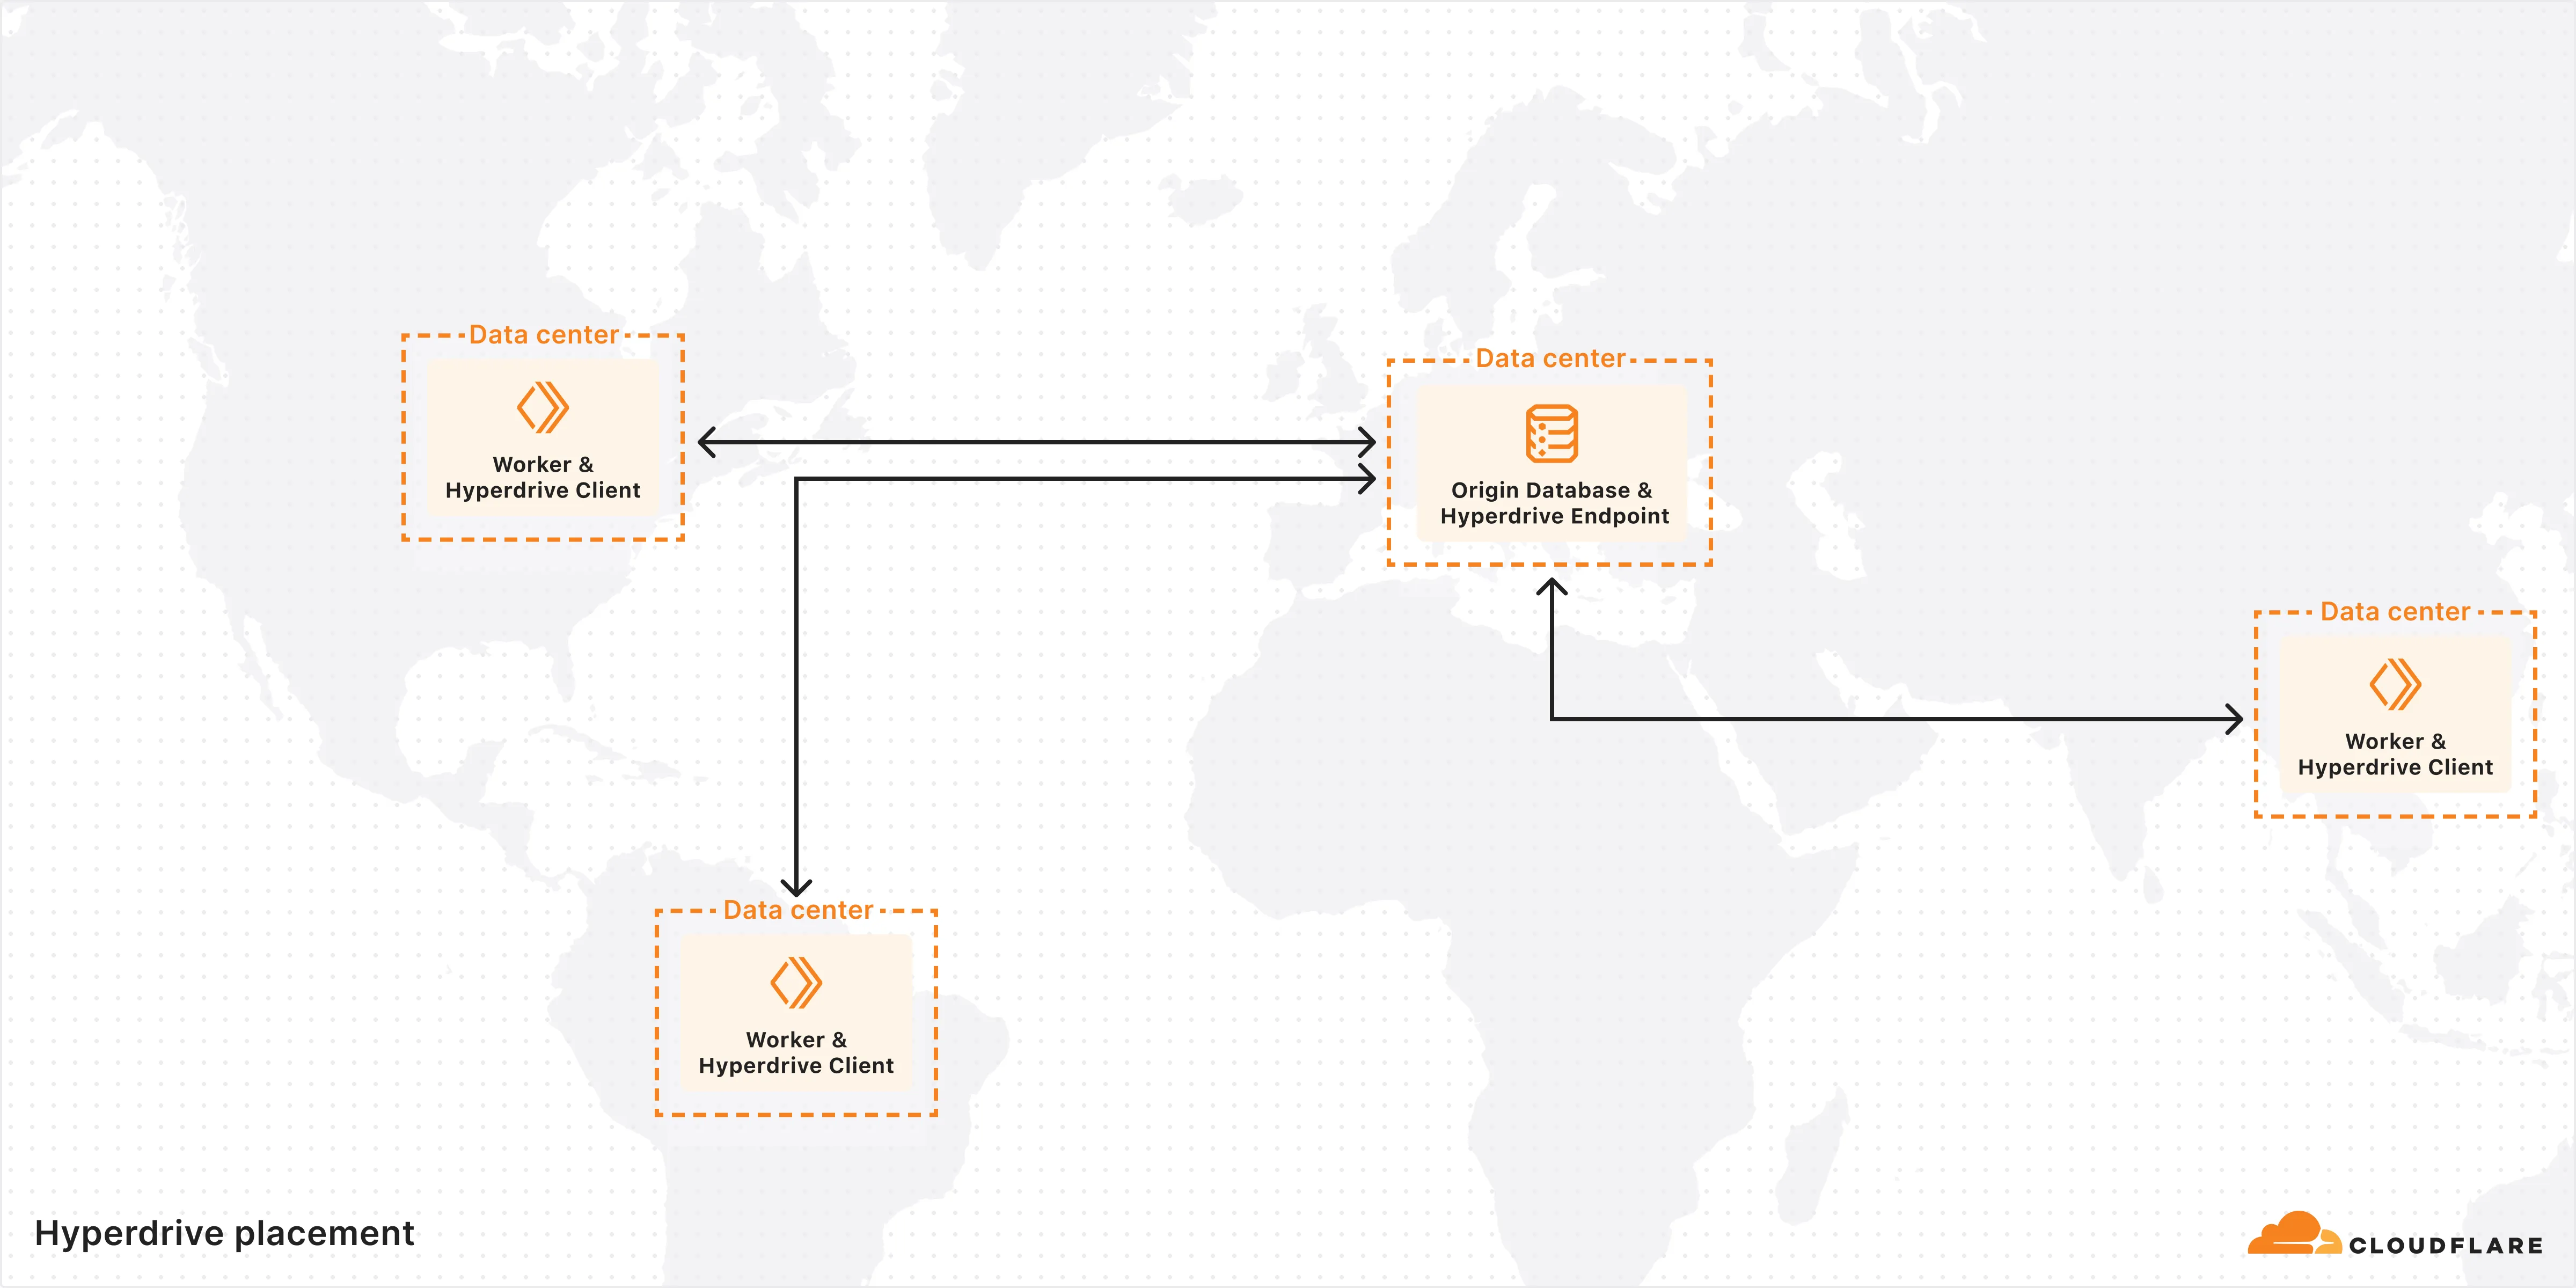
Hyperdrive now pools database connections in one or more regions close to your database. This means that your uncached queries and new database connections have up to 90% less latency as measured from connection pools.
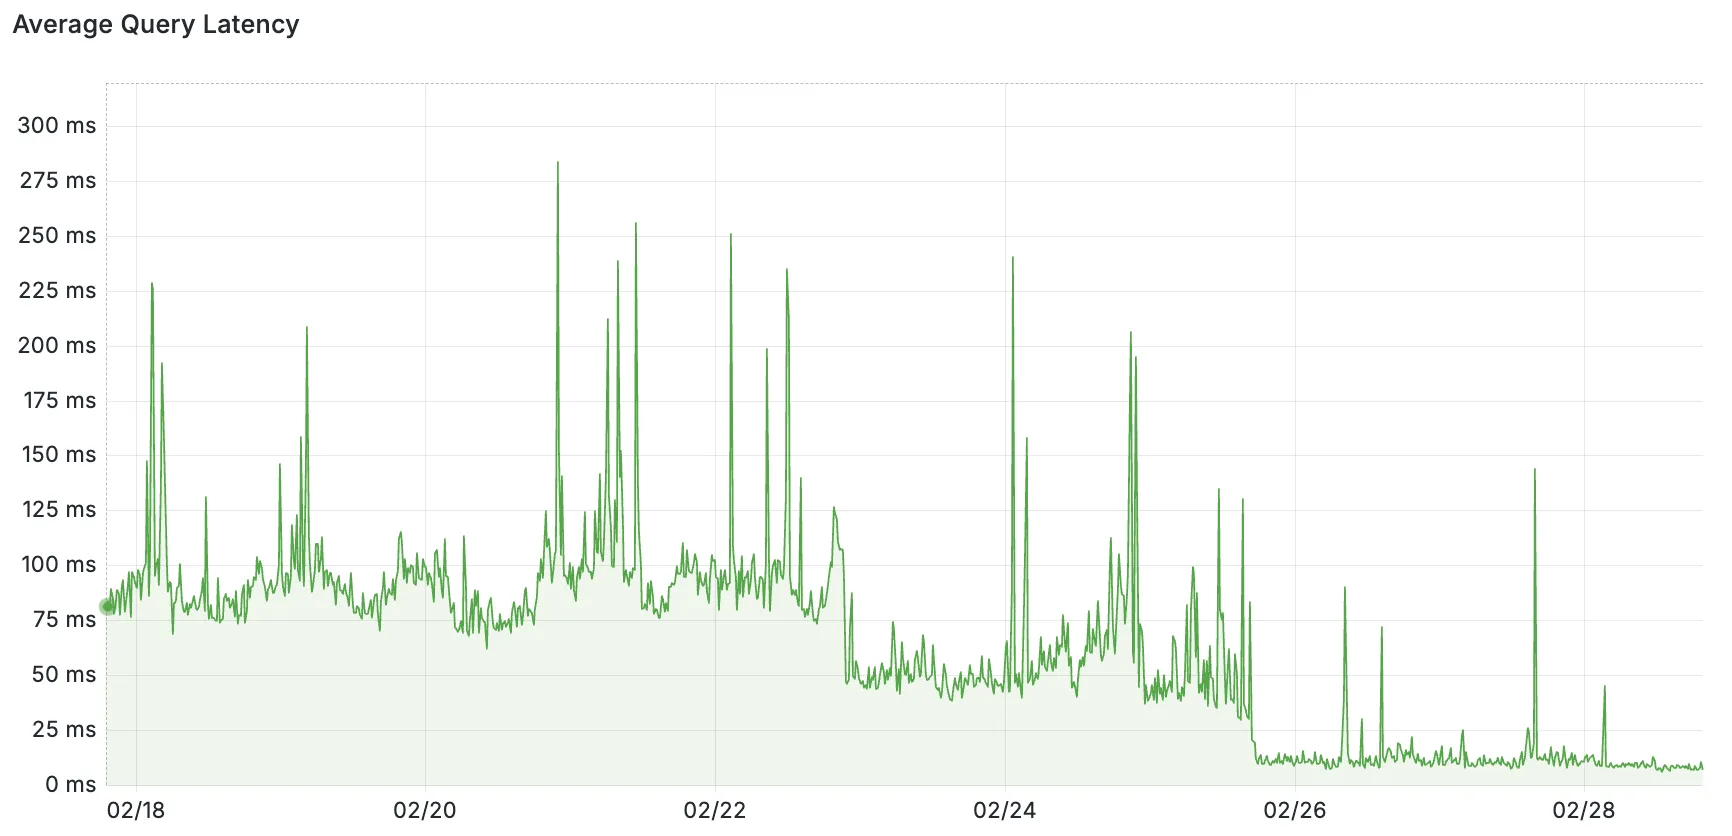
By improving placement of Hyperdrive database connection pools, Workers' Smart Placement is now more effective when used with Hyperdrive, ensuring that your Worker can be placed as close to your database as possible.
With this update, Hyperdrive also uses Cloudflare's standard IP address ranges ↗ to connect to your database. This enables you to configure the firewall policies (IP access control lists) of your database to only allow access from Cloudflare and Hyperdrive.
Refer to documentation on how Hyperdrive makes connecting to regional databases from Cloudflare Workers fast.
This improvement is enabled on all Hyperdrive configurations.
-
Digital Experience Monitoring (DEX) provides visibility into device, network, and application performance across your Cloudflare SASE deployment. The latest release of the Cloudflare One agent (v2025.1.861) now includes device endpoint monitoring capabilities to provide deeper visibility into end-user device performance which can be analyzed directly from the dashboard.
Device health metrics are now automatically collected, allowing administrators to:
- View the last network a user was connected to
- Monitor CPU and RAM utilization on devices
- Identify resource-intensive processes running on endpoints
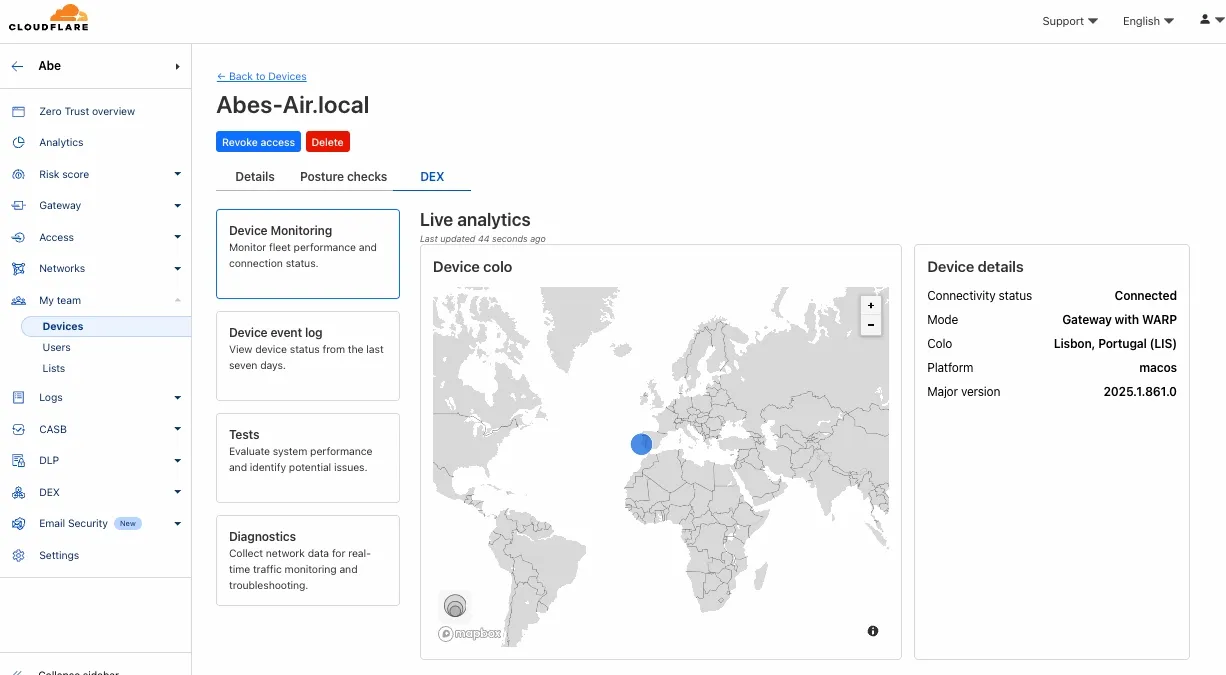
This feature complements existing DEX features like synthetic application monitoring and network path visualization, creating a comprehensive troubleshooting workflow that connects application performance with device state.
For more details refer to our DEX documentation.
-
Today, we are thrilled to announce Media Transformations, a new service that brings the magic of Image Transformations to short-form video files, wherever they are stored!
For customers with a huge volume of short video — generative AI output, e-commerce product videos, social media clips, or short marketing content — uploading those assets to Stream is not always practical. Sometimes, the greatest friction to getting started was the thought of all that migrating. Customers want a simpler solution that retains their current storage strategy to deliver small, optimized MP4 files. Now you can do that with Media Transformations.
To transform a video or image, enable transformations for your zone, then make a simple request with a specially formatted URL. The result is an MP4 that can be used in an HTML video element without a player library. If your zone already has Image Transformations enabled, then it is ready to optimize videos with Media Transformations, too.
URL format https://example.com/cdn-cgi/media/<OPTIONS>/<SOURCE-VIDEO>For example, we have a short video of the mobile in Austin's office. The original is nearly 30 megabytes and wider than necessary for this layout. Consider a simple width adjustment:
Example URL https://example.com/cdn-cgi/media/width=640/<SOURCE-VIDEO>https://developers.cloudflare.com/cdn-cgi/media/width=640/https://pub-d9fcbc1abcd244c1821f38b99017347f.r2.dev/aus-mobile.mp4The result is less than 3 megabytes, properly sized, and delivered dynamically so that customers do not have to manage the creation and storage of these transformed assets.
For more information, learn about Transforming Videos.
-
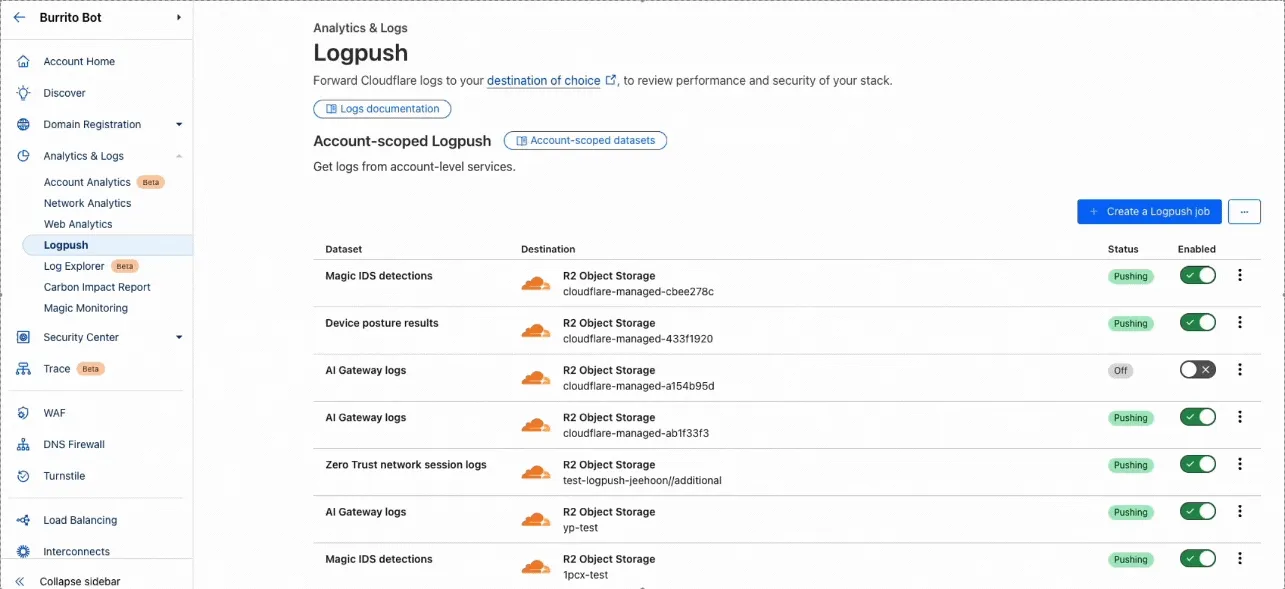
We’ve streamlined the Logpush setup process by integrating R2 bucket creation directly into the Logpush workflow!
Now, you no longer need to navigate multiple pages to manually create an R2 bucket or copy credentials. With this update, you can seamlessly configure a Logpush job to R2 in just one click, reducing friction and making setup faster and easier.
This enhancement makes it easier for customers to adopt Logpush and R2.
For more details refer to our Logs documentation.
-
You can now use bucket locks to set retention policies on your R2 buckets (or specific prefixes within your buckets) for a specified period — or indefinitely. This can help ensure compliance by protecting important data from accidental or malicious deletion.
Locks give you a few ways to ensure your objects are retained (not deleted or overwritten). You can:
- Lock objects for a specific duration, for example 90 days.
- Lock objects until a certain date, for example January 1, 2030.
- Lock objects indefinitely, until the lock is explicitly removed.
Buckets can have up to 1,000 bucket lock rules. Each rule specifies which objects it covers (via prefix) and how long those objects must remain retained.
Here are a couple of examples showing how you can configure bucket lock rules using Wrangler:
Terminal window npx wrangler r2 bucket lock add <bucket> --name 180-days-all --retention-days 180Terminal window npx wrangler r2 bucket lock add <bucket> --name indefinite-logs --prefix logs/ --retention-indefiniteFor more information on bucket locks and how to set retention policies for objects in your R2 buckets, refer to our documentation.
-
We're excited to announce that new logging capabilities for Remote Browser Isolation (RBI) through Logpush are available in Beta starting today!
With these enhanced logs, administrators can gain visibility into end user behavior in the remote browser and track blocked data extraction attempts, along with the websites that triggered them, in an isolated session.
{"AccountID": "$ACCOUNT_ID","Decision": "block","DomainName": "www.example.com","Timestamp": "2025-02-27T23:15:06Z","Type": "copy","UserID": "$USER_ID"}User Actions available:
- Copy & Paste
- Downloads & Uploads
- Printing
Learn more about how to get started with Logpush in our documentation.
-
Access for SaaS applications now include more configuration options to support a wider array of SaaS applications.
OIDC apps now include:
- Group Filtering via RegEx
- OIDC Claim mapping from an IdP
- OIDC token lifetime control
- Advanced OIDC auth flows including hybrid and implicit flows

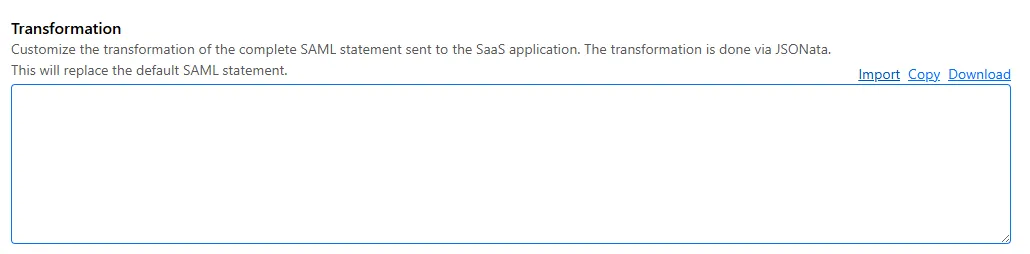
SAML apps now include improved SAML attribute mapping from an IdP.

SAML identities sent to Access applications can be fully customized using JSONata expressions. This allows admins to configure the precise identity SAML statement sent to a SaaS application.
-
We've released a release candidate of the next major version of Wrangler, the CLI for Cloudflare Workers —
wrangler@4.0.0-rc.0.You can run the following command to install it and be one of the first to try it out:
Terminal window npm i wrangler@v4-rcTerminal window pnpm add wrangler@v4-rcTerminal window yarn add wrangler@v4-rcUnlike previous major versions of Wrangler, which were foundational rewrites ↗ and rearchitectures ↗ — Version 4 of Wrangler includes a much smaller set of changes. If you use Wrangler today, your workflow is very unlikely to change. Before we release Wrangler v4 and advance past the release candidate stage, we'll share a detailed migration guide in the Workers developer docs. But for the vast majority of cases, you won't need to do anything to migrate — things will just work as they do today. We are sharing this release candidate in advance of the official release of v4, so that you can try it out early and share feedback.
Version 4 of Wrangler updates the version of esbuild ↗ that Wrangler uses internally, allowing you to use modern JavaScript language features, including:
The
usingkeyword from the Explicit Resource Management standard makes it easier to work with the JavaScript-native RPC system built into Workers. This means that when you obtain a stub, you can ensure that it is automatically disposed when you exit scope it was created in:function sendEmail(id, message) {using user = await env.USER_SERVICE.findUser(id);await user.sendEmail(message);// user[Symbol.dispose]() is implicitly called at the end of the scope.}Import attributes ↗ allow you to denote the type or other attributes of the module that your code imports. For example, you can import a JSON module, using the following syntax:
import data from "./data.json" with { type: "json" };All commands that access resources (for example,
wrangler kv,wrangler r2,wrangler d1) now access local datastores by default, ensuring consistent behavior.Moving forward, the active, maintenance, and current versions of Node.js ↗ will be officially supported by Wrangler. This means the minimum officially supported version of Node.js you must have installed for Wrangler v4 will be Node.js v18 or later. This policy mirrors how many other packages and CLIs support older versions of Node.js, and ensures that as long as you are using a version of Node.js that the Node.js project itself supports, this will be supported by Wrangler as well.
All previously deprecated features in Wrangler v2 ↗ and in Wrangler v3 ↗ have now been removed. Additionally, the following features that were deprecated during the Wrangler v3 release have been removed:
- Legacy Assets (using
wrangler dev/deploy --legacy-assetsor thelegacy_assetsconfig file property). Instead, we recommend you migrate to Workers assets ↗. - Legacy Node.js compatibility (using
wrangler dev/deploy --node-compator thenode_compatconfig file property). Instead, use thenodejs_compatcompatibility flag ↗. This includes the functionality from legacynode_compatpolyfills and natively implemented Node.js APIs. wrangler version. Instead, usewrangler --versionto check the current version of Wrangler.getBindingsProxy()(viaimport { getBindingsProxy } from "wrangler"). Instead, use thegetPlatformProxy()API ↗, which takes exactly the same arguments.usage_model. This no longer has any effect, after the rollout of Workers Standard Pricing ↗.
We'd love your feedback! If you find a bug or hit a roadblock when upgrading to Wrangler v4, open an issue on the
cloudflare/workers-sdkrepository on GitHub ↗. - Legacy Assets (using
-
Radar has expanded its DNS insights, providing visibility into aggregated traffic and usage trends observed by our 1.1.1.1 DNS resolver. In addition to global, location, and ASN traffic trends, we are also providing perspectives on protocol usage, query/response characteristics, and DNSSEC usage.
Previously limited to the
toplocations and ASes endpoints, we have now introduced the following endpoints:timeseries: Retrieves DNS query volume over time.summary: Retrieves summaries of DNS query distribution across ten different dimensions.timeseries_group: Retrieves timeseries data for DNS query distribution across ten different dimensions.
For the
summaryandtimeseries_groupsendpoints, the following dimensions are available, displaying the distribution of DNS queries based on:cache_hit: Cache status (hit vs. miss).dnsssec: DNSSEC support status (secure, insecure, invalid or other).dnsssec_aware: DNSSEC client awareness (aware vs. not-aware).dnsssec_e2e: End-to-end security (secure vs. insecure).ip_version: IP version (IPv4 vs. IPv6).matching_answer: Matching answer status (match vs. no-match).protocol: Transport protocol (UDP, TLS, HTTPS or TCP).query_type: Query type (A,AAAA,PTR, etc.).response_code: Response code (NOERROR,NXDOMAIN,REFUSED, etc.).response_ttl: Response TTL.
Learn more about the new Radar DNS insights in our blog post ↗, and check out the new Radar page ↗.
-
We've released a new REST API for Browser Rendering in open beta, making interacting with browsers easier than ever. This new API provides endpoints for common browser actions, with more to be added in the future.
With the REST API you can:
- Capture screenshots – Use
/screenshotto take a screenshot of a webpage from provided URL or HTML. - Generate PDFs – Use
/pdfto convert web pages into PDFs. - Extract HTML content – Use
/contentto retrieve the full HTML from a page. Snapshot (HTML + Screenshot) – Use/snapshotto capture both the page's HTML and a screenshot in one request - Scrape Web Elements – Use
/scrapeto extract specific elements from a page.
For example, to capture a screenshot:
Screenshot example curl -X POST 'https://api.cloudflare.com/client/v4/accounts/<accountId>/browser-rendering/screenshot' \-H 'Authorization: Bearer <apiToken>' \-H 'Content-Type: application/json' \-d '{"html": "Hello World!","screenshotOptions": {"type": "webp","omitBackground": true}}' \--output "screenshot.webp"Learn more in our documentation.
- Capture screenshots – Use
-
AI Gateway now includes Guardrails, to help you monitor your AI apps for harmful or inappropriate content and deploy safely.
Within the AI Gateway settings, you can configure:
- Guardrails: Enable or disable content moderation as needed.
- Evaluation scope: Select whether to moderate user prompts, model responses, or both.
- Hazard categories: Specify which categories to monitor and determine whether detected inappropriate content should be blocked or flagged.

Learn more in the blog ↗ or our documentation.
-
Workers AI now supports structured JSON outputs with JSON mode, which allows you to request a structured output response when interacting with AI models.
This makes it much easier to retrieve structured data from your AI models, and avoids the (error prone!) need to parse large unstructured text responses to extract your data.
JSON mode in Workers AI is compatible with the OpenAI SDK's structured outputs ↗
response_formatAPI, which can be used directly in a Worker:import { OpenAI } from "openai";// Define your JSON schema for a calendar eventconst CalendarEventSchema = {type: "object",properties: {name: { type: "string" },date: { type: "string" },participants: { type: "array", items: { type: "string" } },},required: ["name", "date", "participants"],};export default {async fetch(request, env) {const client = new OpenAI({apiKey: env.OPENAI_API_KEY,// Optional: use AI Gateway to bring logs, evals & caching to your AI requests// https://developers.cloudflare.com/ai-gateway/providers/openai/// baseUrl: "https://gateway.ai.cloudflare.com/v1/{account_id}/{gateway_id}/openai"});const response = await client.chat.completions.create({model: "gpt-4o-2024-08-06",messages: [{ role: "system", content: "Extract the event information." },{role: "user",content: "Alice and Bob are going to a science fair on Friday.",},],// Use the `response_format` option to request a structured JSON outputresponse_format: {// Set json_schema and provide ra schema, or json_object and parse it yourselftype: "json_schema",schema: CalendarEventSchema, // provide a schema},});// This will be of type CalendarEventSchemaconst event = response.choices[0].message.parsed;return Response.json({calendar_event: event,});},};import { OpenAI } from "openai";interface Env {OPENAI_API_KEY: string;}// Define your JSON schema for a calendar eventconst CalendarEventSchema = {type: "object",properties: {name: { type: "string" },date: { type: "string" },participants: { type: "array", items: { type: "string" } },},required: ["name", "date", "participants"],};export default {async fetch(request: Request, env: Env) {const client = new OpenAI({apiKey: env.OPENAI_API_KEY,// Optional: use AI Gateway to bring logs, evals & caching to your AI requests// https://developers.cloudflare.com/ai-gateway/providers/openai/// baseUrl: "https://gateway.ai.cloudflare.com/v1/{account_id}/{gateway_id}/openai"});const response = await client.chat.completions.create({model: "gpt-4o-2024-08-06",messages: [{ role: "system", content: "Extract the event information." },{role: "user",content: "Alice and Bob are going to a science fair on Friday.",},],// Use the `response_format` option to request a structured JSON outputresponse_format: {// Set json_schema and provide ra schema, or json_object and parse it yourselftype: "json_schema",schema: CalendarEventSchema, // provide a schema},});// This will be of type CalendarEventSchemaconst event = response.choices[0].message.parsed;return Response.json({calendar_event: event,});},};To learn more about JSON mode and structured outputs, visit the Workers AI documentation.
-
Workflows now supports up to 4,500 concurrent (running) instances, up from the previous limit of 100. This limit will continue to increase during the Workflows open beta. This increase applies to all users on the Workers Paid plan, and takes effect immediately.
Review the Workflows limits documentation and/or dive into the get started guide to start building on Workflows.
-
We've released the Agents SDK ↗, a package and set of tools that help you build and ship AI Agents.
You can get up and running with a chat-based AI Agent ↗ (and deploy it to Workers) that uses the Agents SDK, tool calling, and state syncing with a React-based front-end by running the following command:
Terminal window npm create cloudflare@latest agents-starter -- --template="cloudflare/agents-starter"# open up README.md and follow the instructionsYou can also add an Agent to any existing Workers application by installing the
agentspackage directlyTerminal window npm i agents... and then define your first Agent:
import { Agent } from 'agents';export class YourAgent extends Agent<Env> {// Build it out// Access state on this.state or query the Agent's database via this.sql// Handle WebSocket events with onConnect and onMessage// Run tasks on a schedule with this.schedule// Call AI models// ... and/or call other Agents.}Head over to the Agents documentation to learn more about the Agents SDK, the SDK APIs, as well as how to test and deploying agents to production.
-
Super Slurper can now migrate data from any S3-compatible object storage provider to Cloudflare R2. This includes transfers from services like MinIO, Wasabi, Backblaze B2, and DigitalOcean Spaces.
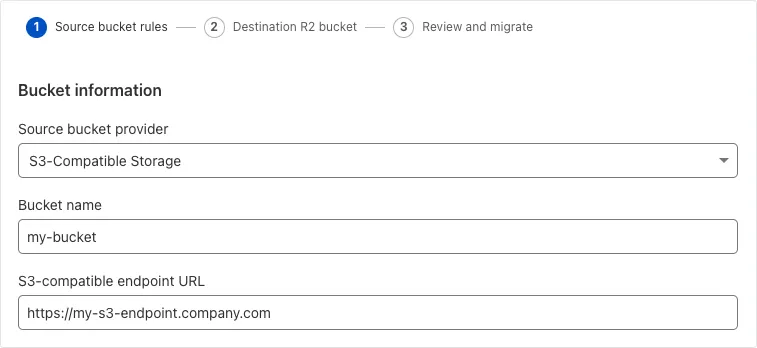
For more information on Super Slurper and how to migrate data from your existing S3-compatible storage buckets to R2, refer to our documentation.
-
You can now interact with the Images API directly in your Worker.
This allows more fine-grained control over transformation request flows and cache behavior. For example, you can resize, manipulate, and overlay images without requiring them to be accessible through a URL.
The Images binding can be configured in the Cloudflare dashboard for your Worker or in the
wrangler.tomlfile in your project's directory:{"images": {"binding": "IMAGES", // i.e. available in your Worker on env.IMAGES},}[images]binding = "IMAGES"Within your Worker code, you can interact with this binding by using
env.IMAGES.Here's how you can rotate, resize, and blur an image, then output the image as AVIF:
const info = await env.IMAGES.info(stream);// stream contains a valid image, and width/height is available on the info objectconst response = (await env.IMAGES.input(stream).transform({ rotate: 90 }).transform({ width: 128 }).transform({ blur: 20 }).output({ format: "image/avif" })).response();return response;For more information, refer to Images Bindings.
-
We've updated the Workers AI text generation models to include context windows and limits definitions and changed our APIs to estimate and validate the number of tokens in the input prompt, not the number of characters.
This update allows developers to use larger context windows when interacting with Workers AI models, which can lead to better and more accurate results.
Our catalog page provides more information about each model's supported context window.
-
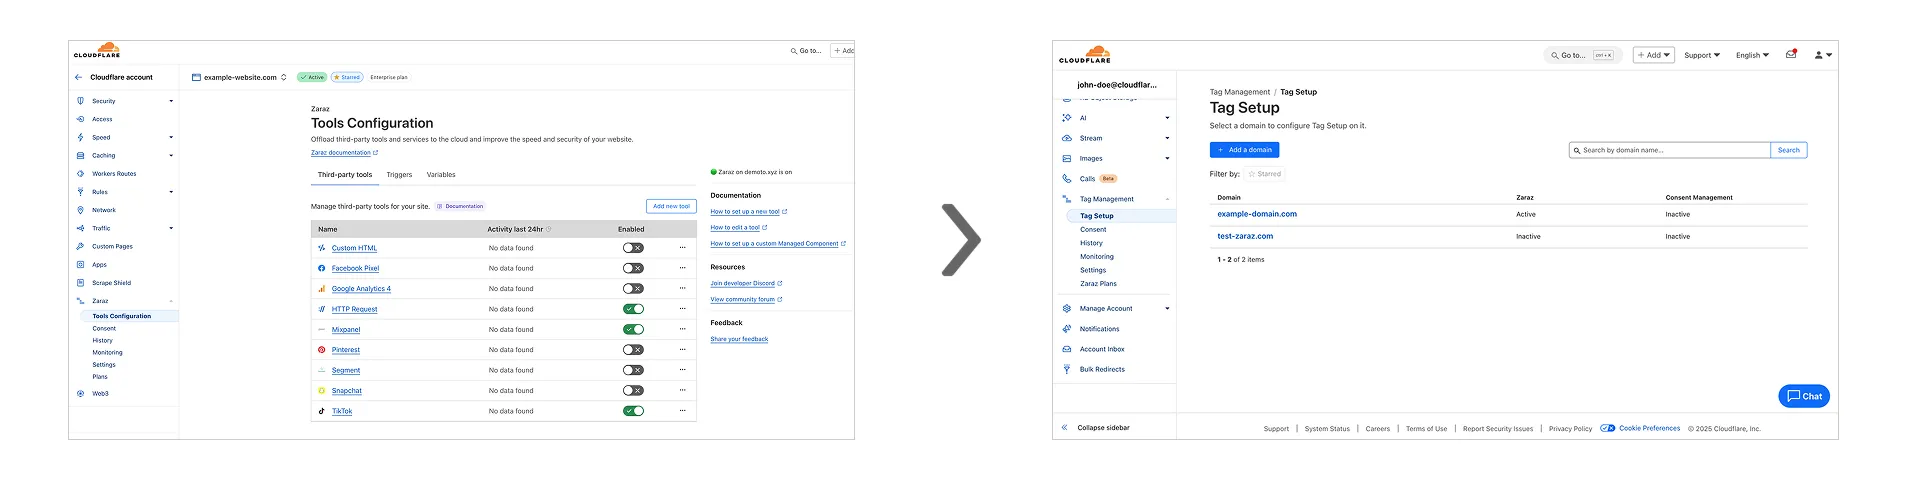
Previously, you could only configure Zaraz by going to each individual zone under your Cloudflare account. Now, if you’d like to get started with Zaraz or manage your existing configuration, you can navigate to the Tag Management ↗ section on the Cloudflare dashboard – this will make it easier to compare and configure the same settings across multiple zones.
These changes will not alter any existing configuration or entitlements for zones you already have Zaraz enabled on. If you’d like to edit existing configurations, you can go to the Tag Setup ↗ section of the dashboard, and select the zone you'd like to edit.
-
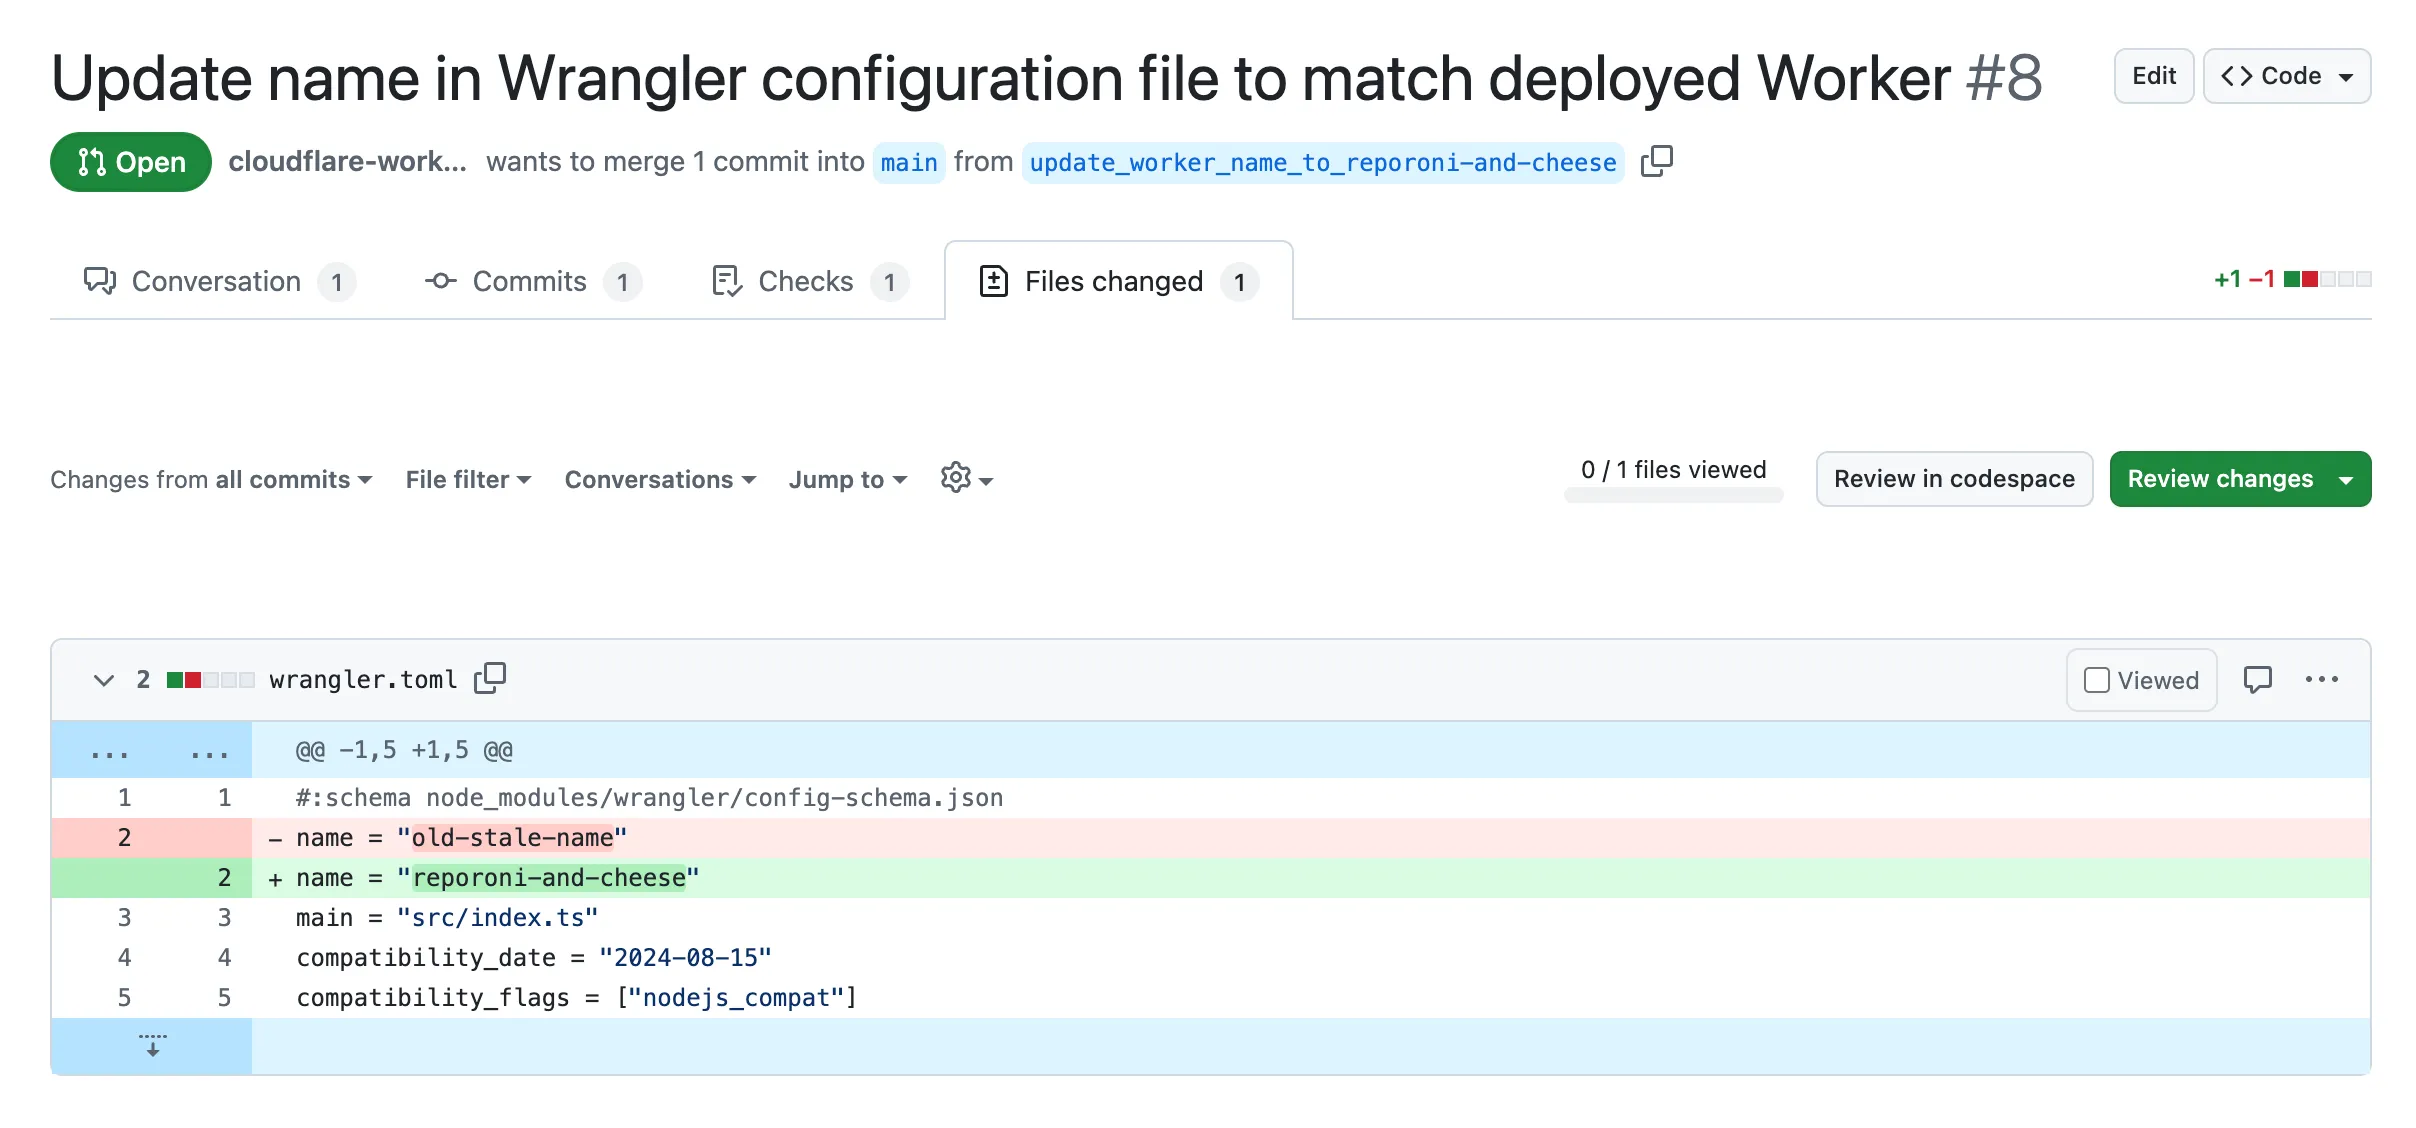
Small misconfigurations shouldn’t break your deployments. Cloudflare is introducing automatic error detection and fixes in Workers Builds, identifying common issues in your wrangler.toml or wrangler.jsonc and proactively offering fixes, so you spend less time debugging and more time shipping.
Here's how it works:
- Before running your build, Cloudflare checks your Worker's Wrangler configuration file (wrangler.toml or wrangler.jsonc) for common errors.
- Once you submit a build, if Cloudflare finds an error it can fix, it will submit a pull request to your repository that fixes it.
- Once you merge this pull request, Cloudflare will run another build.
We're starting with fixing name mismatches between your Wrangler file and the Cloudflare dashboard, a top cause of build failures.
This is just the beginning, we want your feedback on what other errors we should catch and fix next. Let us know in the Cloudflare Developers Discord, #workers-and-pages-feature-suggestions ↗.
-
We've updated the Workers AI pricing to include the latest models and how model usage maps to Neurons.
- Each model's core input format(s) (tokens, audio seconds, images, etc) now include mappings to Neurons, making it easier to understand how your included Neuron volume is consumed and how you are charged at scale
- Per-model pricing, instead of the previous bucket approach, allows us to be more flexible on how models are charged based on their size, performance and capabilities. As we optimize each model, we can then pass on savings for that model.
- You will still only pay for what you consume: Workers AI inference is serverless, and not billed by the hour.
Going forward, models will be launched with their associated Neuron costs, and we'll be updating the Workers AI dashboard and API to reflect consumption in both raw units and Neurons. Visit the Workers AI pricing page to learn more about Workers AI pricing.
-
We've added an example prompt to help you get started with building AI agents and applications on Cloudflare Workers, including Workflows, Durable Objects, and Workers KV.
You can use this prompt with your favorite AI model, including Claude 3.5 Sonnet, OpenAI's o3-mini, Gemini 2.0 Flash, or Llama 3.3 on Workers AI. Models with large context windows will allow you to paste the prompt directly: provide your own prompt within the
<user_prompt></user_prompt>tags.Terminal window {paste_prompt_here}<user_prompt>user: Build an AI agent using Cloudflare Workflows. The Workflow should run when a new GitHub issue is opened on a specific project with the label 'help' or 'bug', and attempt to help the user troubleshoot the issue by calling the OpenAI API with the issue title and description, and a clear, structured prompt that asks the model to suggest 1-3 possible solutions to the issue. Any code snippets should be formatted in Markdown code blocks. Documentation and sources should be referenced at the bottom of the response. The agent should then post the response to the GitHub issue. The agent should run as the provided GitHub bot account.</user_prompt>This prompt is still experimental, but we encourage you to try it out and provide feedback ↗.
-
Super Slurper now transfers data from cloud object storage providers like AWS S3 and Google Cloud Storage to Cloudflare R2 up to 5x faster than it did before.
We moved from a centralized service to a distributed system built on the Cloudflare Developer Platform — using Cloudflare Workers, Durable Objects, and Queues — to both improve performance and increase system concurrency capabilities (and we'll share more details about how we did it soon!)
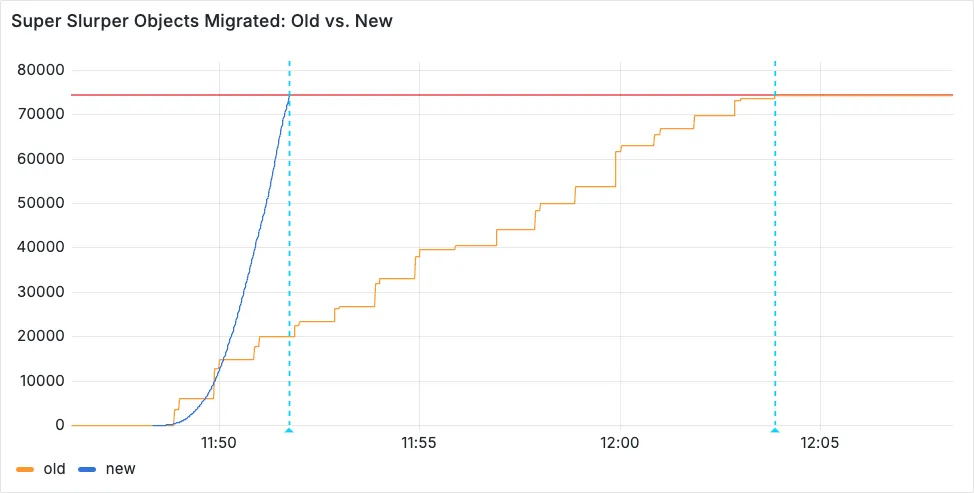
Time to copy 75,000 objects from AWS S3 to R2 decreased from 15 minutes 30 seconds (old) to 3 minutes 25 seconds (after performance improvements)
For more information on Super Slurper and how to migrate data from existing object storage to R2, refer to our documentation.
-
You can now customize a queue's message retention period, from a minimum of 60 seconds to a maximum of 14 days. Previously, it was fixed to the default of 4 days.
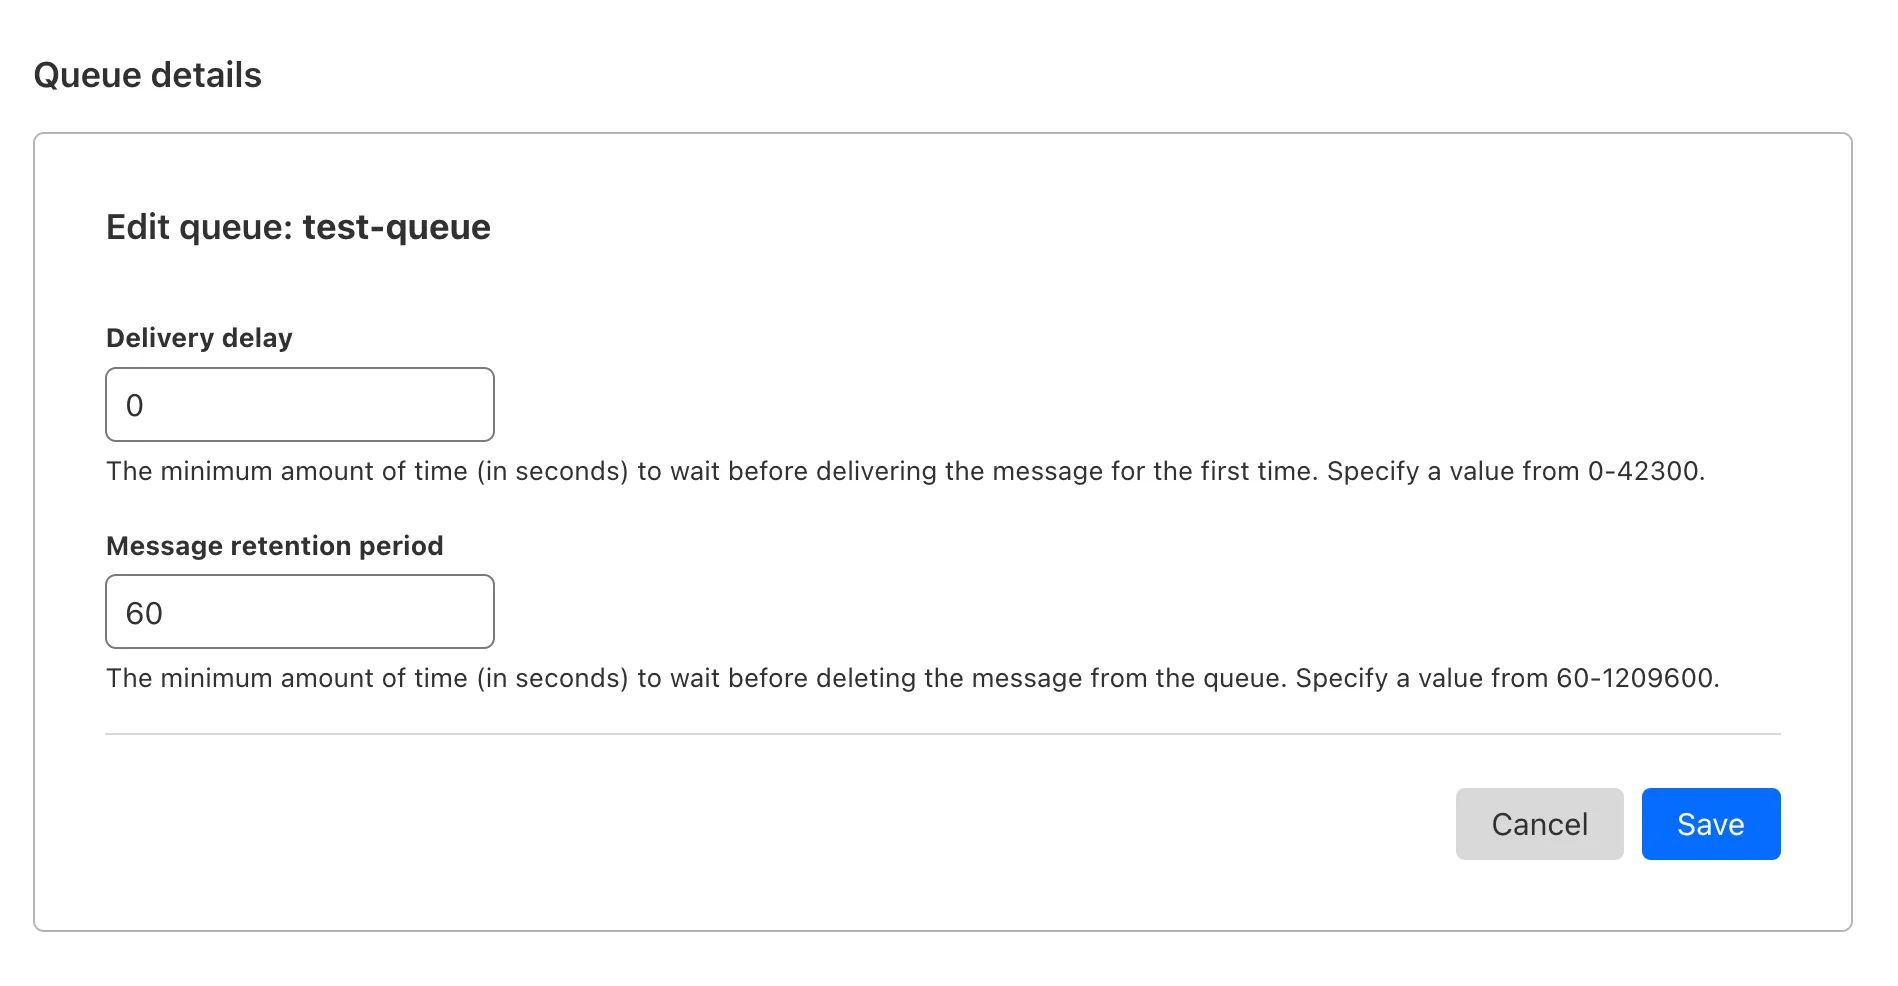
You can customize the retention period on the settings page for your queue, or using Wrangler:
Update message retention period $ wrangler queues update my-queue --message-retention-period-secs 600This feature is available on all new and existing queues. If you haven't used Cloudflare Queues before, get started with the Cloudflare Queues guide.
-
Previously, all viewers watched "the live edge," or the latest content of the broadcast, synchronously. If a viewer paused for more than a few seconds, the player would automatically "catch up" when playback started again. Seeking through the broadcast was only available once the recording was available after it conluded.
Starting today, customers can make a small adjustment to the player embed or manifest URL to enable the DVR experience for their viewers. By offering this feature as an opt-in adjustment, our customers are empowered to pick the best experiences for their applications.
When building a player embed code or manifest URL, just add
dvrEnabled=trueas a query parameter. There are some things to be aware of when using this option. For more information, refer to DVR for Live.
-
You can now locally configure your Magic WAN Connector to work in a static IP configuration.
This local method does not require having access to a DHCP Internet connection. However, it does require being comfortable with using tools to access the serial port on Magic WAN Connector as well as using a serial terminal client to access the Connector's environment.
For more details, refer to WAN with a static IP address.
-
Cloudflare has supported both RSA and ECDSA certificates across our platform for a number of years. Both certificates offer the same security, but ECDSA is more performant due to a smaller key size. However, RSA is more widely adopted and ensures compatibility with legacy clients. Instead of choosing between them, you may want both – that way, ECDSA is used when clients support it, but RSA is available if not.
Now, you can upload both an RSA and ECDSA certificate on a custom hostname via the API.
curl -X POST https://api.cloudflare.com/client/v4/zones/$ZONE_ID/custom_hostnames \-H 'Content-Type: application/json' \-H "X-Auth-Email: $CLOUDFLARE_EMAIL" \-H "X-Auth-Key: $CLOUDFLARE_API_KEY" \-d '{"hostname": "hostname","ssl": {"custom_cert_bundle": [{"custom_certificate": "RSA Cert","custom_key": "RSA Key"},{"custom_certificate": "ECDSA Cert","custom_key": "ECDSA Key"}],"bundle_method": "force","wildcard": false,"settings": {"min_tls_version": "1.0"}}}’You can also:
-
Upload an RSA or ECDSA certificate to a custom hostname with an existing ECDSA or RSA certificate, respectively.
-
Replace the RSA or ECDSA certificate with a certificate of its same type.
-
Delete the RSA or ECDSA certificate (if the custom hostname has both an RSA and ECDSA uploaded).
This feature is available for Business and Enterprise customers who have purchased custom certificates.
-
-
We have upgraded and streamlined Cloudflare Rules limits across all plans, simplifying rule management and improving scalability for everyone.
New limits by product:
- Bulk Redirects
- Free: 20 → 10,000 URL redirects across lists
- Pro: 500 → 25,000 URL redirects across lists
- Business: 500 → 50,000 URL redirects across lists
- Enterprise: 10,000 → 1,000,000 URL redirects across lists
- Cloud Connector
- Free: 5 → 10 connectors
- Enterprise: 125 → 300 connectors
- Custom Errors
- Pro: 5 → 25 error assets and rules
- Business: 20 → 50 error assets and rules
- Enterprise: 50 → 300 error assets and rules
- Snippets
- Pro: 10 → 25 code snippets and rules
- Business: 25 → 50 code snippets and rules
- Enterprise: 50 → 300 code snippets and rules
- Cache Rules, Configuration Rules, Compression Rules, Origin Rules, Single Redirects, and Transform Rules
- Enterprise: 125 → 300 rules
- Bulk Redirects
-
We're introducing Custom Errors (beta), which builds on our existing Custom Error Responses feature with new asset storage capabilities.
This update allows you to store externally hosted error pages on Cloudflare and reference them in custom error rules, eliminating the need to supply inline content.
This brings the following new capabilities:
- Custom error assets – Fetch and store external error pages at the edge for use in error responses.
- Account-Level custom errors – Define error handling rules and assets at the account level for consistency across multiple zones. Zone-level rules take precedence over account-level ones, and assets are not shared between levels.
You can use Cloudflare API to upload your existing assets for use with Custom Errors:
Terminal window curl "https://api.cloudflare.com/client/v4/zones/{zone_id}/custom_pages/assets" \--header "Authorization: Bearer <API_TOKEN>" \--header 'Content-Type: application/json' \--data '{"name": "maintenance","description": "Maintenance template page","url": "https://example.com/"}'You can then reference the stored asset in a Custom Error rule:
Terminal window curl --request PUT \"https://api.cloudflare.com/client/v4/zones/{zone_id}/rulesets/phases/http_custom_errors/entrypoint" \--header "Authorization: Bearer <API_TOKEN>" \--header 'Content-Type: application/json' \--data '{"rules": [{"action": "serve_error","action_parameters": {"asset_name": "maintenance","content_type": "text/html","status_code": 503},"enabled": true,"expression": "http.request.uri.path contains \"error\""}]}'
-
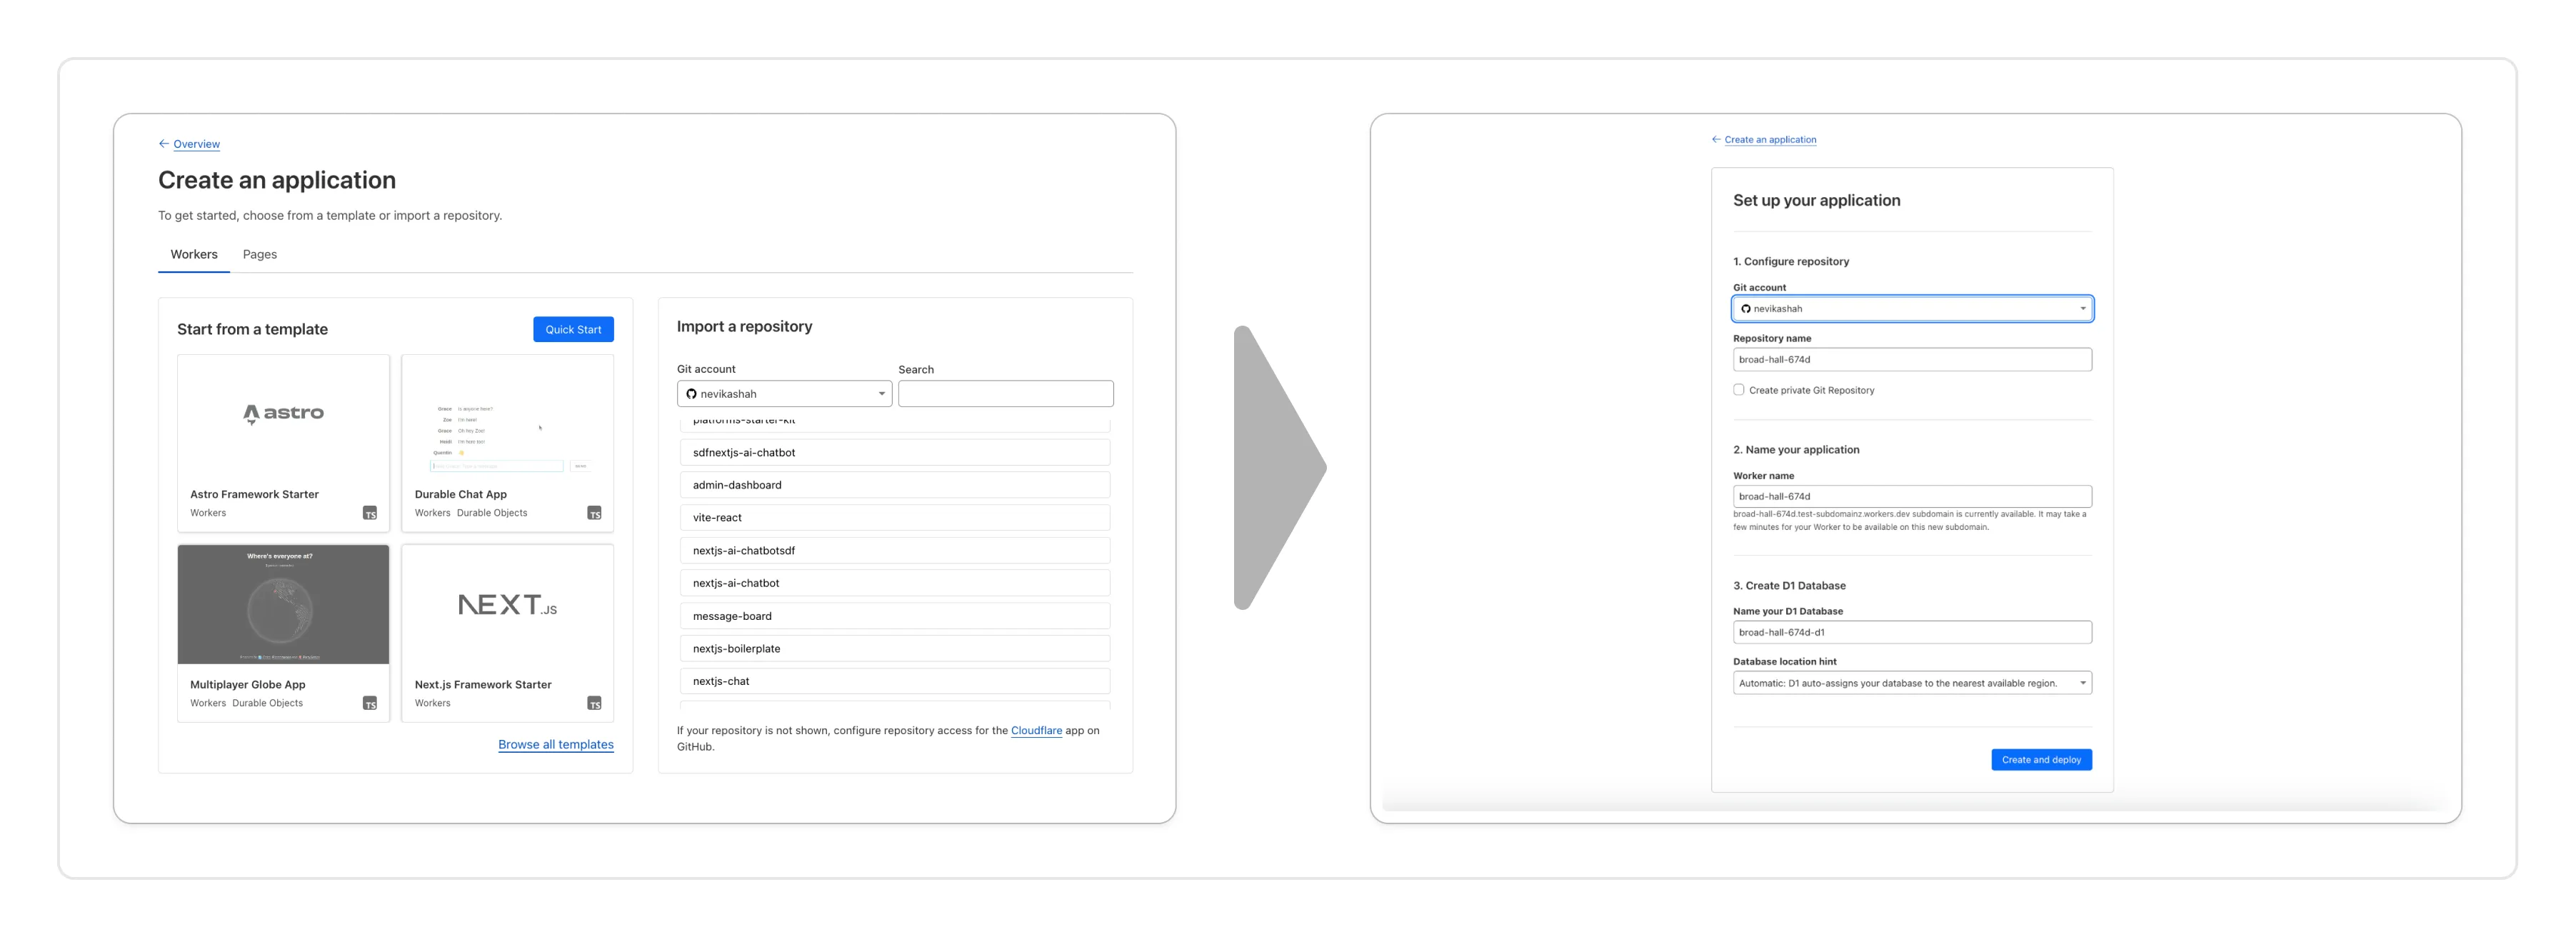
You can now create a Worker by:
- Importing a Git repository: Choose an existing Git repo on your GitHub/GitLab account and set up Workers Builds to deploy your Worker.
- Deploying a template with Git: Choose from a brand new selection of production ready examples ↗ to help you get started with popular frameworks like Astro ↗, Remix ↗ and Next ↗ or build stateful applications with Cloudflare resources like D1 databases, Workers AI or Durable Objects! When you're ready to deploy, Cloudflare will set up your project by cloning the template to your GitHub/GitLab account, provisioning any required resources and deploying your Worker.
With every push to your chosen branch, Cloudflare will automatically build and deploy your Worker.
To get started, go to the Workers dashboard ↗.
These new features are available today in the Cloudflare dashboard to a subset of Cloudflare customers, and will be coming to all customers in the next few weeks. Don't see it in your dashboard, but want early access? Add your Cloudflare Account ID to this form ↗.
-
AI Gateway adds additional ways to handle requests - Request Timeouts and Request Retries, making it easier to keep your applications responsive and reliable.
Timeouts and retries can be used on both the Universal Endpoint or directly to a supported provider.
Request timeouts A request timeout allows you to trigger fallbacks or a retry if a provider takes too long to respond.
To set a request timeout directly to a provider, add a
cf-aig-request-timeoutheader.Provider-specific endpoint example curl https://gateway.ai.cloudflare.com/v1/{account_id}/{gateway_id}/workers-ai/@cf/meta/llama-3.1-8b-instruct \--header 'Authorization: Bearer {cf_api_token}' \--header 'Content-Type: application/json' \--header 'cf-aig-request-timeout: 5000'--data '{"prompt": "What is Cloudflare?"}'Request retries A request retry automatically retries failed requests, so you can recover from temporary issues without intervening.
To set up request retries directly to a provider, add the following headers:
- cf-aig-max-attempts (number)
- cf-aig-retry-delay (number)
- cf-aig-backoff ("constant" | "linear" | "exponential)
-
AI Gateway has added three new providers: Cartesia, Cerebras, and ElevenLabs, giving you more even more options for providers you can use through AI Gateway. Here's a brief overview of each:
- Cartesia provides text-to-speech models that produce natural-sounding speech with low latency.
- Cerebras delivers low-latency AI inference to Meta's Llama 3.1 8B and Llama 3.3 70B models.
- ElevenLabs offers text-to-speech models with human-like voices in 32 languages.
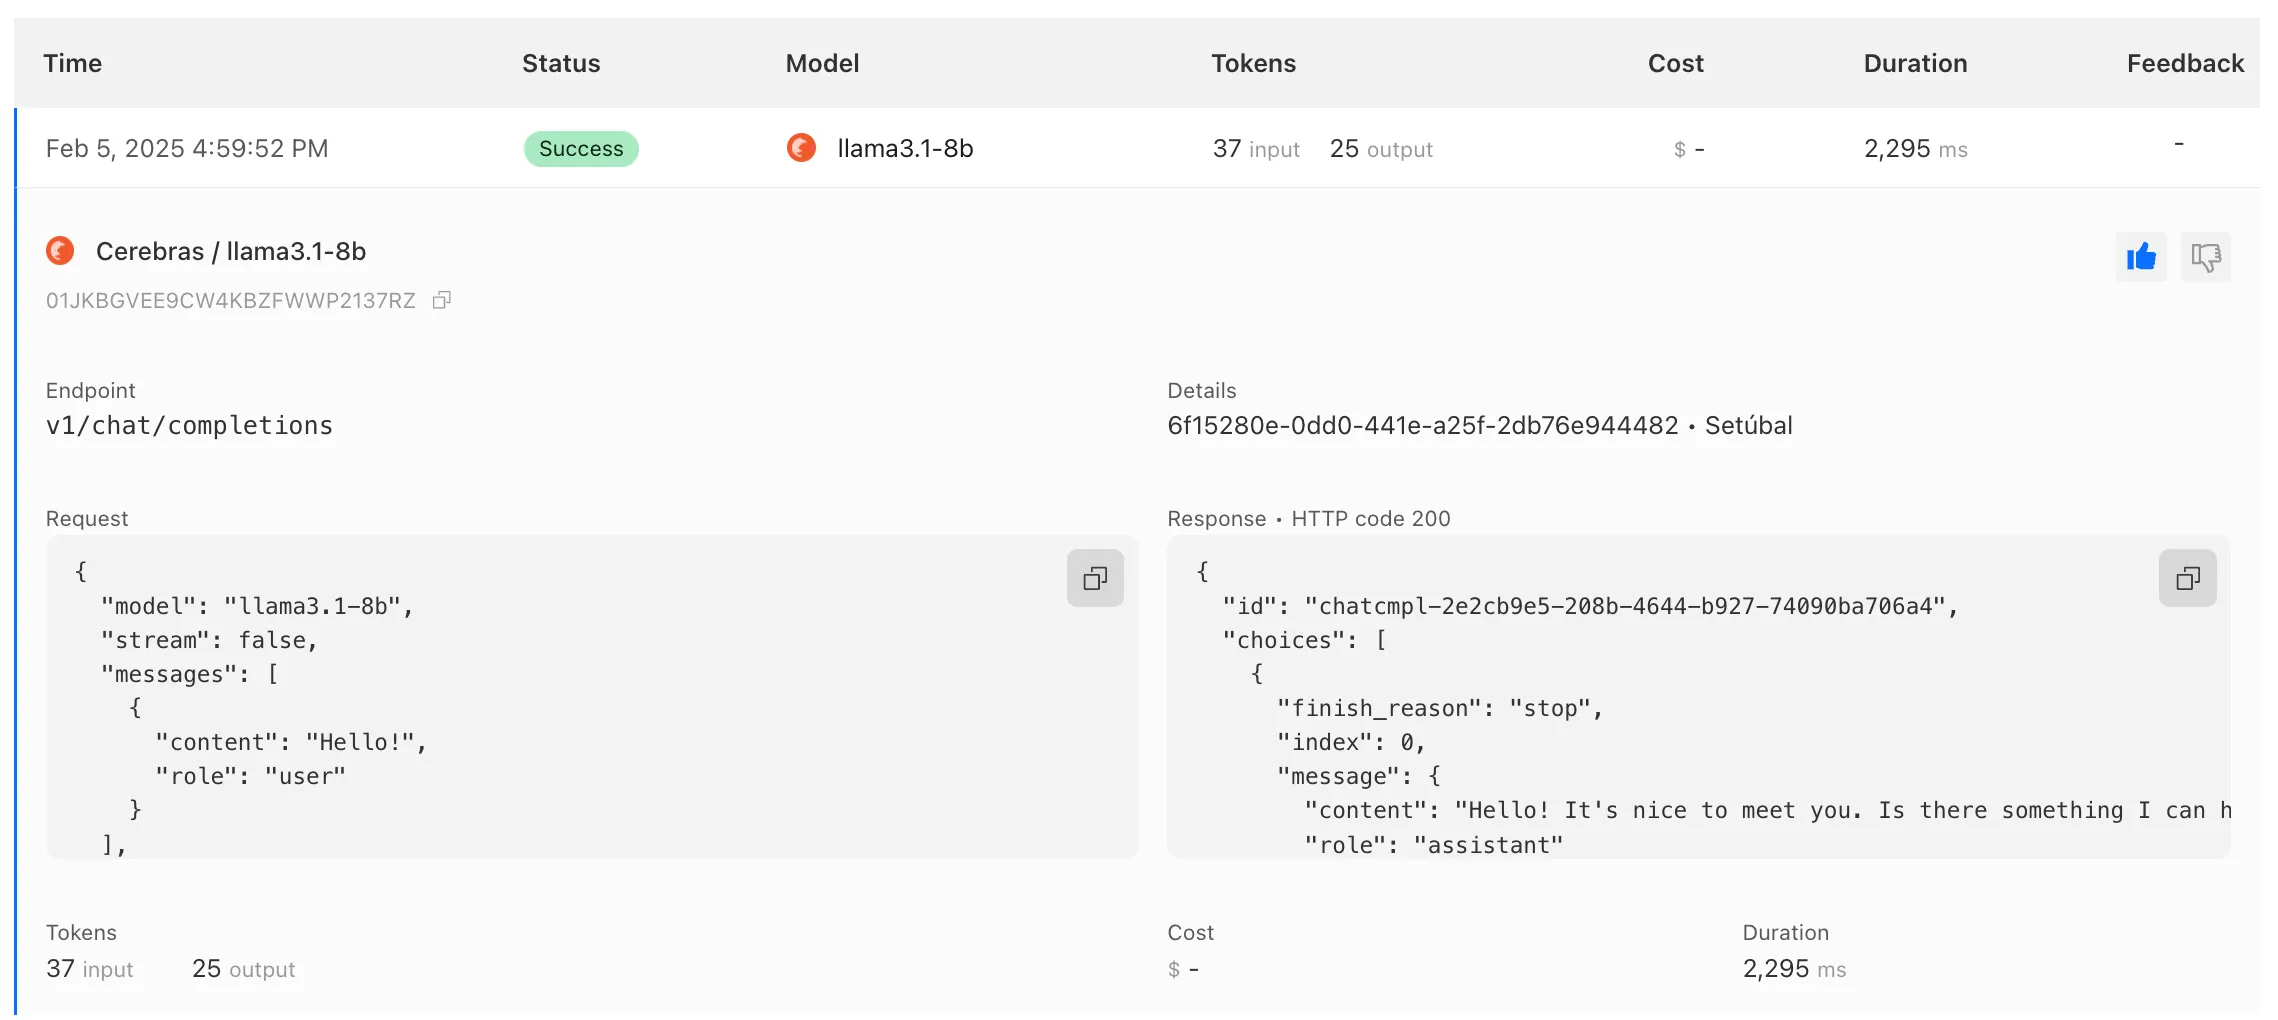
To get started with AI Gateway, just update the base URL. Here's how you can send a request to Cerebras using cURL:
Example fetch request curl -X POST https://gateway.ai.cloudflare.com/v1/ACCOUNT_TAG/GATEWAY/cerebras/chat/completions \--header 'content-type: application/json' \--header 'Authorization: Bearer CEREBRAS_TOKEN' \--data '{"model": "llama-3.3-70b","messages": [{"role": "user","content": "What is Cloudflare?"}]}'
-
You can now implement our child safety tooling, the CSAM Scanning Tool, more easily. Instead of requiring external reporting credentials, you only need a verified email address for notifications to onboard. This change makes the tool more accessible to a wider range of customers.
When enabled, the tool automatically hashes images for enabled websites as they enter the Cloudflare cache ↗. These hashes are then checked against a database of known abusive images.
- Potential match detected?
- The content URL is blocked, and
- Cloudflare will notify you about the found matches via the provided email address.
We have also made updates to our Service-Specific Terms ↗ to reflect these changes.
- Potential match detected?
-
Radar has expanded its AI insights with new API endpoints for Internet services rankings, robots.txt analysis, and AI inference data.
Radar now provides rankings for Internet services, including Generative AI platforms, based on anonymized 1.1.1.1 resolver data. Previously limited to the annual Year in Review, these insights are now available daily via the API, through the following endpoints:
topshow service popularity at a specific date.timeseries_groupstrack ranking trends over time.
Radar now analyzes robots.txt files from the top 10,000 domains, identifying AI bot access rules. AI-focused user agents from ai.robots.txt ↗ are categorized as:
- Fully allowed/disallowed if directives apply to all paths (
*). - Partially allowed/disallowed if restrictions apply to specific paths.
These insights are now available weekly via the API, through the following endpoints:
top/user_agents/directiveto get the top AI user agents by directive.top/domain_categoriesto get the top domain categories by robots.txt files.
Radar now provides insights into public AI inference models from Workers AI, tracking usage trends across models and tasks. These insights are now available via the API, through the following endpoints:
summaryto view aggregatedmodelandtaskpopularity.timeseries_groupsto track changes over time formodelortask.
Learn more about the new Radar AI insights in our blog post ↗.
-
We've revamped the Workers Metrics dashboard ↗.
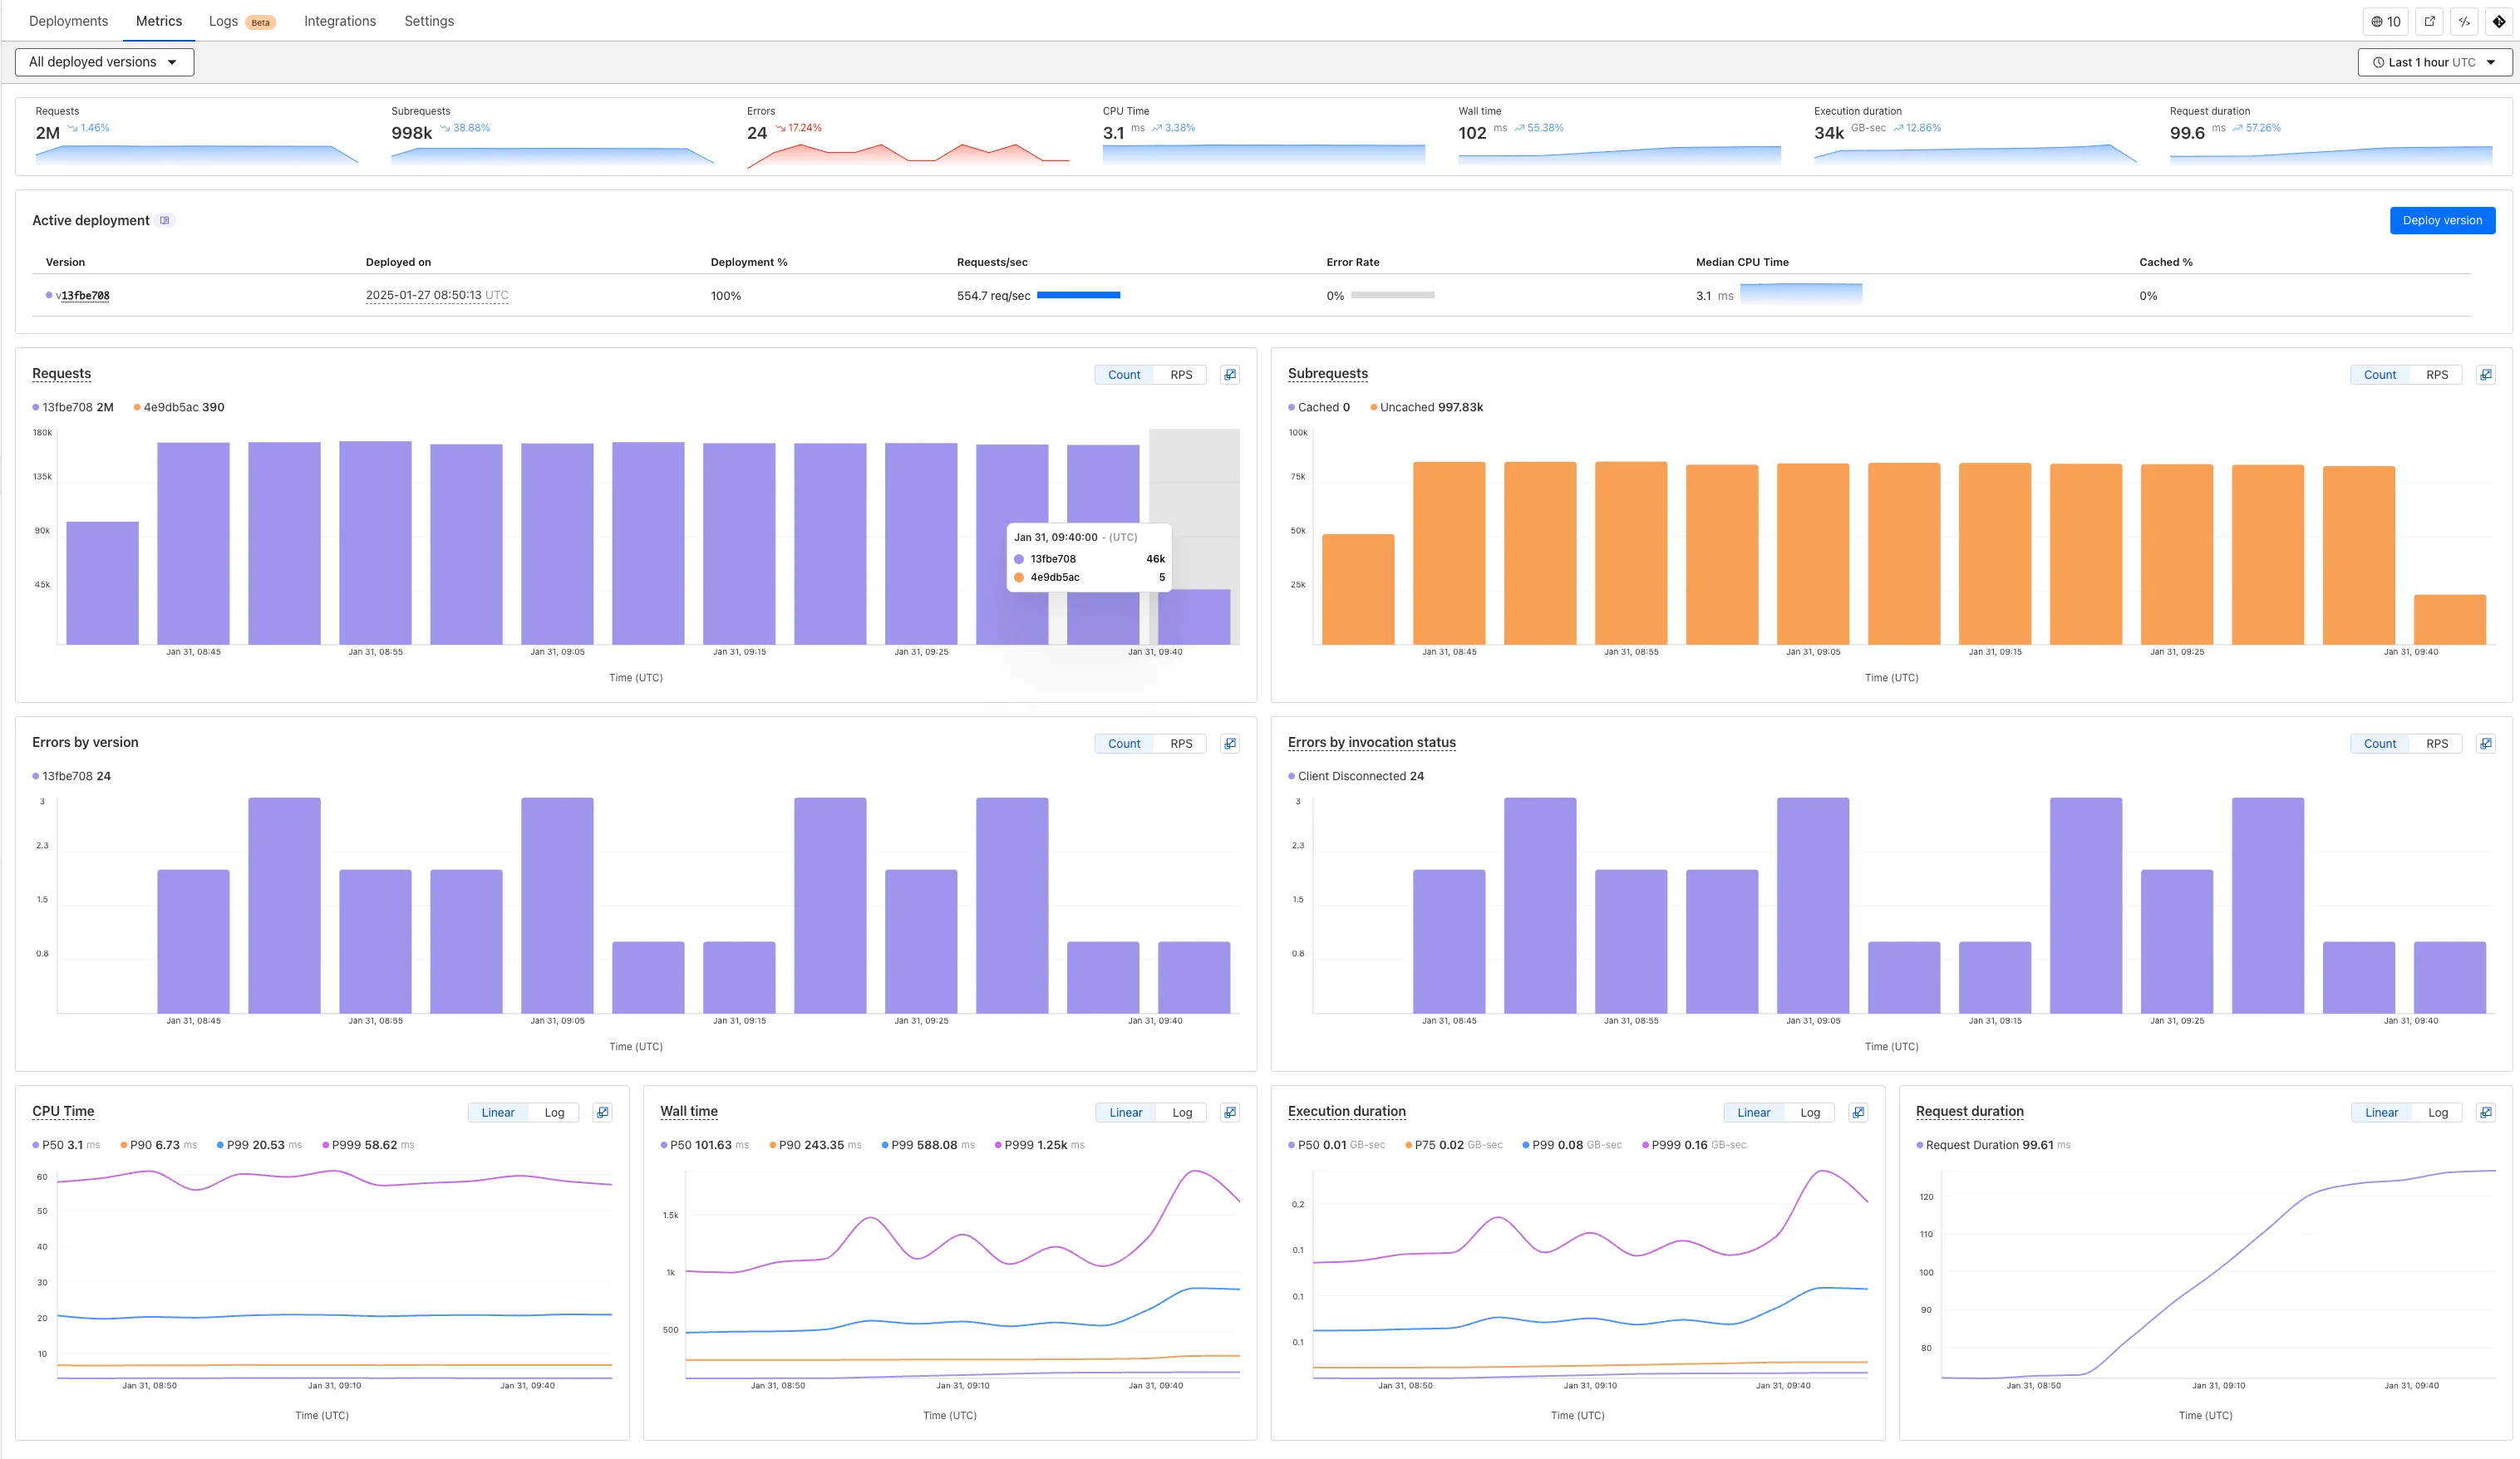
Now you can easily compare metrics across Worker versions, understand the current state of a gradual deployment, and review key Workers metrics in a single view. This new interface enables you to:
- Drag-and-select using a graphical timepicker for precise metric selection.

- Use histograms to visualize cumulative metrics, allowing you to bucket and compare rates over time.
- Focus on Worker versions by directly interacting with the version numbers in the legend.
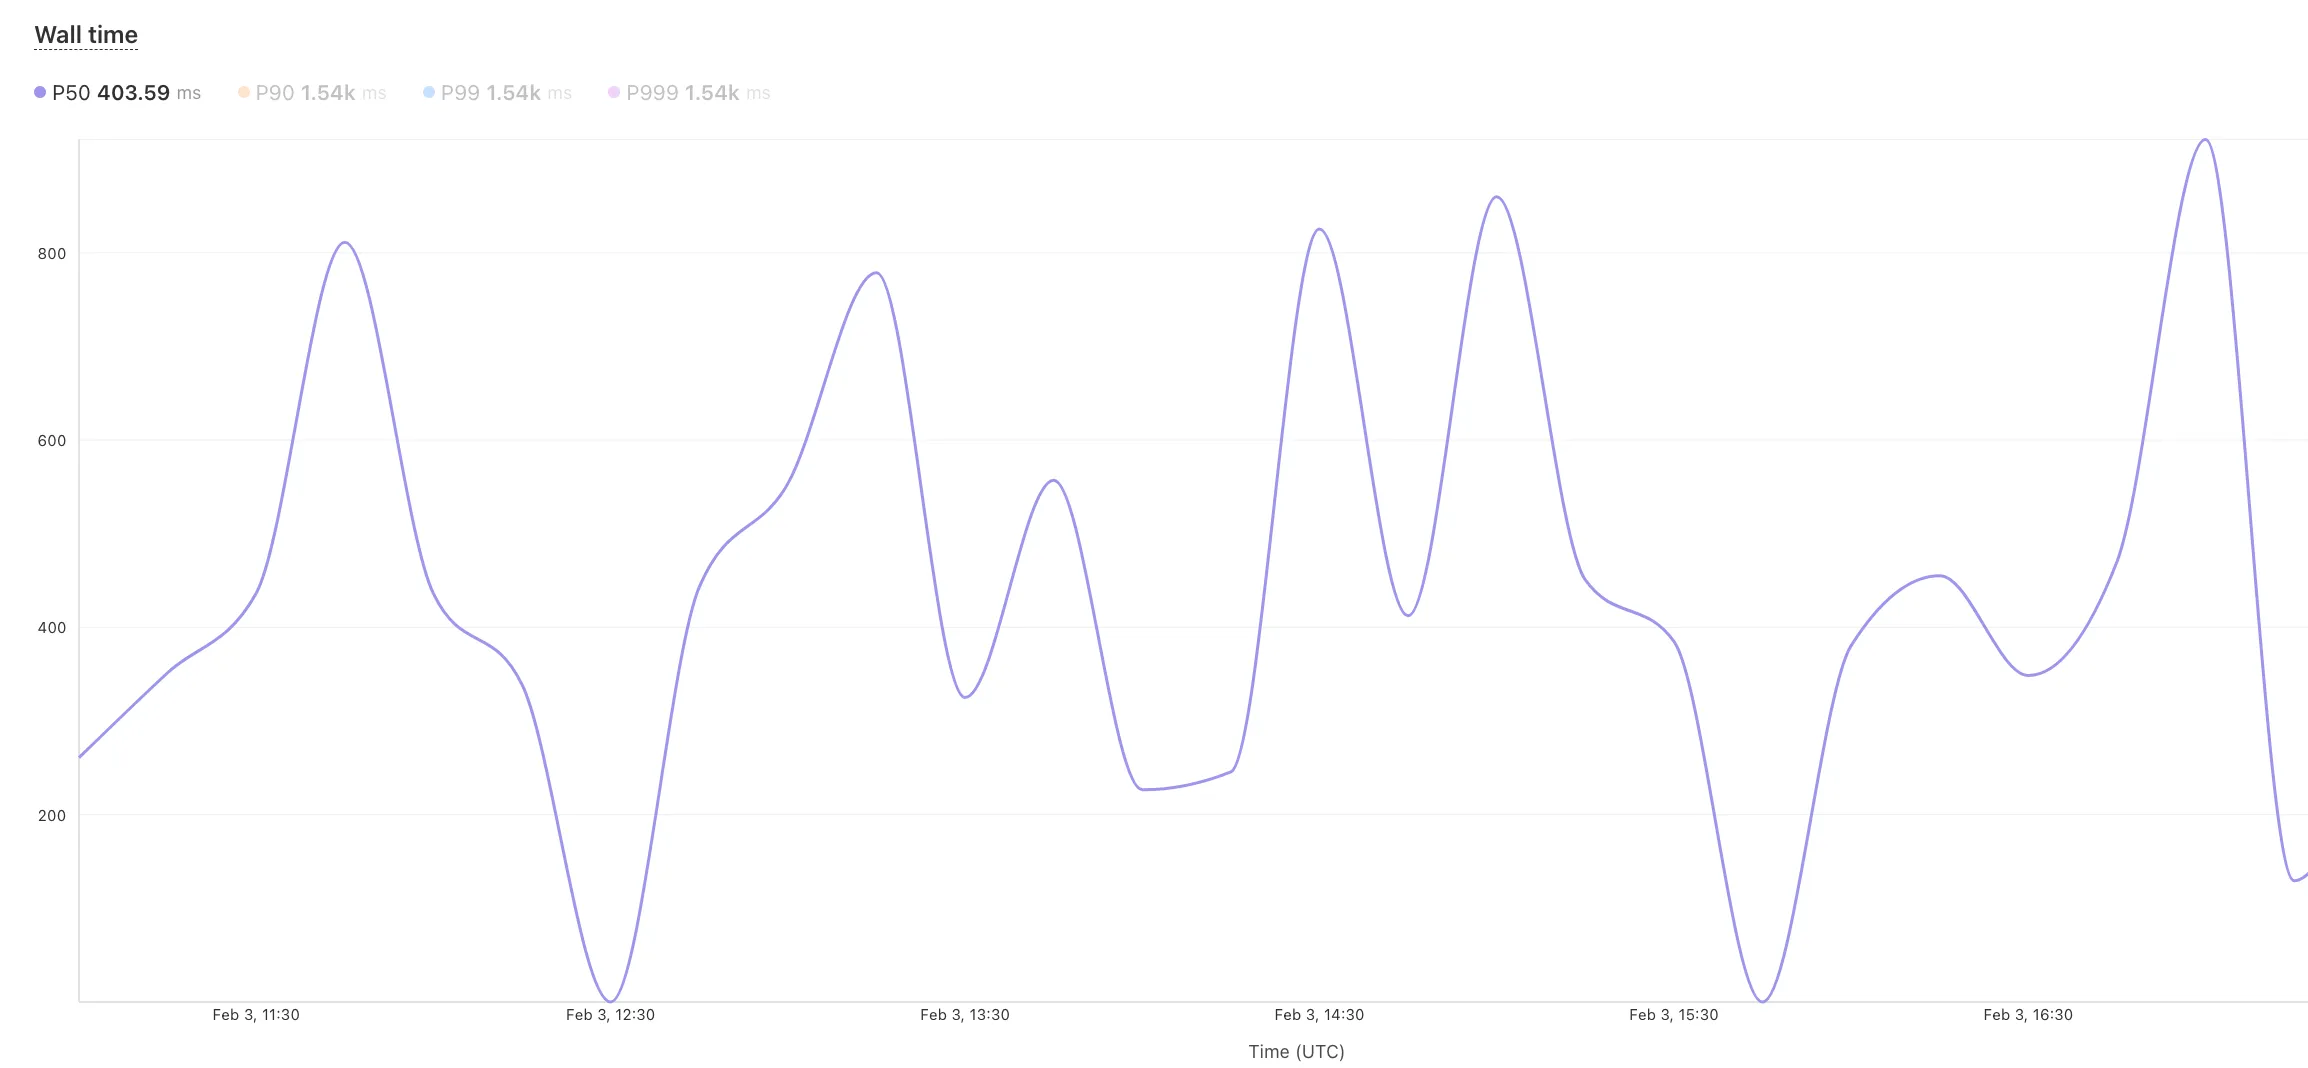
- Monitor and compare active gradual deployments.
- Track error rates across versions with grouping both by version and by invocation status.
- Measure how Smart Placement improves request duration.
Learn more about metrics.
-
Gateway HTTP policies can now block files that are password-protected, compressed, or otherwise unscannable.
These unscannable files are now matched with the Download and Upload File Types traffic selectors for HTTP policies:
- Password-protected Microsoft Office document
- Password-protected PDF
- Password-protected ZIP archive
- Unscannable ZIP archive
To get started inspecting and modifying behavior based on these and other rules, refer to HTTP filtering.
-
A new beta release for the Windows WARP client is now available on the Downloads page. This release contains significant improvements to our captive portal / public Wi-Fi detection logic. If you have experienced captive portal issues in the past, re-test and give this version a try.
Changes and improvements
- Improved captive portal detection to make more public networks compatible and have faster detection.
- Improved error messages shown in the app.
- Added the ability to control if the WARP interface IPs are registered with DNS servers or not.
- Removed DNS logs view from the Windows client GUI. DNS logs can be viewed as
part of
warp-diagor by viewing the log file on the user's local directory. - Fixed issue that would result in a user receiving multiple re-authentication requests when waking their device from sleep.
- WARP tunnel protocol details can now be viewed using the
warp-cli tunnel statscommand. - Improvements to Windows multi-user including support for fast user switching. If you are interested in testing this feature, reach out to your Cloudflare account team.
- Fixed issue with device revocation and re-registration when switching configurations.
- Fixed issue where DEX tests would run during certain sleep states where the networking stack was not fully up. This would result in failures that would be ignored.
Known issues
-
DNS resolution may be broken when the following conditions are all true:
- WARP is in Secure Web Gateway without DNS filtering (tunnel-only) mode.
- A custom DNS server address is configured on the primary network adapter.
- The custom DNS server address on the primary network adapter is changed while WARP is connected.
To work around this issue, reconnect the WARP client by toggling off and back on.
-
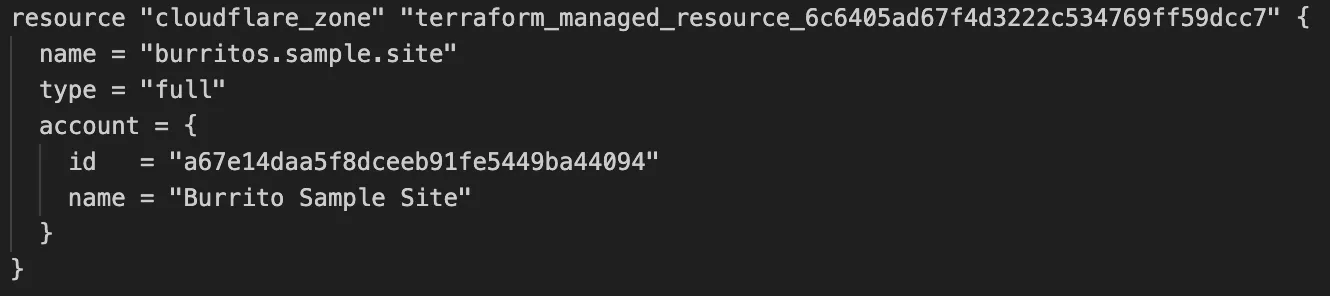
Cloudflare's v5 Terraform Provider is now generally available. With this release, Terraform resources are now automatically generated based on OpenAPI Schemas. This change brings alignment across our SDKs, API documentation, and now Terraform Provider. The new provider boosts coverage by increasing support for API properties to 100%, adding 25% more resources, and more than 200 additional data sources. Going forward, this will also reduce the barriers to bringing more resources into Terraform across the broader Cloudflare API. This is a small, but important step to making more of our platform manageable through GitOps, making it easier for you to manage Cloudflare just like you do your other infrastructure.
The Cloudflare Terraform Provider v5 is a ground-up rewrite of the provider and introduces breaking changes for some resource types. Please refer to the upgrade guide ↗ for best practices, or the blog post on automatically generating Cloudflare's Terraform Provider ↗ for more information about the approach.
For more info
-
Cloudflare is removing five fields from the
metaobject of DNS records. These fields have been unused for more than a year and are no longer set on new records. This change may take up to four weeks to fully roll out.The affected fields are:
- the
auto_addedboolean - the
managed_by_appsboolean and correspondingapps_install_id - the
managed_by_argo_tunnelboolean and correspondingargo_tunnel_id
An example record returned from the API would now look like the following:
Updated API Response {"result": {"id": "<ID>","zone_id": "<ZONE_ID>","zone_name": "example.com","name": "www.example.com","type": "A","content": "192.0.2.1","proxiable": true,"proxied": false,"ttl": 1,"locked": false,"meta": {"auto_added": false,"managed_by_apps": false,"managed_by_argo_tunnel": false,"source": "primary"},"comment": null,"tags": [],"created_on": "2025-03-17T20:37:05.368097Z","modified_on": "2025-03-17T20:37:05.368097Z"},"success": true,"errors": [],"messages": []}For more guidance, refer to Manage DNS records.
- the
-
Workers for Platforms customers can now attach static assets (HTML, CSS, JavaScript, images) directly to User Workers, removing the need to host separate infrastructure to serve the assets.
This allows your platform to serve entire front-end applications from Cloudflare's global edge, utilizing caching for fast load times, while supporting dynamic logic within the same Worker. Cloudflare automatically scales its infrastructure to handle high traffic volumes, enabling you to focus on building features without managing servers.
Static Sites: Host and serve HTML, CSS, JavaScript, and media files directly from Cloudflare's network, ensuring fast loading times worldwide. This is ideal for blogs, landing pages, and documentation sites because static assets can be efficiently cached and delivered closer to the user, reducing latency and enhancing the overall user experience.
Full-Stack Applications: Combine asset hosting with Cloudflare Workers to power dynamic, interactive applications. If you're an e-commerce platform, you can serve your customers' product pages and run inventory checks from within the same Worker.
index.js export default {async fetch(request, env) {const url = new URL(request.url);// Check real-time inventoryif (url.pathname === "/api/inventory/check") {const product = url.searchParams.get("product");const inventory = await env.INVENTORY_KV.get(product);return new Response(inventory);}// Serve static assets (HTML, CSS, images)return env.ASSETS.fetch(request);},};index.ts export default {async fetch(request, env) {const url = new URL(request.url);// Check real-time inventoryif (url.pathname === '/api/inventory/check') {const product = url.searchParams.get('product');const inventory = await env.INVENTORY_KV.get(product);return new Response(inventory);}// Serve static assets (HTML, CSS, images)return env.ASSETS.fetch(request);}};Get Started: Upload static assets using the Workers for Platforms API or Wrangler. For more information, visit our Workers for Platforms documentation. ↗
-
You can now transform HTML elements with streamed content using
HTMLRewriter.Methods like
replace,append, andprependnow acceptResponseandReadableStreamvalues asContent.This can be helpful in a variety of situations. For instance, you may have a Worker in front of an origin, and want to replace an element with content from a different source. Prior to this change, you would have to load all of the content from the upstream URL and convert it into a string before replacing the element. This slowed down overall response times.
Now, you can pass the
Responseobject directly into thereplacemethod, and HTMLRewriter will immediately start replacing the content as it is streamed in. This makes responses faster.index.js class ElementRewriter {async element(element) {// able to replace elements while streaming content// the fetched body is not buffered into memory as part// of the replacelet res = await fetch("https://upstream-content-provider.example");element.replace(res);}}export default {async fetch(request, env, ctx) {let response = await fetch("https://site-to-replace.com");return new HTMLRewriter().on("[data-to-replace]", new ElementRewriter()).transform(response);},};index.ts class ElementRewriter {async element(element: any) {// able to replace elements while streaming content// the fetched body is not buffered into memory as part// of the replacelet res = await fetch('https://upstream-content-provider.example');element.replace(res);}}export default {async fetch(request, env, ctx): Promise<Response> {let response = await fetch('https://site-to-replace.com');return new HTMLRewriter().on('[data-to-replace]', new ElementRewriter()).transform(response);},} satisfies ExportedHandler<Env>;For more information, see the
HTMLRewriterdocumentation.
-
We have released new Workers bindings API methods, allowing you to connect Workers applications to AI Gateway directly. These methods simplify how Workers calls AI services behind your AI Gateway configurations, removing the need to use the REST API and manually authenticate.
To add an AI binding to your Worker, include the following in your Wrangler configuration file:

With the new AI Gateway binding methods, you can now:
- Send feedback and update metadata with
patchLog. - Retrieve detailed log information using
getLog. - Execute universal requests to any AI Gateway provider with
run.
For example, to send feedback and update metadata using
patchLog: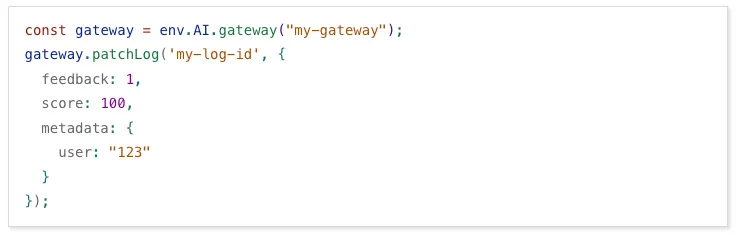
- Send feedback and update metadata with
-
Browser Rendering now supports 10 concurrent browser instances per account and 10 new instances per minute, up from the previous limits of 2.
This allows you to launch more browser tasks from Cloudflare Workers.
To manage concurrent browser sessions, you can use Queues or Workflows:
index.js export default {async queue(batch, env) {for (const message of batch.messages) {const browser = await puppeteer.launch(env.BROWSER);const page = await browser.newPage();try {await page.goto(message.url, {waitUntil: message.waitUntil,});// Process page...} finally {await browser.close();}}},};index.ts interface QueueMessage {url: string;waitUntil: number;}export interface Env {BROWSER_QUEUE: Queue<QueueMessage>;BROWSER: Fetcher;}export default {async queue(batch: MessageBatch<QueueMessage>, env: Env): Promise<void> {for (const message of batch.messages) {const browser = await puppeteer.launch(env.BROWSER);const page = await browser.newPage();try {await page.goto(message.url, {waitUntil: message.waitUntil});// Process page...} finally {await browser.close();}}}};
-
Stream's generated captions leverage Workers AI to automatically transcribe audio and provide captions to the player experience. We have added support for these languages:
cs- Czechnl- Dutchfr- Frenchde- Germanit- Italianja- Japaneseko- Koreanpl- Polishpt- Portugueseru- Russianes- Spanish
For more information, learn about adding captions to videos.
-
The new Snippets code editor lets you edit Snippet code and rule in one place, making it easier to test and deploy changes without switching between pages.
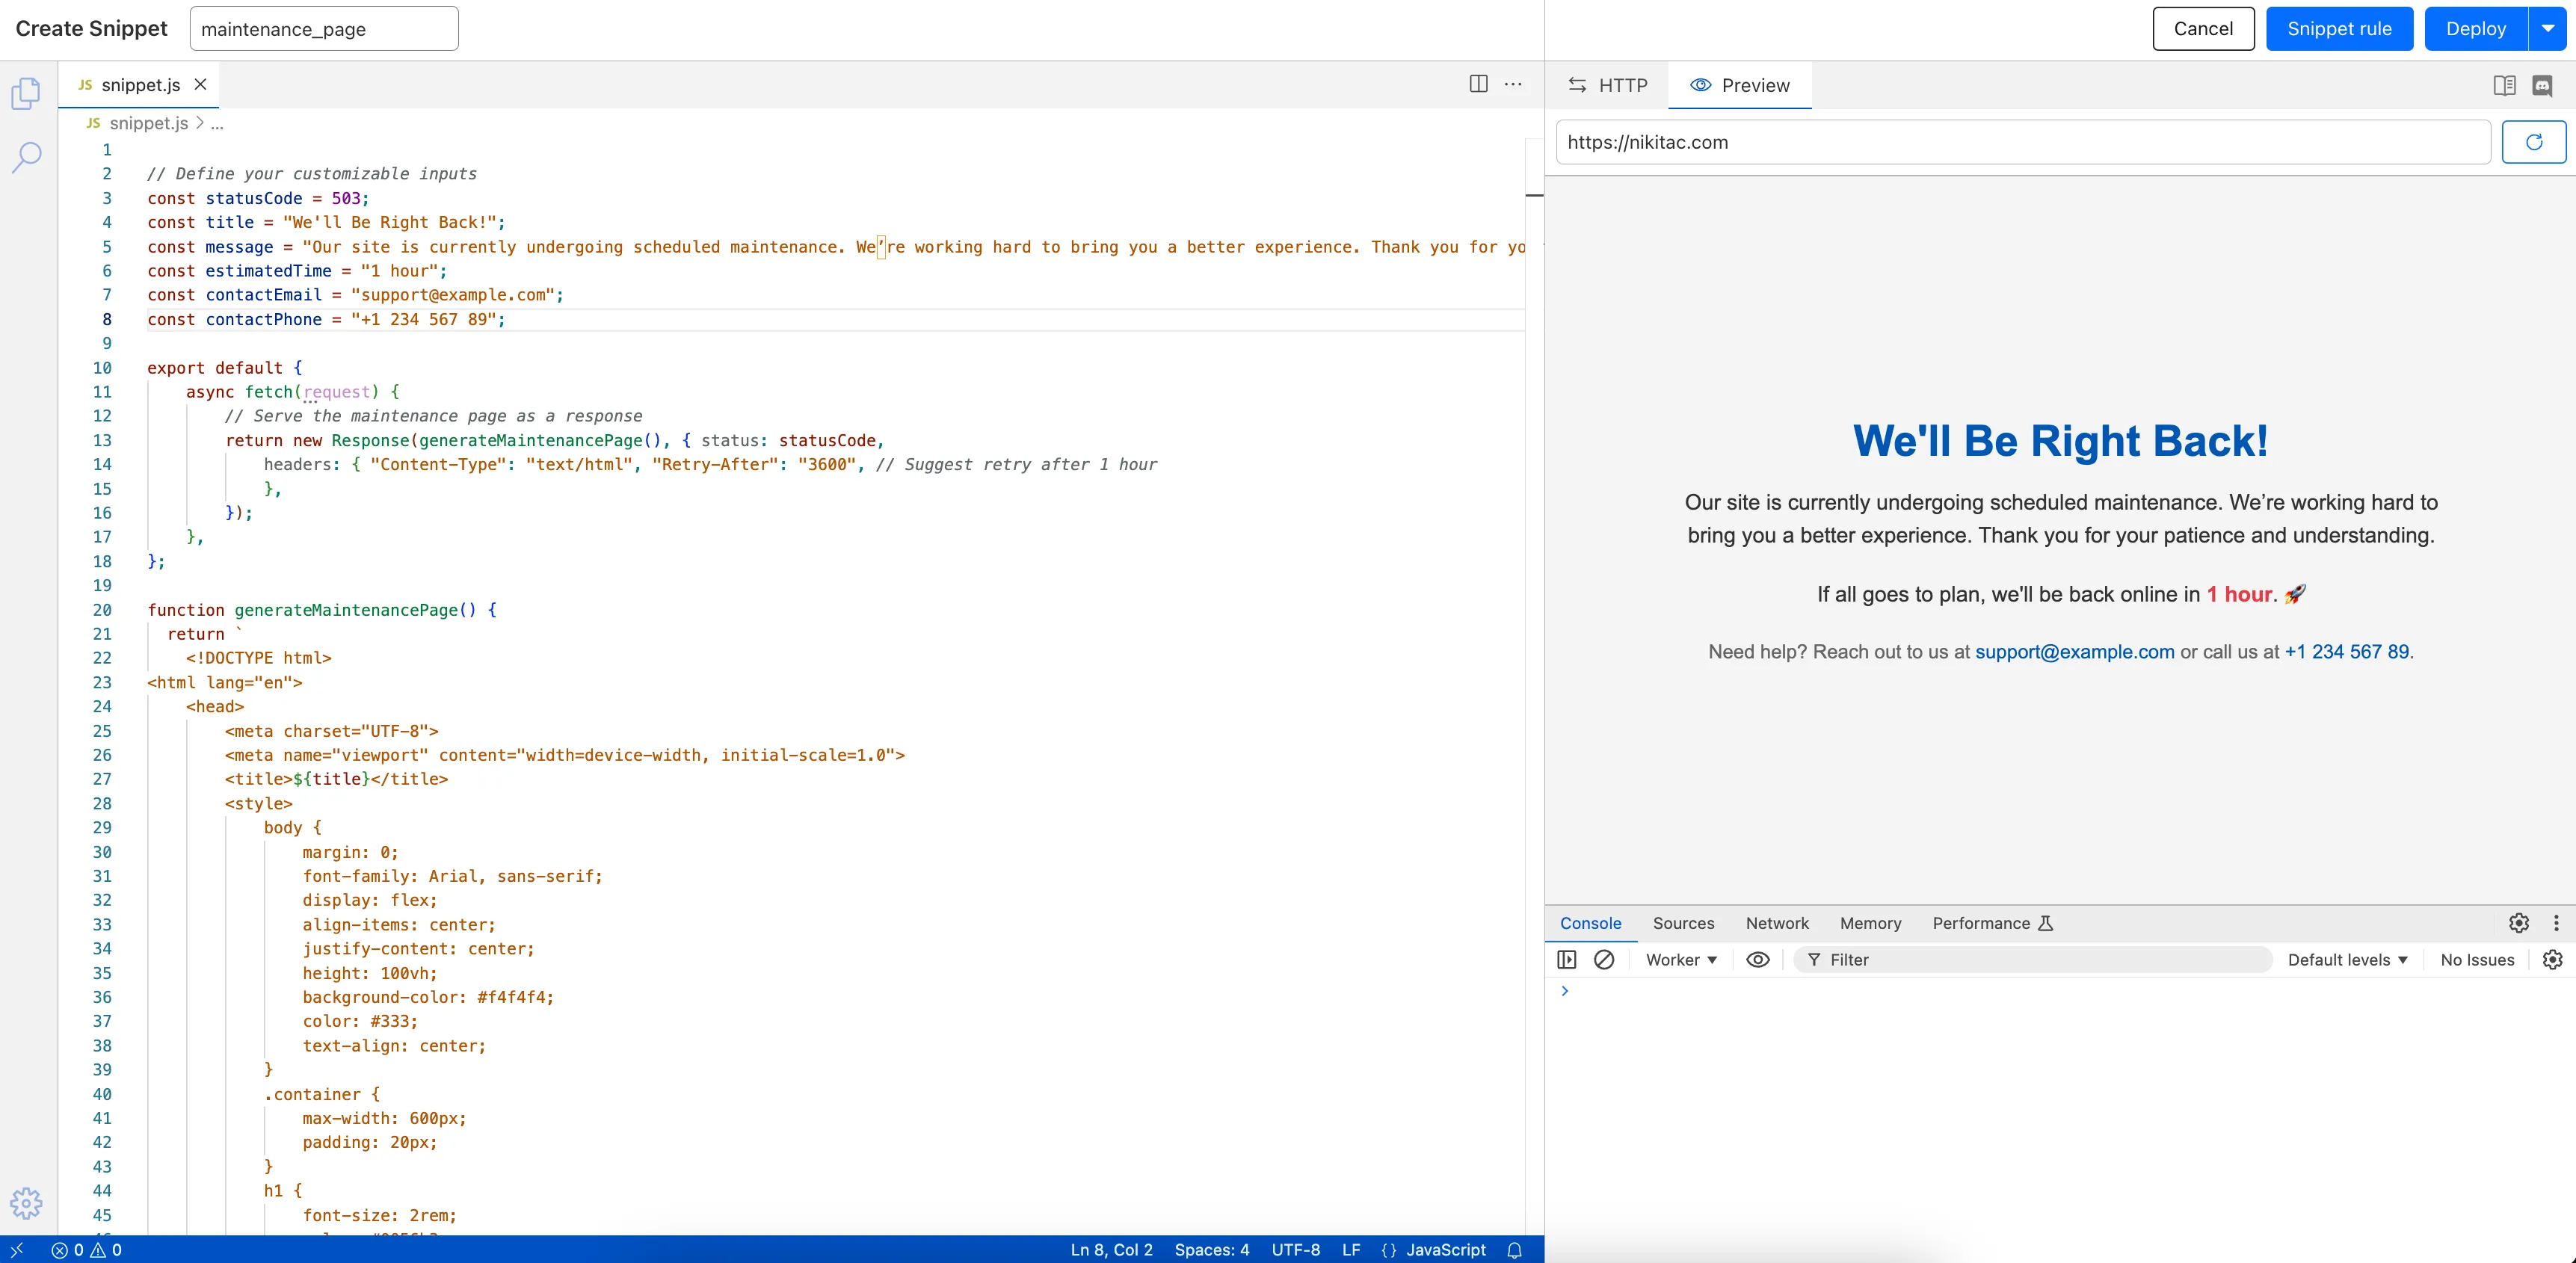
What’s new:
- Single-page editing for code and rule – No need to jump between screens.
- Auto-complete & syntax highlighting – Get suggestions and avoid mistakes.
- Code formatting & refactoring – Write cleaner, more readable code.
Try it now in Rules > Snippets ↗.
-
Hyperdrive now automatically configures your Cloudflare Tunnel to connect to your private database.
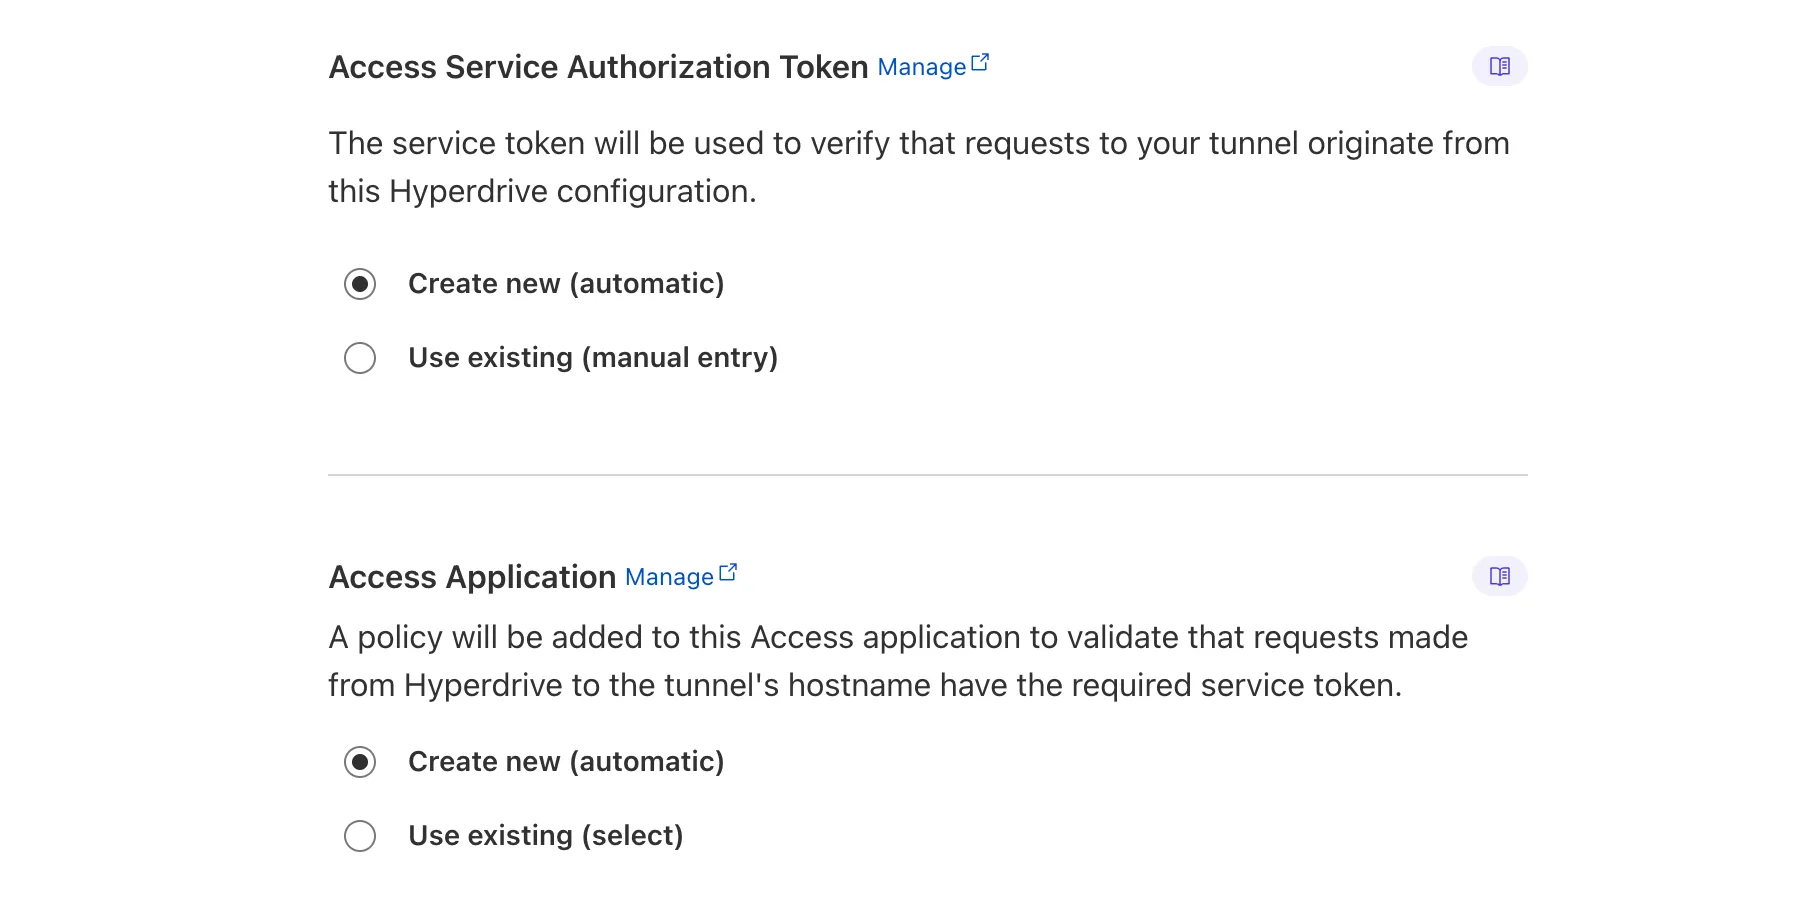
When creating a Hyperdrive configuration for a private database, you only need to provide your database credentials and set up a Cloudflare Tunnel within the private network where your database is accessible. Hyperdrive will automatically create the Cloudflare Access, Service Token, and Policies needed to secure and restrict your Cloudflare Tunnel to the Hyperdrive configuration.
To create a Hyperdrive for a private database, you can follow the Hyperdrive documentation. You can still manually create the Cloudflare Access, Service Token, and Policies if you prefer.
This feature is available from the Cloudflare dashboard.
-
You can now have up to 1000 Workers KV namespaces per account.
Workers KV namespace limits were increased from 200 to 1000 for all accounts. Higher limits for Workers KV namespaces enable better organization of key-value data, such as by category, tenant, or environment.
Consult the Workers KV limits documentation for the rest of the limits. This increased limit is available for both the Free and Paid Workers plans.
-
When using a Worker with the
nodejs_compatcompatibility flag enabled, you can now use the following Node.js APIs:You can use
node:net↗ to create a direct connection to servers via a TCP sockets withnet.Socket↗.index.js import net from "node:net";const exampleIP = "127.0.0.1";export default {async fetch(req) {const socket = new net.Socket();socket.connect(4000, exampleIP, function () {console.log("Connected");});socket.write("Hello, Server!");socket.end();return new Response("Wrote to server", { status: 200 });},};index.ts import net from "node:net";const exampleIP = "127.0.0.1";export default {async fetch(req): Promise<Response> {const socket = new net.Socket();socket.connect(4000, exampleIP, function () {console.log("Connected");});socket.write("Hello, Server!");socket.end();return new Response("Wrote to server", { status: 200 });},} satisfies ExportedHandler;Additionally, you can now use other APIs including
net.BlockList↗ andnet.SocketAddress↗.Note that
net.Server↗ is not supported.You can use
node:dns↗ for name resolution via DNS over HTTPS using Cloudflare DNS ↗ at 1.1.1.1.index.js import dns from "node:dns";let responese = await dns.promises.resolve4("cloudflare.com", "NS");index.ts import dns from 'node:dns';let responese = await dns.promises.resolve4('cloudflare.com', 'NS');All
node:dnsfunctions are available, exceptlookup,lookupService, andresolvewhich throw "Not implemented" errors when called.You can use
node:timers↗ to schedule functions to be called at some future period of time.This includes
setTimeout↗ for calling a function after a delay,setInterval↗ for calling a function repeatedly, andsetImmediate↗ for calling a function in the next iteration of the event loop.index.js import timers from "node:timers";console.log("first");timers.setTimeout(() => {console.log("last");}, 10);timers.setTimeout(() => {console.log("next");});index.ts import timers from "node:timers";console.log("first");timers.setTimeout(() => {console.log("last");}, 10);timers.setTimeout(() => {console.log("next");});
-
Workflows (beta) now allows you to define up to 1024 steps.
sleepsteps do not count against this limit.We've also added:
instanceIdas property to theWorkflowEventtype, allowing you to retrieve the current instance ID from within a running Workflow instance- Improved queueing logic for Workflow instances beyond the current maximum concurrent instances, reducing the cases where instances are stuck in the queued state.
- Support for
pauseandresumefor Workflow instances in a queued state.
We're continuing to work on increases to the number of concurrent Workflow instances, steps, and support for a new
waitForEventAPI over the coming weeks.
-
Rules Overview gives you a single page to manage all your Cloudflare Rules.
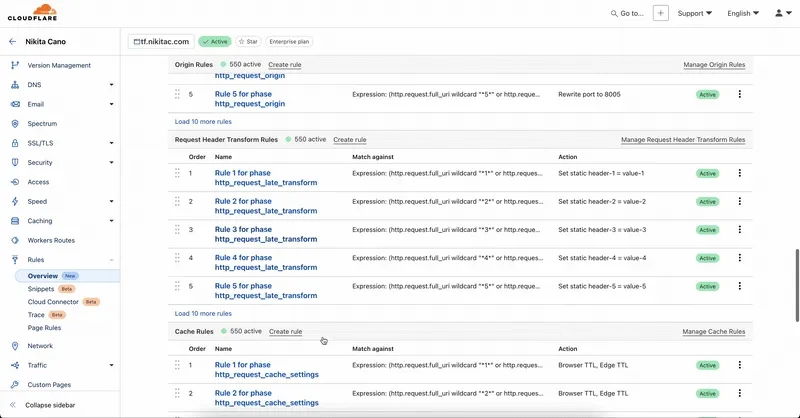
What you can do:
- See all your rules in one place – No more clicking around.
- Find rules faster – Search by name.
- Understand execution order – See how rules run in sequence.
- Debug easily – Use Trace without switching tabs.
Check it out in Rules > Overview ↗.
-
Users making D1 requests via the Workers API can see up to a 60% end-to-end latency improvement due to the removal of redundant network round trips needed for each request to a D1 database.

p50, p90, and p95 request latency aggregated across entire D1 service. These latencies are a reference point and should not be viewed as your exact workload improvement.
This performance improvement benefits all D1 Worker API traffic, especially cross-region requests where network latency is an outsized latency factor. For example, a user in Europe talking to a database in North America. D1 location hints can be used to influence the geographic location of a database.
For more details on how D1 removed redundant round trips, see the D1 specific release note entry.
-
You can now detect source code leaks with Data Loss Prevention (DLP) with predefined checks against common programming languages.
The following programming languages are validated with natural language processing (NLP).
- C
- C++
- C#
- Go
- Haskell
- Java
- JavaScript
- Lua
- Python
- R
- Rust
- Swift
For more details, refer to DLP profiles.
-
AI Gateway now supports DeepSeek, including their cutting-edge DeepSeek-V3 model. With this addition, you have even more flexibility to manage and optimize your AI workloads using AI Gateway. Whether you're leveraging DeepSeek or other providers, like OpenAI, Anthropic, or Workers AI, AI Gateway empowers you to:
- Monitor: Gain actionable insights with analytics and logs.
- Control: Implement caching, rate limiting, and fallbacks.
- Optimize: Improve performance with feedback and evaluations.

To get started, simply update the base URL of your DeepSeek API calls to route through AI Gateway. Here's how you can send a request using cURL:
Example fetch request curl https://gateway.ai.cloudflare.com/v1/{account_id}/{gateway_id}/deepseek/chat/completions \--header 'content-type: application/json' \--header 'Authorization: Bearer DEEPSEEK_TOKEN' \--data '{"model": "deepseek-chat","messages": [{"role": "user","content": "What is Cloudflare?"}]}'For detailed setup instructions, see our DeepSeek provider documentation.
-


Workers Builds, the integrated CI/CD system for Workers (currently in beta), now lets you cache artifacts across builds, speeding up build jobs by eliminating repeated work, such as downloading dependencies at the start of each build.
-
Build Caching: Cache dependencies and build outputs between builds with a shared project-wide cache, ensuring faster builds for the entire team.
-
Build Watch Paths: Define paths to include or exclude from the build process, ideal for monorepos to target only the files that need to be rebuilt per Workers project.
To get started, select your Worker on the Cloudflare dashboard ↗ then go to Settings > Builds, and connect a GitHub or GitLab repository. Once connected, you'll see options to configure Build Caching and Build Watch Paths.
-
-
The latest
cloudflaredbuild 2024.12.2 ↗ introduces the ability to collect all the diagnostic logs needed to troubleshoot acloudflaredinstance.A diagnostic report collects data from a single instance of
cloudflaredrunning on the local machine and outputs it to acloudflared-diagfile.The
cloudflared-diag-YYYY-MM-DDThh-mm-ss.ziparchive contains the files listed below. The data in a file either applies to thecloudflaredinstance being diagnosed (diagnosee) or the instance that triggered the diagnosis (diagnoser). For example, if your tunnel is running in a Docker container, the diagnosee is the Docker instance and the diagnoser is the host instance.File name Description Instance cli-configuration.jsonTunnel run parameters used when starting the tunnel diagnosee cloudflared_logs.txtTunnel log file1 diagnosee configuration.jsonTunnel configuration parameters diagnosee goroutine.pprofgoroutine profile made available by pprofdiagnosee heap.pprofheap profile made available by pprofdiagnosee metrics.txtSnapshot of Tunnel metrics at the time of diagnosis diagnosee network.txtJSON traceroutes to Cloudflare's global network using IPv4 and IPv6 diagnoser raw-network.txtRaw traceroutes to Cloudflare's global network using IPv4 and IPv6 diagnoser systeminformation.jsonOperating system information and resource usage diagnosee task-result.jsonResult of each diagnostic task diagnoser tunnelstate.jsonTunnel connections at the time of diagnosis diagnosee -
If the log file is blank, you may need to set
--logleveltodebugwhen you start the tunnel. The--loglevelparameter is only required if you ran the tunnel from the CLI using acloudflared tunnel runcommand. It is not necessary if the tunnel runs as a Linux/macOS service or runs in Docker/Kubernetes. ↩
For more information, refer to Diagnostic logs.
-
-
You now have more transparency about team and user submissions for phishing emails through a Reclassification tab in the Zero Trust dashboard.
Reclassifications happen when users or admins submit a phish to Email Security. Cloudflare reviews and - in some cases - reclassifies these emails based on improvements to our machine learning models.
This new tab increases your visibility into this process, allowing you to view what submissions you have made and what the outcomes of those submissions are.

-
Magic WAN and Magic Transit customers can use the Cloudflare dashboard to configure and manage BGP peering between their networks and their Magic routing table when using a Direct CNI on-ramp.
Using BGP peering with a CNI allows customers to:
- Automate the process of adding or removing networks and subnets.
- Take advantage of failure detection and session recovery features.
With this functionality, customers can:
- Establish an eBGP session between their devices and the Magic WAN / Magic Transit service when connected via CNI.
- Secure the session by MD5 authentication to prevent misconfigurations.
- Exchange routes dynamically between their devices and their Magic routing table.
Refer to Magic WAN BGP peering or Magic Transit BGP peering to learn more about this feature and how to set it up.
-
Hyperdrive now caches queries in all Cloudflare locations, decreasing cache hit latency by up to 90%.
When you make a query to your database and Hyperdrive has cached the query results, Hyperdrive will now return the results from the nearest cache. By caching data closer to your users, the latency for cache hits reduces by up to 90%.
This reduction in cache hit latency is reflected in a reduction of the session duration for all queries (cached and uncached) from Cloudflare Workers to Hyperdrive, as illustrated below.
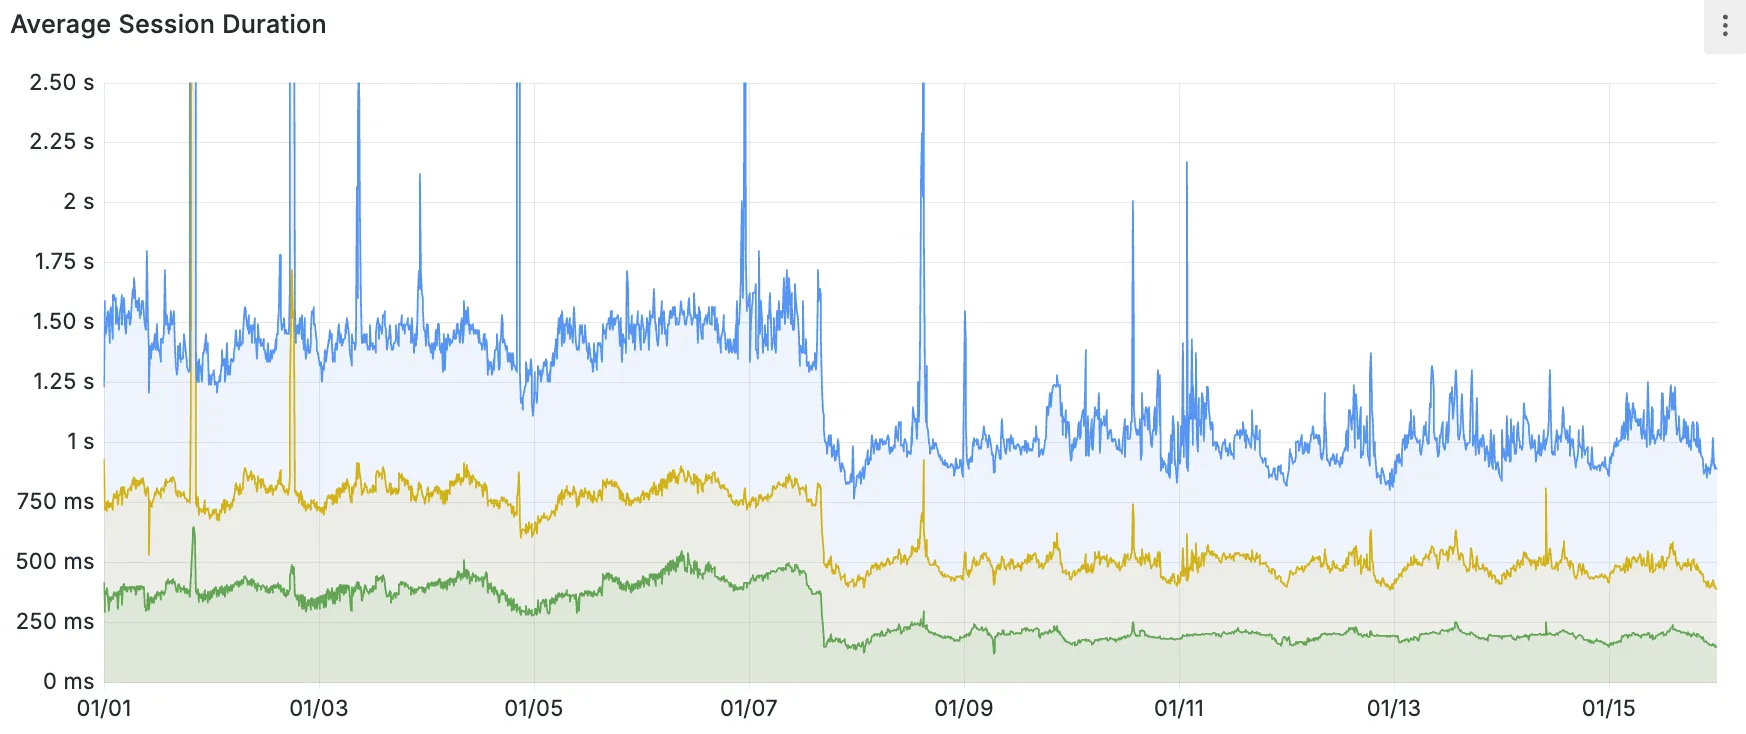
P50, P75, and P90 Hyperdrive session latency for all client connection sessions (both cached and uncached queries) for Hyperdrive configurations with caching enabled during the rollout period.
This performance improvement is applied to all new and existing Hyperdrive configurations that have caching enabled.
For more details on how Hyperdrive performs query caching, refer to the Hyperdrive documentation.
-
Now, you can manage Cloudflare Snippets with Terraform. Use infrastructure-as-code to deploy and update Snippet code and rules without manual changes in the dashboard.
Example Terraform configuration:
resource "cloudflare_snippet" "my_snippet" {zone_id = "<ZONE_ID>"name = "my_test_snippet_1"main_module = "file1.js"files {name = "file1.js"content = file("file1.js")}}resource "cloudflare_snippet_rules" "cookie_snippet_rule" {zone_id = "<ZONE_ID>"rules {enabled = trueexpression = "http.cookie eq \"a=b\""description = "Trigger snippet on specific cookie"snippet_name = "my_test_snippet_1"}depends_on = [cloudflare_snippet.my_snippet]}Learn more in the Configure Snippets using Terraform documentation.
-
You can now generate customized terraform files for building cloud network on-ramps to Magic WAN.
Magic Cloud can scan and discover existing network resources and generate the required terraform files to automate cloud resource deployment using their existing infrastructure-as-code workflows for cloud automation.
You might want to do this to:
- Review the proposed configuration for an on-ramp before deploying it with Cloudflare.
- Deploy the on-ramp using your own infrastructure-as-code pipeline instead of deploying it with Cloudflare.
For more details, refer to Set up with Terraform.
-
You can now use CASB to find security misconfigurations in your AWS cloud environment using Data Loss Prevention.
You can also connect your AWS compute account to extract and scan your S3 buckets for sensitive data while avoiding egress fees. CASB will scan any objects that exist in the bucket at the time of configuration.
To connect a compute account to your AWS integration:
- In Zero Trust ↗, go to CASB > Integrations.
- Find and select your AWS integration.
- Select Open connection instructions.
- Follow the instructions provided to connect a new compute account.
- Select Refresh.
-
Now, you can use Cloud Connector to route traffic to your R2 buckets based on URLs, headers, geolocation, and more.
Example setup:
Terminal window curl --request PUT \"https://api.cloudflare.com/client/v4/zones/{zone_id}/cloud_connector/rules" \--header "Authorization: Bearer <API_TOKEN>" \--header "Content-Type: application/json" \--data '[{"expression": "http.request.uri.path wildcard \"/images/*\"","provider": "cloudflare_r2","description": "Connect to R2 bucket containing images","parameters": {"host": "mybucketcustomdomain.example.com"}}]'Get started using Cloud Connector documentation.
-
You can now use the
cacheproperty of theRequestinterface to bypass Cloudflare's cache when making subrequests from Cloudflare Workers, by setting its value tono-store.index.js export default {async fetch(req, env, ctx) {const request = new Request("https://cloudflare.com", {cache: "no-store",});const response = await fetch(request);return response;},};index.ts export default {async fetch(req, env, ctx): Promise<Response> {const request = new Request("https://cloudflare.com", { cache: 'no-store'});const response = await fetch(request);return response;}} satisfies ExportedHandler<Environment>When you set the value to
no-storeon a subrequest made from a Worker, the Cloudflare Workers runtime will not check whether a match exists in the cache, and not add the response to the cache, even if the response includes directives in theCache-ControlHTTP header that otherwise indicate that the response is cacheable.This increases compatibility with NPM packages and JavaScript frameworks that rely on setting the
cacheproperty, which is a cross-platform standard part of theRequestinterface. Previously, if you set thecacheproperty onRequest, the Workers runtime threw an exception.If you've tried to use
@planetscale/database,redis-js,stytch-node,supabase,axiom-jsor have seen the error messageThe cache field on RequestInitializerDict is not implemented in fetch— you should try again, making sure that the Compatibility Date of your Worker is set to on or after2024-11-11, or thecache_option_enabledcompatibility flag is enabled for your Worker.- Learn how the Cache works with Cloudflare Workers
- Enable Node.js compatibility for your Cloudflare Worker
- Explore Runtime APIs and Bindings available in Cloudflare Workers
-
Workflows is now in open beta, and available to any developer a free or paid Workers plan.
Workflows allow you to build multi-step applications that can automatically retry, persist state and run for minutes, hours, days, or weeks. Workflows introduces a programming model that makes it easier to build reliable, long-running tasks, observe as they progress, and programatically trigger instances based on events across your services.
You can get started with Workflows by following our get started guide and/or using
npm create cloudflareto pull down the starter project:Terminal window npm create cloudflare@latest workflows-starter -- --template "cloudflare/workflows-starter"You can open the
src/index.tsfile, extend it, and usewrangler deployto deploy your first Workflow. From there, you can:- Learn the Workflows API
- Trigger Workflows via your Workers apps.
- Understand the Rules of Workflows and how to adopt best practices
-
It’s now easy to create wildcard-based URL Rewrites. No need for complex functions—just define your patterns and go.
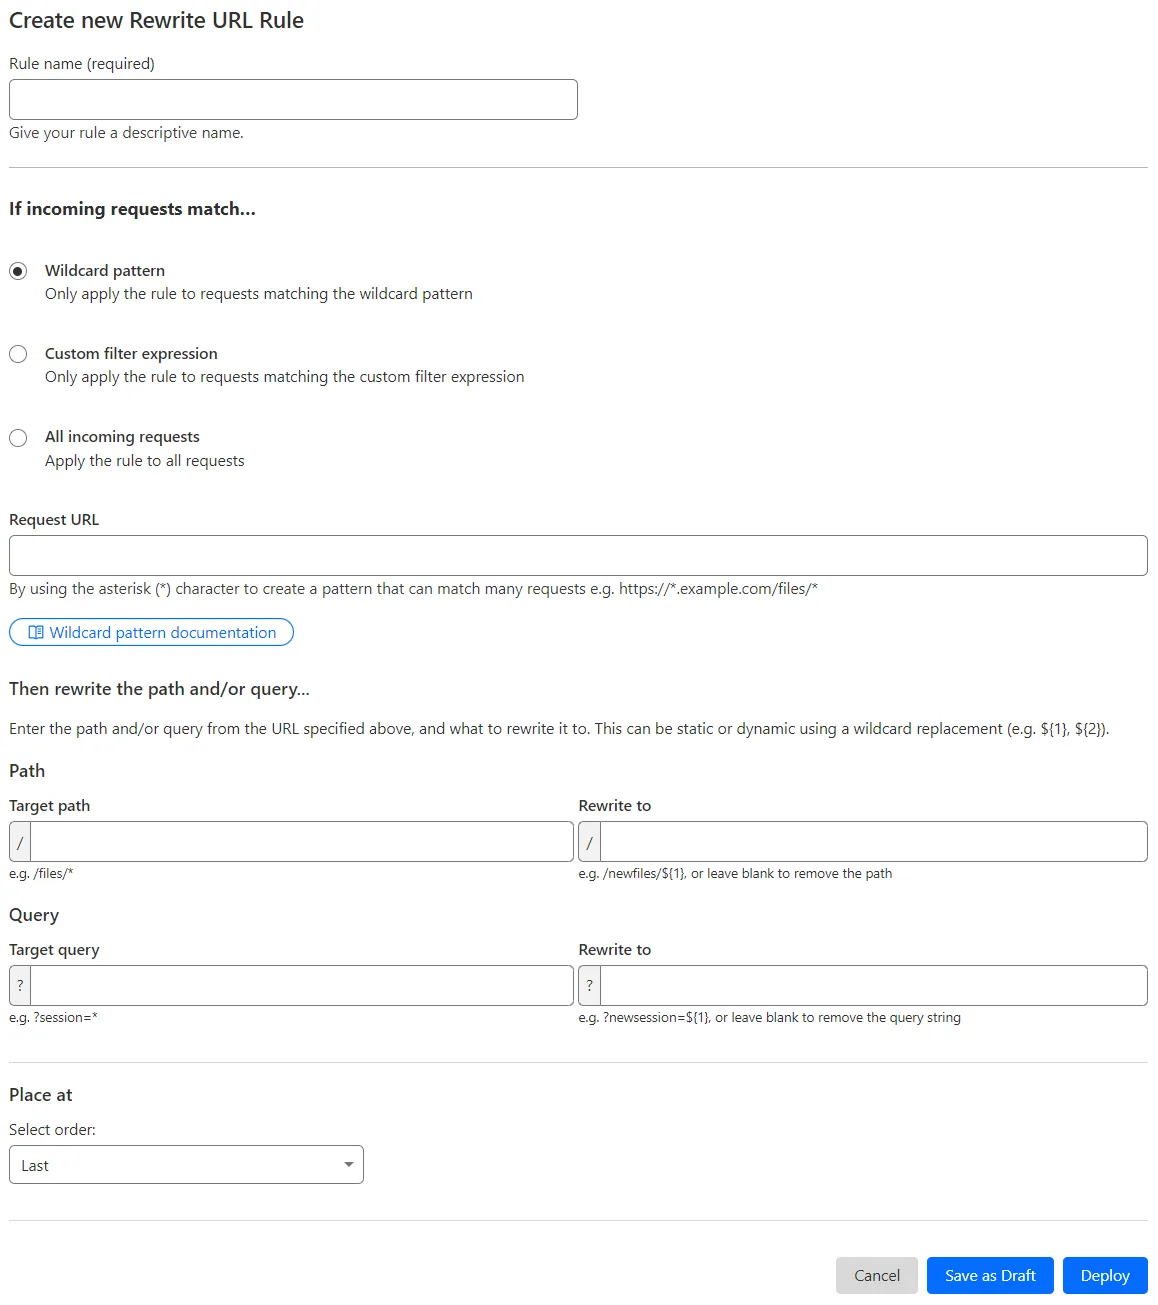
What’s improved:
- Full wildcard support – Create rewrite patterns using intuitive interface.
- Simplified rule creation – No need for complex functions.
Try it via creating a Rewrite URL rule in the dashboard.
-
The Magic Firewall dashboard now allows you to search custom rules using the rule name and/or ID.
- Log into the Cloudflare dashboard ↗ and select your account.
- Go to Analytics & Logs > Network Analytics.
- Select Magic Firewall.
- Add a filter for Rule ID.
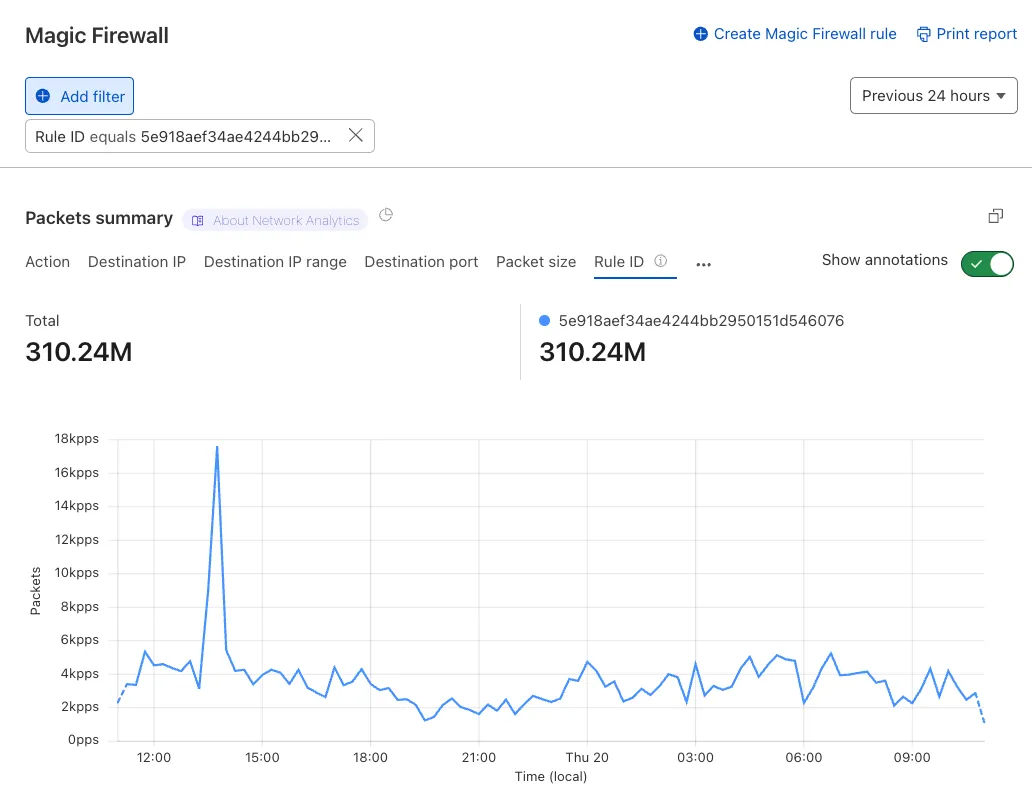
Additionally, the rule ID URL link has been added to Network Analytics.
For more details abour rules, refer to Add rules.
-
The free version of Magic Network Monitoring (MNM) is now available to everyone with a Cloudflare account by default.
- Log in to your Cloudflare dashboard ↗, and select your account.
- Go to Analytics & Logs > Magic Monitoring.
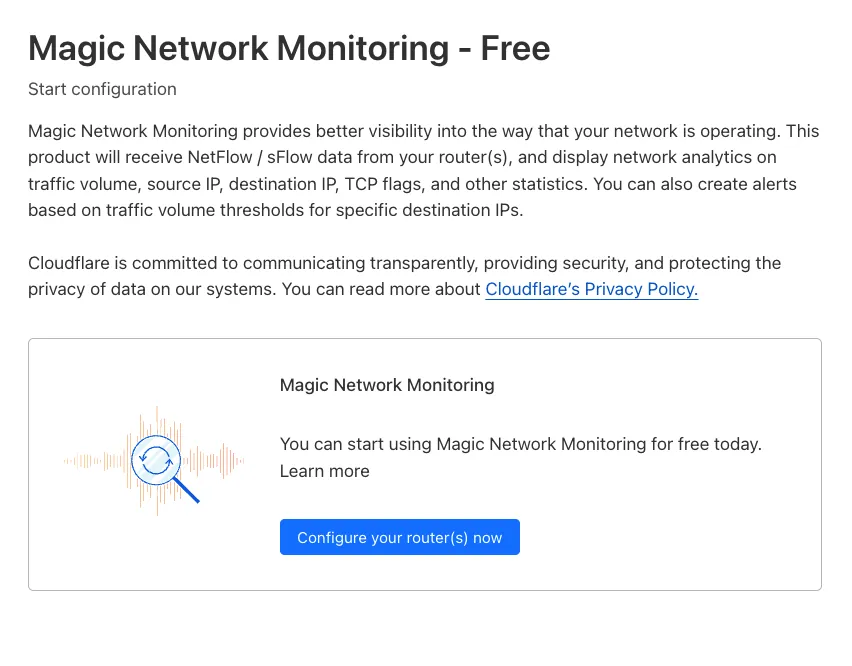
For more details, refer to the Get started guide.
-
Now, you can create common rule configurations in just one click using Rules Templates.
What you can do:
- Pick a pre-built rule – Choose from a library of templates.
- One-click setup – Deploy best practices instantly.
- Customize as needed – Adjust templates to fit your setup.
Template cards are now also available directly in the rule builder for each product.
Need more ideas? Check out the Examples gallery in our documentation.
-
Beyond the controls in Zero Trust, you can now exchange user risk scores with Okta to inform SSO-level policies.
First, configure Zero Trust to send user risk scores to Okta.
- Set up the Okta SSO integration.
- In Zero Trust ↗, go to Settings > Authentication.
- In Login methods, locate your Okta integration and select Edit.
- Turn on Send risk score to Okta.
- Select Save.
- Upon saving, Zero Trust will display the well-known URL for your organization. Copy the value.
Next, configure Okta to receive your risk scores.
- On your Okta admin dashboard, go to Security > Device Integrations.
- Go to Receive shared signals, then select Create stream.
- Name your integration. In Set up integration with, choose Well-known URL.
- In Well-known URL, enter the well-known URL value provided by Zero Trust.
- Select Create.
-
Welcome to your new home for product updates on Cloudflare One.
Our new changelog lets you read about changes in much more depth, offering in-depth examples, images, code samples, and even gifs.
If you are looking for older product updates, refer to the following locations.
-
You can now easily enable Real User Monitoring (RUM) monitoring for your hostnames, while safely dropping requests from visitors in the European Union to comply with GDPR and CCPA.
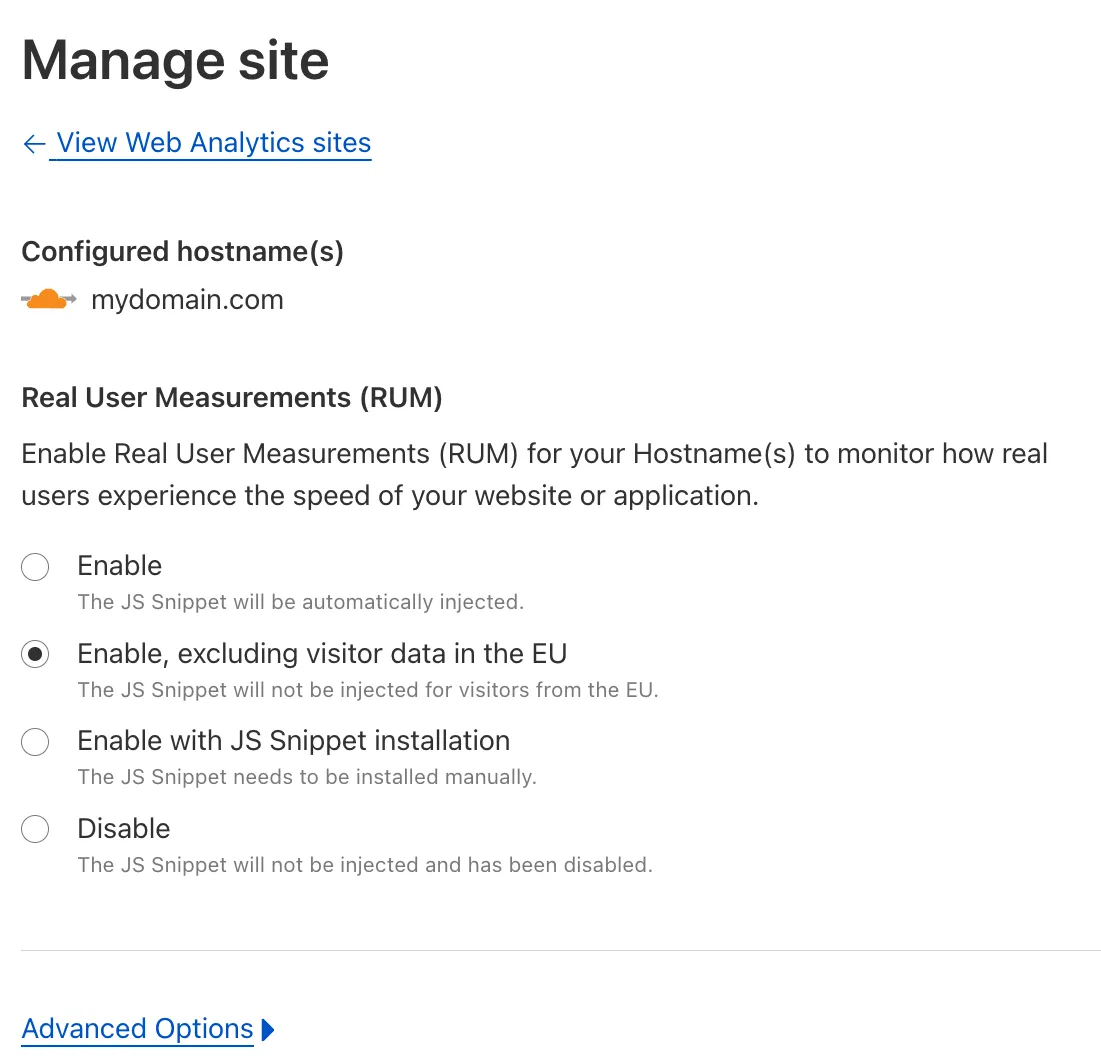
Our Web Analytics product has always been centered on giving you insights into your users' experience that you need to provide the best quality experience, without sacrificing user privacy in the process.
To help with that aim, you can now selectively enable RUM monitoring for your hostname and exclude EU visitor data in a single click. If you opt for this option, we will drop all metrics collected by our EU data centeres automatically.
You can learn more about what metrics are reported by Web Analytics and how it is collected in the Web Analytics documentation. You can enable Web Analytics on any hostname by going to the Web Analytics ↗ section of the dashboard, selecting "Manage Site" for the hostname you want to monitor, and choosing the appropriate enablement option.
Was this helpful?
- Resources
- API
- New to Cloudflare?
- Products
- Sponsorships
- Open Source
- Support
- Help Center
- System Status
- Compliance
- GDPR
- Company
- cloudflare.com
- Our team
- Careers
- 2025 Cloudflare, Inc.
- Privacy Policy
- Terms of Use
- Report Security Issues
- Trademark